1. Home
  2. Devices
  3. Nutri One
  4. Nutri ONE – light messages – buttons and diode
  1. Home
  2. Devices
  3. Nutri ONE – light messages – buttons and diode

Nutri ONE – light messages – buttons and diode

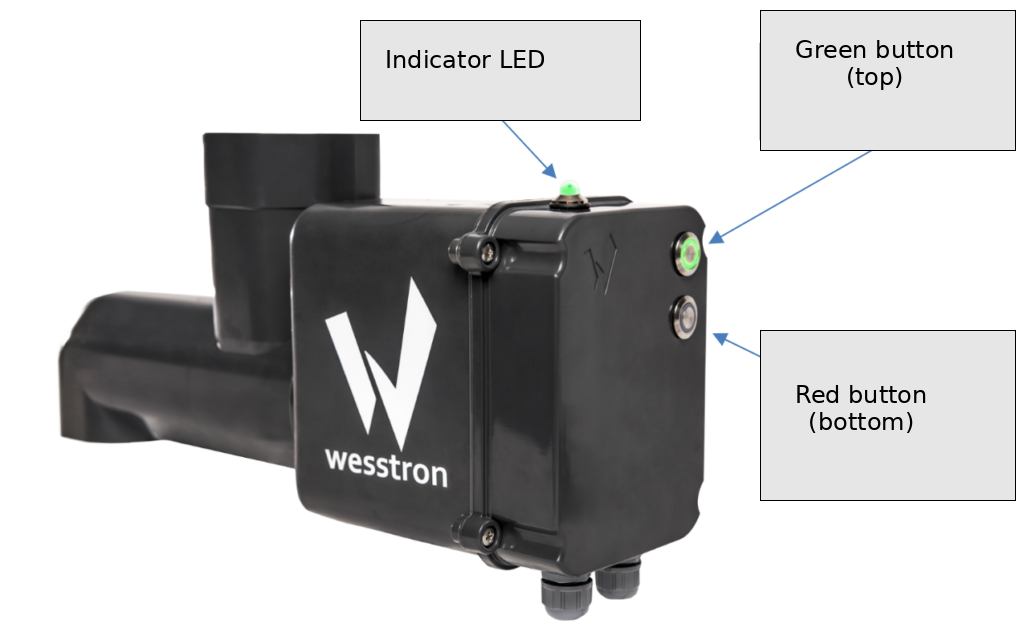
Photo of the Nutri ONE dispenser housing labeled in English: Indicator LED at the top, the green button (top) and the red button (bottom) on the front panel.
Nutri ONE dispenser- indicator light and buttons

Indicator light on the housing
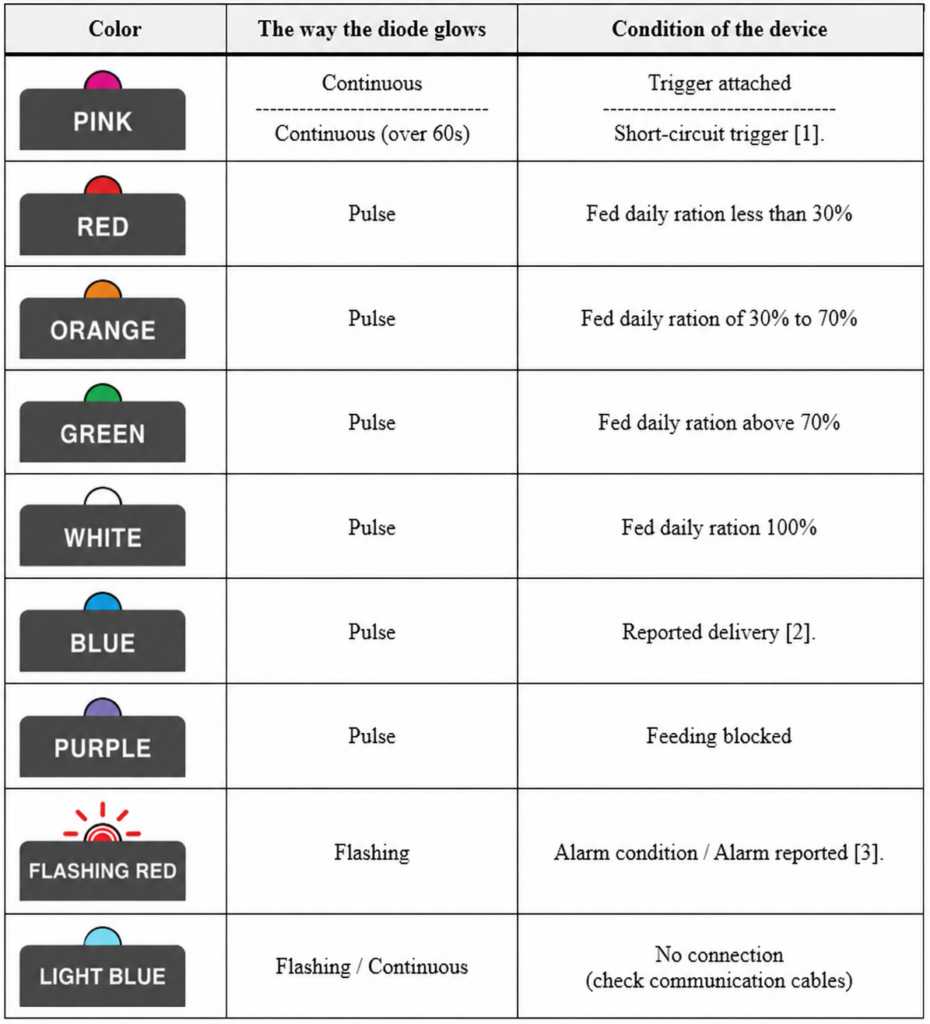
Color-coded LED status table listing Pink, Red, Orange, Green, White, Blue, Purple, Flashing Red and Light Blue, each with its glow pattern and the corresponding device condition (daily ration fed, alarm, feeding blocked, no connection, etc.).

NOTE!
A DIODE THAT BURNS WITH A CONTINUOUS LIGHT IN A SITUATION NOT LISTED ABOVE INDICATES A FAULTY OPERATION OF THE DEVICE. IT IS RECOMMENDED TO DISCONNECT AND RECONNECT THE DISPENSER TO THE POWER SUPPLY TO RESTART.

[1]
A trigger short circuit can be caused by a clogged drain pipe transporting feed to the trough. Clean the pipe and check whether the short-circuit condition has resolved. In addition, check that the trough is not full of water. Trigger short-circuiting can be sustained by its continuous activation, high humidity or excessive wetting of the drain pipe. Make sure that such situations do not occur.

[2]
To report delivery, press and hold the green button for a minimum of 3s. The correct pressing of the button will be signaled by its blinking. A correctly reported delivery is indicated by a flashing blue LED. NOTE! Blinking of the blue diode indicates non-acceptance of the delivery notification (possible reasons: more than 5 days to the planned delivery, planned delivery day undefined, delivery notification active).
Press and hold the green button for a minimum of 3s to complete the delivery notification. The end of labor will be signaled by stopping the flashing of the blue LED. NOTE! The condition for the completion of childbirth is to report it in advance.

[3]
To validate the alarm, press and hold the red button for a minimum of 3s. The correct pressing of the button will be signaled by its blinking. Validation of the alarm will be signaled by stopping the blinking of the red LED.
To report an alarm, press and hold the red button for a minimum of 3s. The correct pressing of the button will be signaled by its blinking. Triggering of the alarm will be signaled by blinking red LED.
NOTE! The condition for reporting an alarm is that it is not on the device beforehand.

Buttons

ColorThe way the diode glowsCondition of the device
Icon of the dispenser's two buttons with the top one lit steady green, representing the "feeding unlocked, correct operation" state.Green – continuousFeeding Unlocked
Correct work
The dispenser works according to the configuration
Icon of the dispenser's two buttons with neither lit, representing the "feeding blocked, dispenser not feeding" state.NoFeeding blocked
Dispenser does not feed
Additionally signaled by the top purple indicator light
Icon of the dispenser's two buttons with the bottom one lit red, representing an alarm signal on the device.3 x blinkThe device is in the process of feeding or the scheduled dose has not yet been dispensed
Updated on 2026-07-23
Was this article helpful?

Related Articles

Need Support?
Can't find the answer you're looking for?
Contact Support

Leave a Comment