1. Home
  2. Devices
  3. Micrclimate SK4
  4. How to configure the climate controller in the application?

How to configure the climate controller in the application?

Contents

This tutorial will describe how to configure the SK-3 and SK-4 climate controllers.

Moving to the configuration tab

After logging in, go to the “Settings” tab.
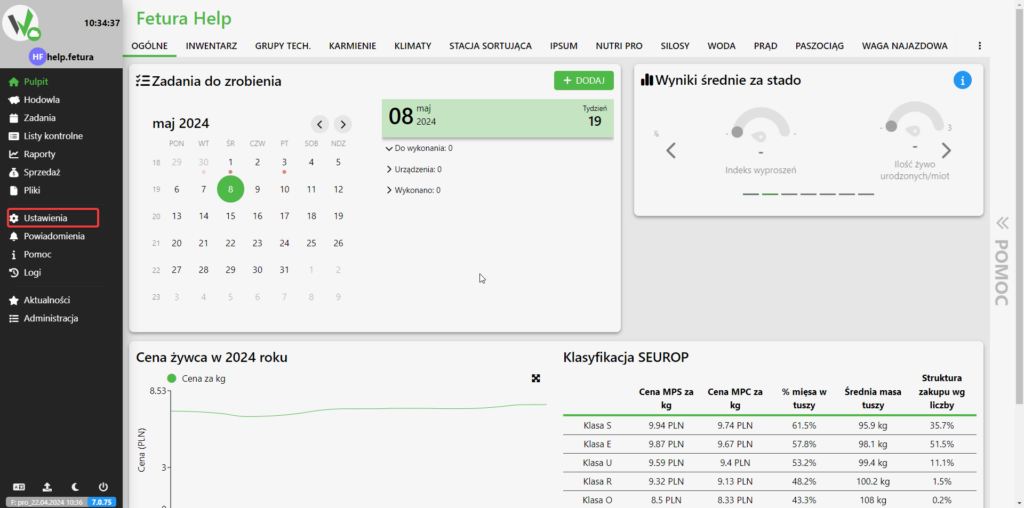
Fetura CLOUD dashboard with the left sidebar item „Ustawienia” (Settings) highlighted in red, used to open the application settings; the sidebar also contains Pulpit, Hodowla, Zadania, Listy kontrolne, Raporty, Sprzedaż, Pliki, Powiadomienia, Pomoc, Logi, Aktualności and Administracja. The top navigation bar lists OGÓLNE, INWENTARZ, GRUPY TECH., KARMIENIE, KLIMATY, STACJA SORTUJĄCA, IPSUM, NUTRI PRO, SILOSY, WODA, PRĄD, PASZOCIĄG, WAGA NAJAZDOWA. The dashboard tiles are: „Zadania do zrobienia” with a calendar, „Wyniki średnie za stado” with the gauges Indeks wyproszeń and Ilość żywo urodzonych/miot, „Cena żywca w 2024 roku” and „Klasyfikacja SEUROP” with a table of classes S, E, U, R, O and the columns Cena MPS za kg, Cena MPC za kg, % mięsa w tuszy, Średnia masa tuszy, Struktura zakupu wg liczby.

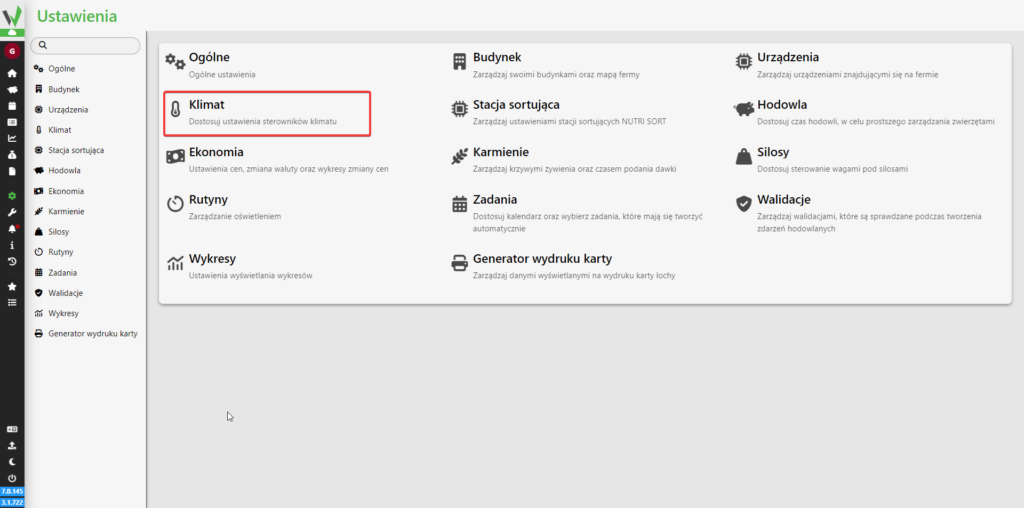
Then go to the “Climates” tab.

Fetura CLOUD Settings overview with the „Klimat” (Climate) tile highlighted in red, used to open the climate controller settings section. The overview lists all settings sections with their descriptions: Ogólne – Ogólne ustawienia; Budynek – Zarządzaj swoimi budynkami oraz mapą fermy; Urządzenia – Zarządzaj urządzeniami znajdującymi się na fermie; Klimat – Dostosuj ustawienia sterowników klimatu; Stacja sortująca – Zarządzaj ustawieniami stacji sortujących NUTRI SORT; Hodowla – Dostosuj czas hodowli, w celu prostszego zarządzania zwierzętami; Ekonomia – Ustawienia cen, zmiana waluty oraz wykres zmiany cen; Karmienie – Zarządzaj krzywymi żywienia oraz czasem podania dawki; Silosy – Dostosuj sterowanie wagami pod silosami; Rutyny – Zarządzanie oświetleniem; Zadania – Dostosuj kalendarz oraz wybierz zadania, które mają się tworzyć automatycznie; Walidacje – Zarządzaj walidacjami sprawdzanymi podczas tworzenia zdarzeń hodowlanych; Wykresy – Ustawienia wyświetlania wykresów; Generator wydruku karty – Zarządzaj danymi wyświetlanymi na wydruku karty lochy.

Then go to the “SK3 and SK4 driver management” tab.
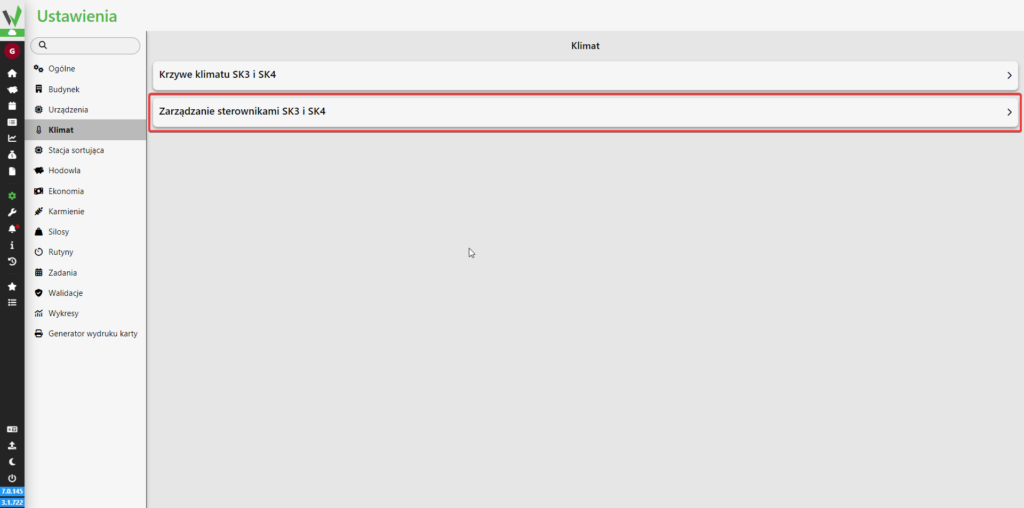
Climate settings page (Klimat) in Fetura CLOUD with the row „Zarządzanie sterownikami SK3 i SK4” (SK3 and SK4 driver management) highlighted in red; the section contains only two rows: „Krzywe klimatu SK3 i SK4” and „Zarządzanie sterownikami SK3 i SK4”. The settings sidebar on the left lists: Ogólne, Budynek, Urządzenia, Klimat (active), Stacja sortująca, Hodowla, Ekonomia, Karmienie, Silosy, Rutyny, Zadania, Walidacje, Wykresy, Generator wydruku karty.

In the next step, select which drivers you want to configure [1] and proceed [2].

You can only select controllers of the same type, SK-3 and SK-4 cannot be selected at the same time!
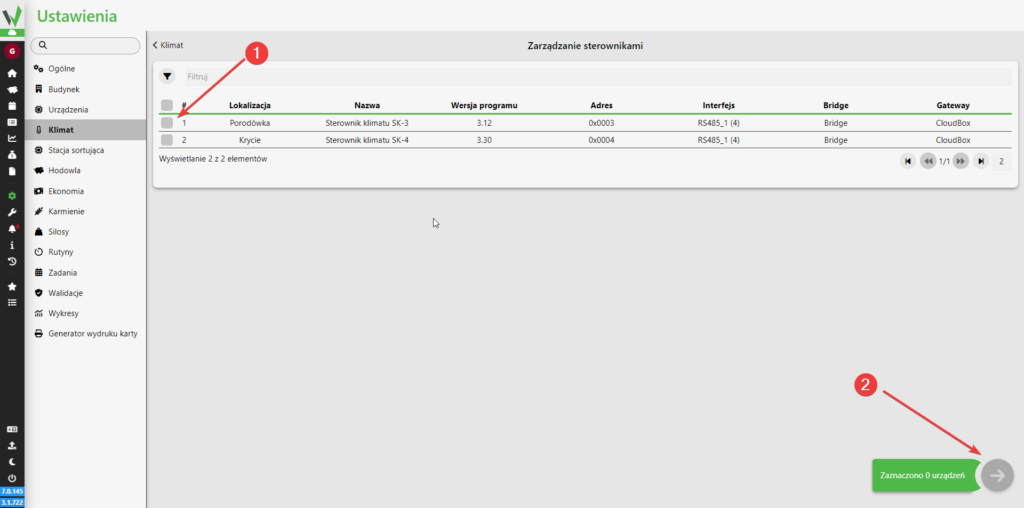
SK3 and SK4 driver management table (Zarządzanie sterownikami) in Fetura CLOUD, with a red arrow marking the checkbox column nr 1 used to select which controllers to configure and the green forward arrow nr 2 (Zaznaczono 0 urządzeń) used to continue. The table columns are: Lokalizacja, Nazwa, Wersja programu, Adres, Interfejs, Bridge, Gateway. Row 1: Porodówka, Sterownik klimatu SK-3, program version 3.12, address 0x0003, interface RS485_1 (4), Bridge, CloudBox. Row 2: Krycie, Sterownik klimatu SK-4, program version 3.30, address 0x0004, interface RS485_1 (4), Bridge, CloudBox. Only controllers of the same type can be selected at once.

Configuration of the climate controller

After selecting the drivers, you will find yourself in a view with all the driver settings.

Alarm settings

On this panel it is possible to set when an alarm will be triggered in case of detecting a temperature lower than the desired temperature by a certain number of degrees [1], in case of detecting a temperature higher than the desired temperature by a certain number of degrees [2],
at which temperature an alarm is always to be reported [3], when detecting a concentration of carbon dioxide higher than a certain concentration of molecules per million [4],
when detecting a concentration of ammonia higher than a certain concentration of molecules
per million [5]. In the case of SK-4, it is possible to set after what time of no change of elevator position an alarm will be reported [6]. After setting the parameters, click the save button [7].
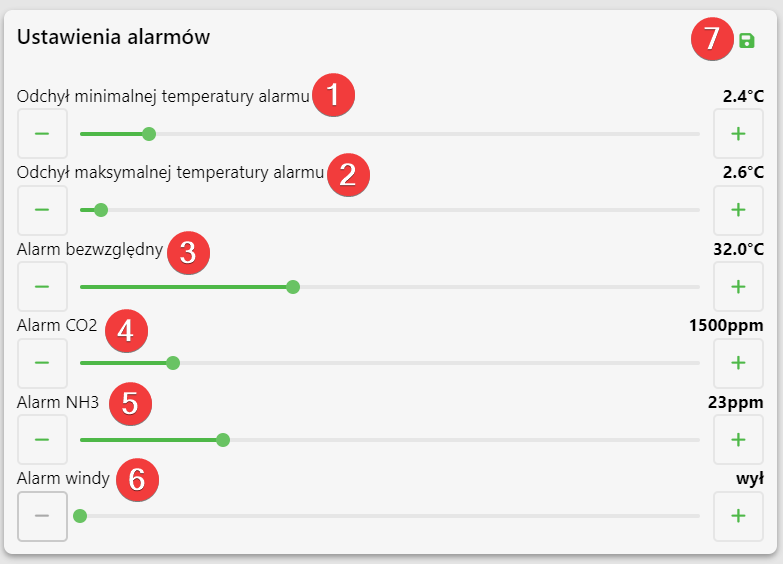
Climate controller alarm settings panel (Ustawienia alarmów) in Fetura CLOUD with numbered red markers and the values shown on the sliders: Odchył minimalnej temperatury alarmu nr 1 = 2.4°C, Odchył maksymalnej temperatury alarmu nr 2 = 2.6°C, Alarm bezwzględny nr 3 = 32.0°C, Alarm CO2 nr 4 = 1500ppm, Alarm NH3 nr 5 = 23ppm, Alarm windy nr 6 = wył (off, SK-4 only), and the green save icon nr 7 in the top right corner. Each slider has minus and plus buttons for fine adjustment.

Alarm settings on the SK-3 controller

To directly set alarm settings on the controller, click the highlighted Enter button on the controller.
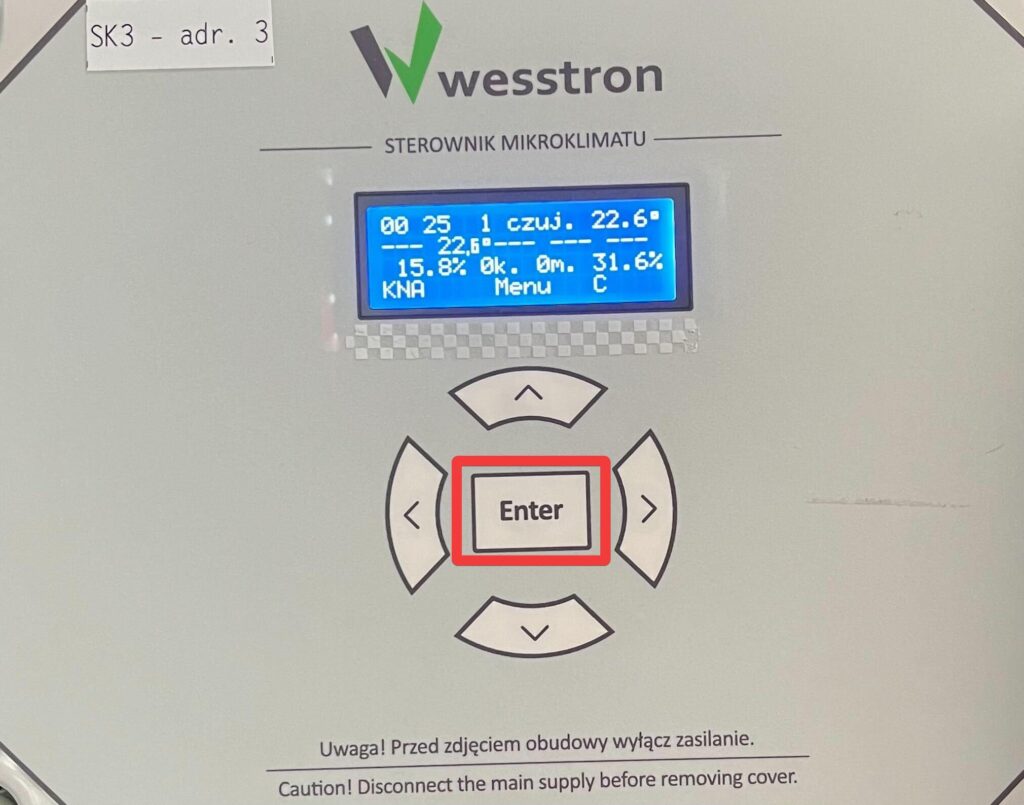
Photo of the SK-3 climate controller front panel (labelled wesstron STEROWNIK MIKROKLIMATU, sticker SK3 - adr. 3) with the Enter button outlined in a red box, pressed to open the on-device menu. The LCD shows the main screen: first line „00 25  1 czuj. 22.6°”, second line „--- 22.6° --- --- ---”, third line „15.8% 0k. 0m. 31.6%”, bottom line „KNA   Menu   C”. Around the Enter button there are four arrow keys (up, down, left, right). At the bottom of the housing a warning: „Uwaga! Przed zdjęciem obudowy wyłącz zasilanie. / Caution! Disconnect the main supply before removing cover.”

Then click the right arrow until the User Menu is visible.
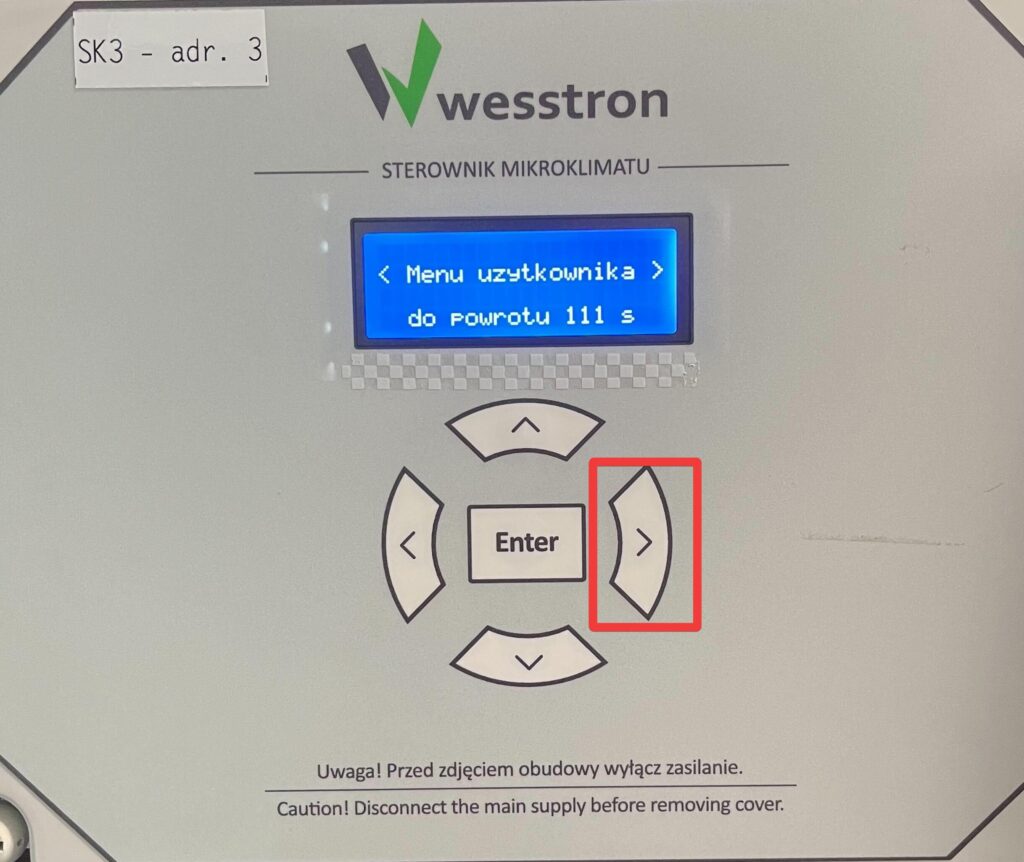
Photo of the SK-3 climate controller display showing the User Menu screen, with the right arrow button outlined in red, used to move to the next menu item.

Click Enter again to enter the User Menu and use the left/right arrows to find the alarm parameters.

Minimum temperature alarm

Use the right arrow to find the min alarm deviation view .
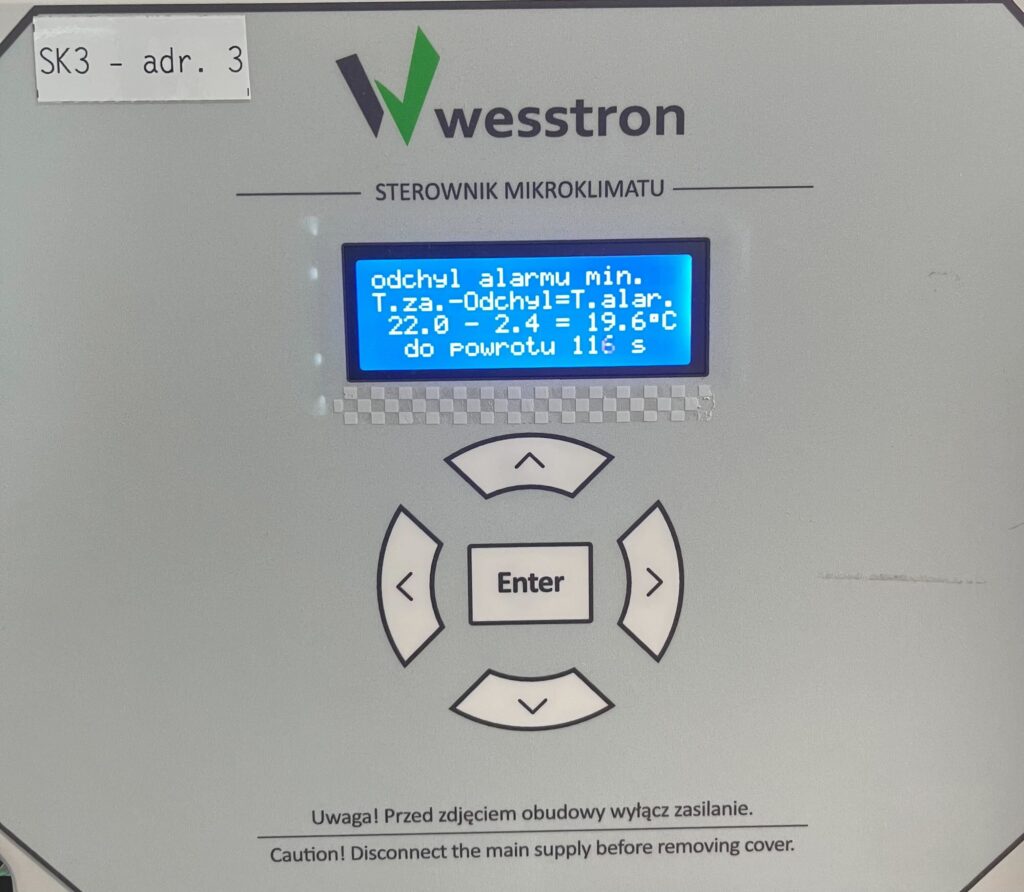
Photo of the SK-3 climate controller display showing the minimum alarm deviation screen. The LCD reads: „odchyl alarmu min.”, „T.za.-Odchyl=T.alar.”, „22.0 - 2.4 = 19.6°C”, „do powrotu 116 s” - so the alarm temperature is calculated as the desired temperature minus the deviation (here 22.0°C - 2.4°C = 19.6°C). The value is changed with the up and down arrows and confirmed with Enter.

Use the down / up arrows to change the alarm notification threshold and click Enter to save it.
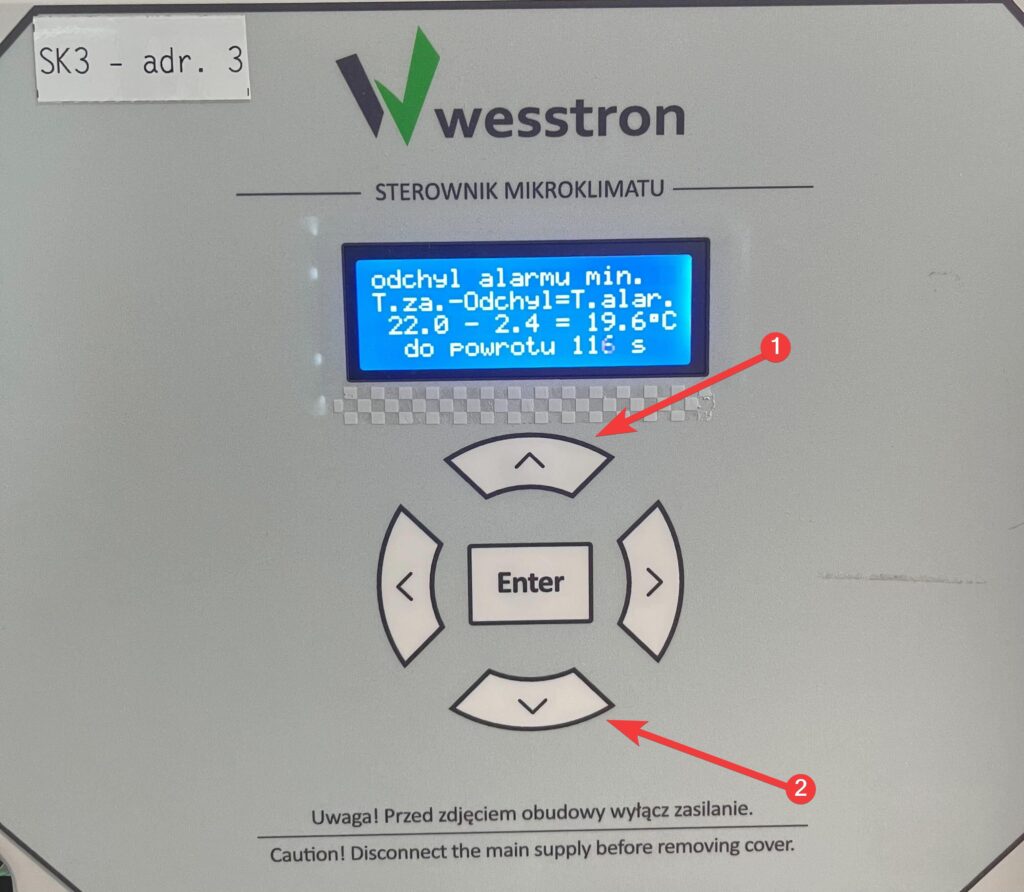
Photo of the SK-3 climate controller display showing the minimum alarm deviation screen, with the up arrow marked nr 1 and the down arrow marked nr 2 used to change the value (confirmed with Enter). The LCD reads: „odchyl alarmu min.”, „T.za.-Odchyl=T.alar.”, „22.0 - 2.4 = 19.6°C”, „do powrotu 116 s” - the alarm temperature equals the desired temperature minus the deviation (22.0°C - 2.4°C = 19.6°C).
Maximum temperature alarm

Use the right arrow to find the max alarm deviation view and use the down / up arrows to change the alarm notification threshold. After making changes, click Enter.
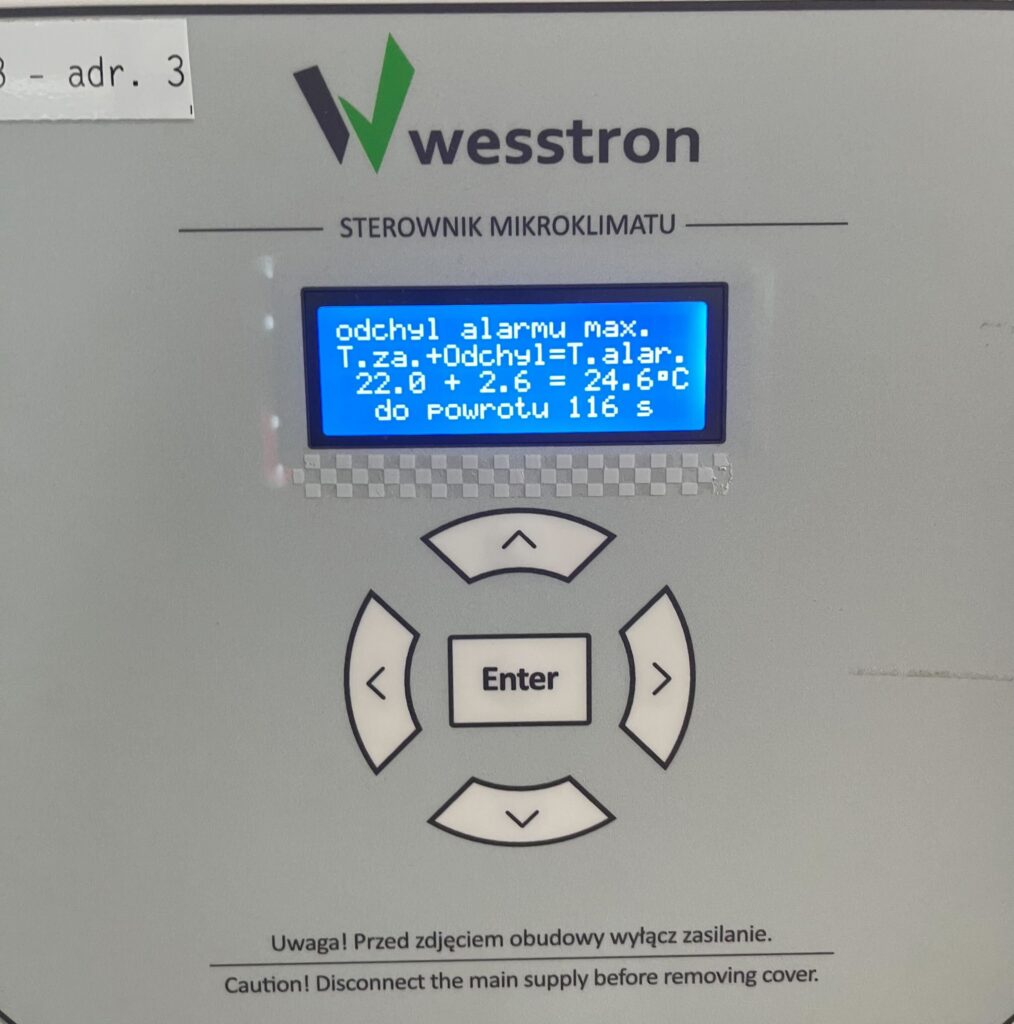
Photo of the SK-3 climate controller display showing the maximum alarm deviation screen. The LCD reads: „odchyl alarmu max.”, „T.za.+Odchyl=T.alar.”, „22.0 + 2.6 = 24.6°C”, „do powrotu 116 s” - the alarm temperature equals the desired temperature plus the deviation (22.0°C + 2.6°C = 24.6°C). The value is changed with the up and down arrows and confirmed with Enter.
Absolute alert

Use the right arrow to find the absolute alarm view and use the down / up arrows to change the alarm notification threshold. After making changes, click Enter.
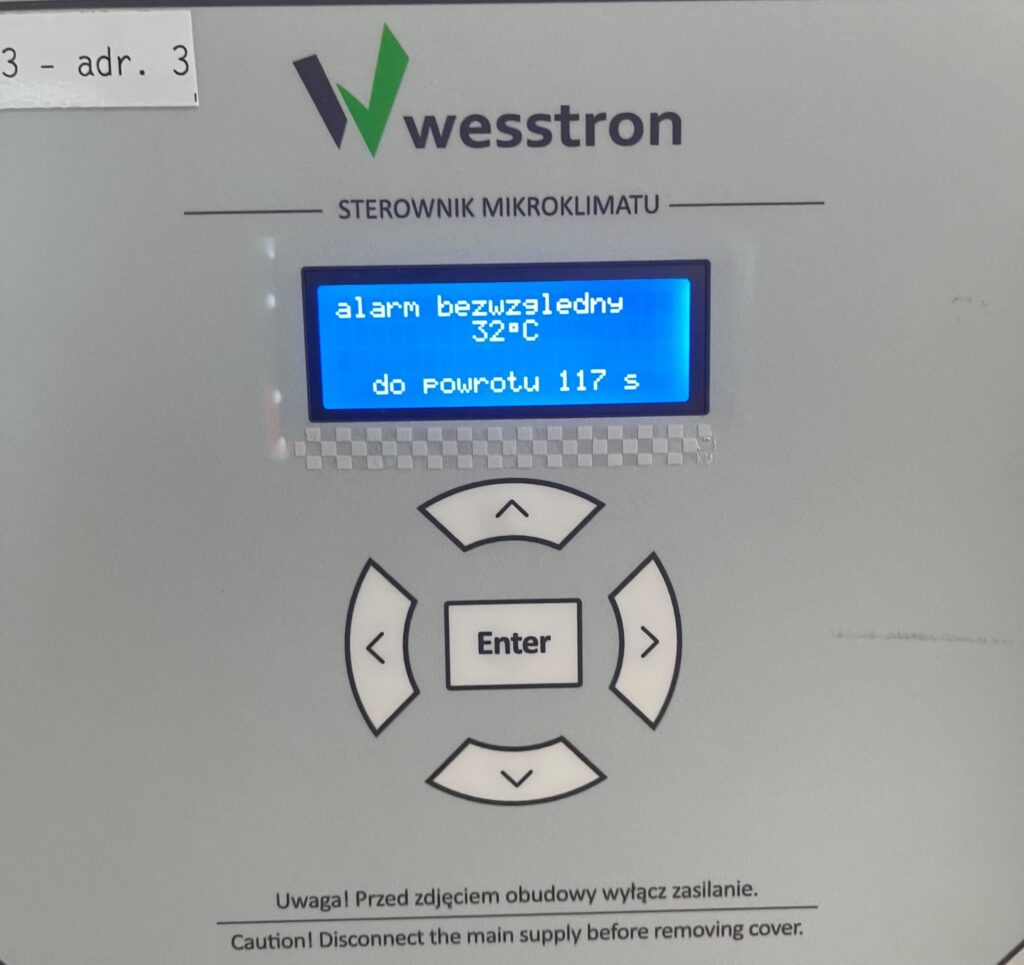
Photo of the SK-3 climate controller display showing the absolute alarm screen (alarm bezwzględny) set to 32 degrees Celsius.
Too much carbon dioxide alarm

Use the right arrow to find the CO2 alarm view and use the down / up arrows to change the alarm notification threshold. After making changes, click Enter.
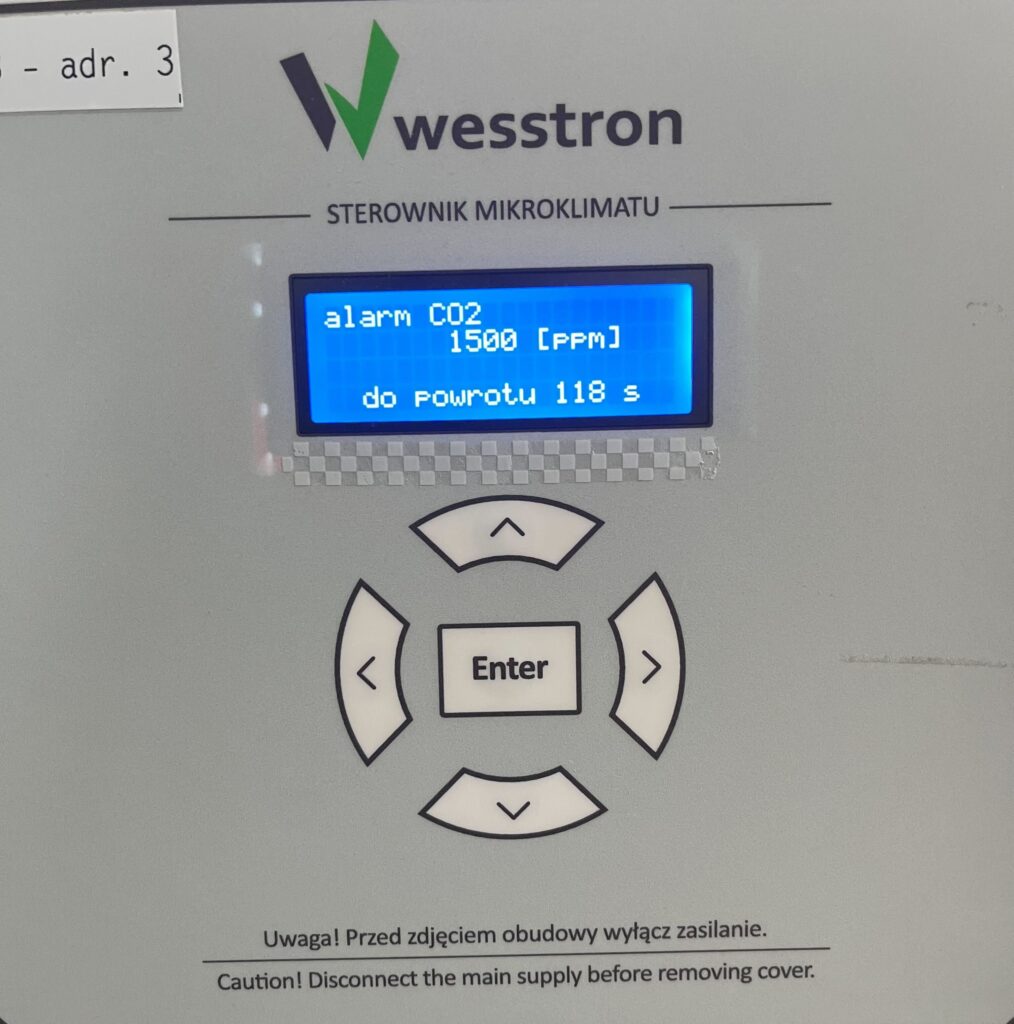
Photo of the SK-3 climate controller display showing the CO2 alarm screen set to 1500 ppm.
Exit menu

To exit the user menu after setting alarm thresholds, use the right arrow to find the Exit Menu view and click Enter, or click the left and right arrows at the same time.

Alarm settings on the SK-4 controller

In order to directly set alarms on the SK-4 controller, you need to log on the climate controller. To do this, click the highlighted item.
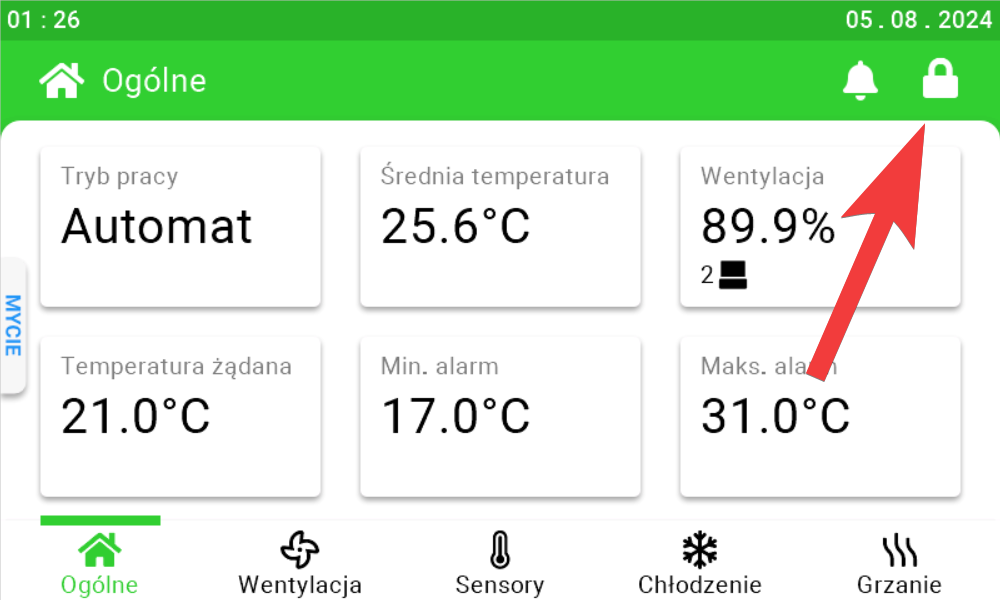
Fetura CLOUD SK-4 climate controller touchscreen main view (Ogólne) with the padlock icon in the top right marked by a red arrow, tapped to log in. The screen shows six tiles: Tryb pracy = Automat, Średnia temperatura = 25.6°C, Wentylacja = 89.9% with 2 fan groups, Temperatura żądana = 21.0°C, Min. alarm = 17.0°C, Maks. alarm = 31.0°C. The bottom navigation bar contains: Ogólne, Wentylacja, Sensory, Chłodzenie, Grzanie, and a MYCIE tab is docked on the left edge; the top bar shows the clock, date, a bell icon and the padlock.

Enter the PIN you set, or swipe your card to log in.
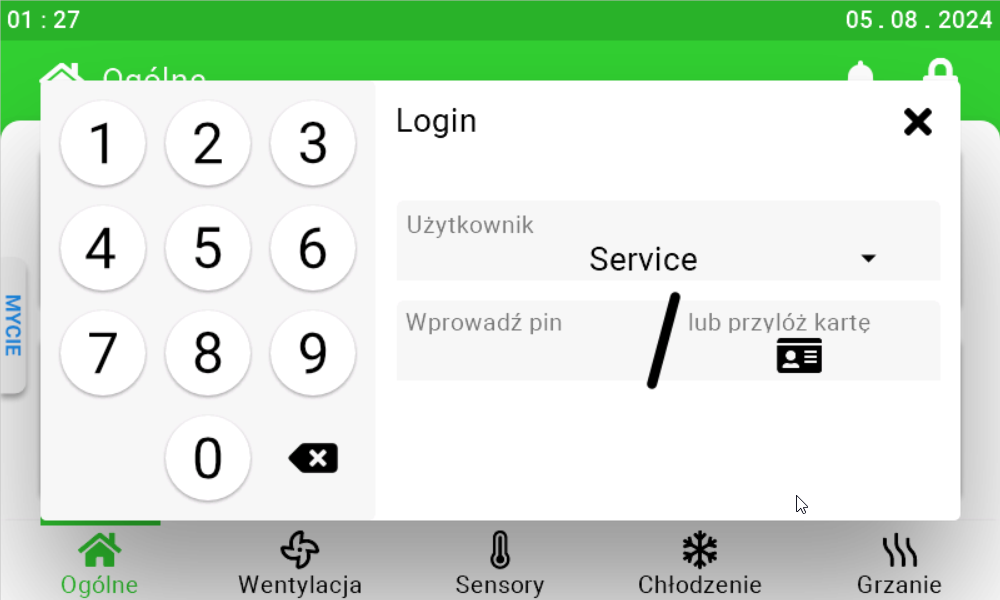
Fetura CLOUD SK-4 climate controller Login dialog opened from the padlock icon: on the left a numeric keypad with digits 0-9 and a backspace key, on the right the field „Użytkownik” set to „Service” (dropdown with the available users) and the field „Wprowadź pin” next to the alternative „lub przyłóż kartę” with a card icon. The bottom navigation bar (Ogólne, Wentylacja, Sensory, Chłodzenie, Grzanie) stays visible behind the dialog.

Once you have logged in correctly, a gear icon will appear. Click it to go to the climate controller settings.
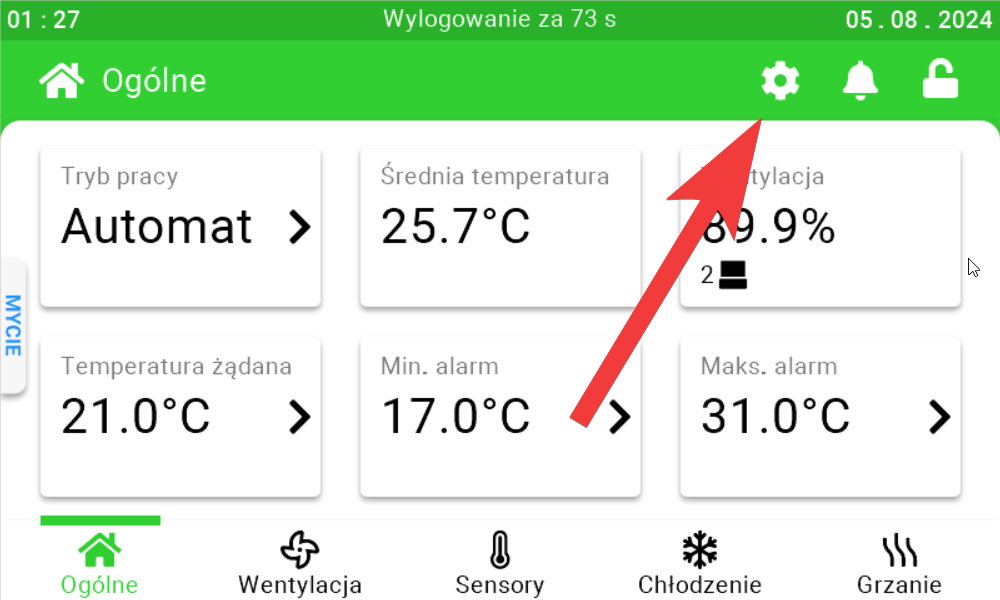
Fetura CLOUD SK-4 climate controller main view after logging in, with a red arrow pointing to the gear (settings) icon that has appeared in the top bar next to the bell and the open padlock; the top bar also shows the automatic logout countdown „Wylogowanie za 73 s”. The tiles now have arrows for editing and show: Tryb pracy = Automat, Średnia temperatura = 25.7°C, Wentylacja = 89.9%, Temperatura żądana = 21.0°C, Min. alarm = 17.0°C, Maks. alarm = 31.0°C.

In the new view, go to the Alarms tab.
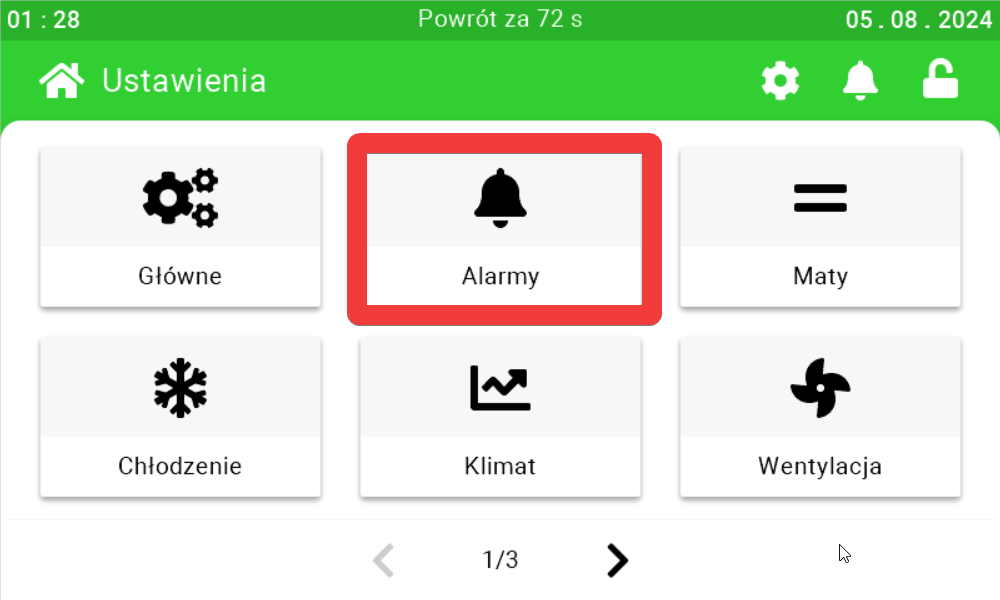
Fetura CLOUD SK-4 climate controller settings menu (Ustawienia, page 1 of 3) with the Alarmy (Alarms) tile highlighted in red. Page 1/3 contains the tiles: Główne, Alarmy, Maty, Chłodzenie, Klimat, Wentylacja; arrows at the bottom switch between pages and the top bar shows the countdown „Powrót za 72 s”.

Use the sliders and the buttons arranged on their sides to set the appropriate alarm thresholds.
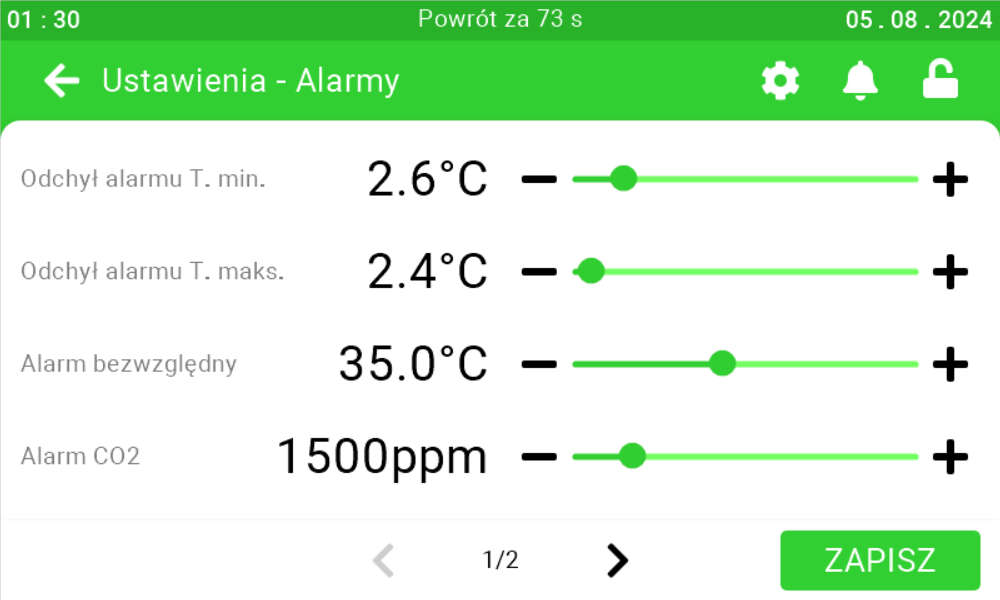
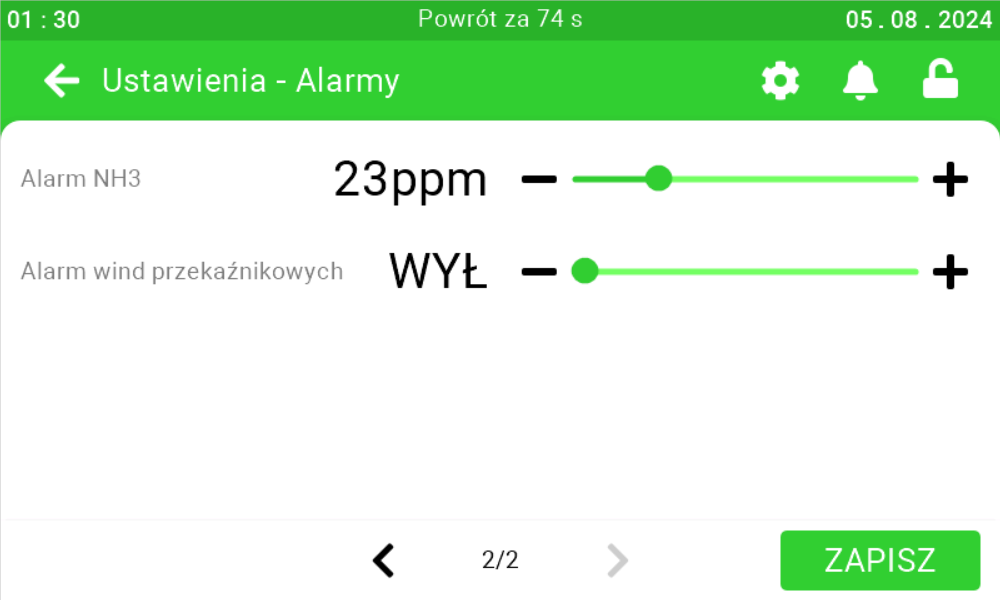
Fetura CLOUD SK-4 alarm settings screen (Ustawienia - Alarmy, page 1 of 2) with the values shown on the sliders: Odchył alarmu T. min. = 2.6°C, Odchył alarmu T. maks. = 2.4°C, Alarm bezwzględny = 35.0°C, Alarm CO2 = 1500ppm. Each row has minus and plus buttons next to the slider; page arrows are at the bottom and the green ZAPISZ (Save) button is in the bottom right corner.
Fetura CLOUD SK-4 alarm settings screen (Ustawienia - Alarmy, page 2 of 2) with the values shown on the sliders: Alarm NH3 = 23ppm and Alarm wind przekaźnikowych = WYŁ (off). Each row has minus and plus buttons; the green ZAPISZ (Save) button is in the bottom right corner.

CO2 sensor settings

On this panel you can set what is the minimum voltage for the minimum value of the sensor [1], what is the maximum voltage for the maximum value of the sensor [2],
what is the minimum value of the sensor for the minimum voltage [3], what is the maximum value of the sensor for the maximum voltage [4]. After setting the parameters, click the save button [5].
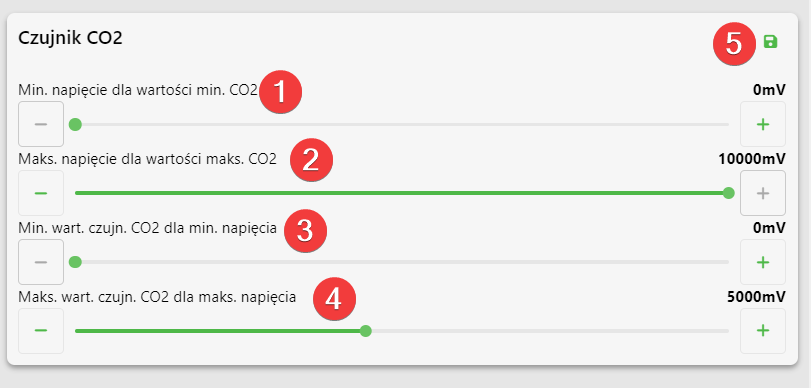
CO2 sensor settings panel (Czujnik CO2) in Fetura CLOUD with numbered red markers and the values shown on the sliders: Min. napięcie dla wartości min. CO2 nr 1 = 0mV, Maks. napięcie dla wartości maks. CO2 nr 2 = 10000mV, Min. wart. czujn. CO2 dla min. napięcia nr 3 = 0mV, Maks. wart. czujn. CO2 dla maks. napięcia nr 4 = 5000mV, and the green save icon nr 5 in the top right corner.

CO2 sensor settings on the SK-3 climate controller

To directly set the CO2 sensor settings on the controller, click the highlighted Enter button on the controller.

Photo of the SK-3 climate controller front panel (labelled wesstron STEROWNIK MIKROKLIMATU, sticker SK3 - adr. 3) with the Enter button outlined in a red box, pressed to open the on-device menu. The LCD shows the main screen: first line „00 25  1 czuj. 22.6°”, second line „--- 22.6° --- --- ---”, third line „15.8% 0k. 0m. 31.6%”, bottom line „KNA   Menu   C”. Around the Enter button there are four arrow keys (up, down, left, right). At the bottom of the housing a warning: „Uwaga! Przed zdjęciem obudowy wyłącz zasilanie. / Caution! Disconnect the main supply before removing cover.”

Use the right arrow to go to the Installer Menu and click Enter.
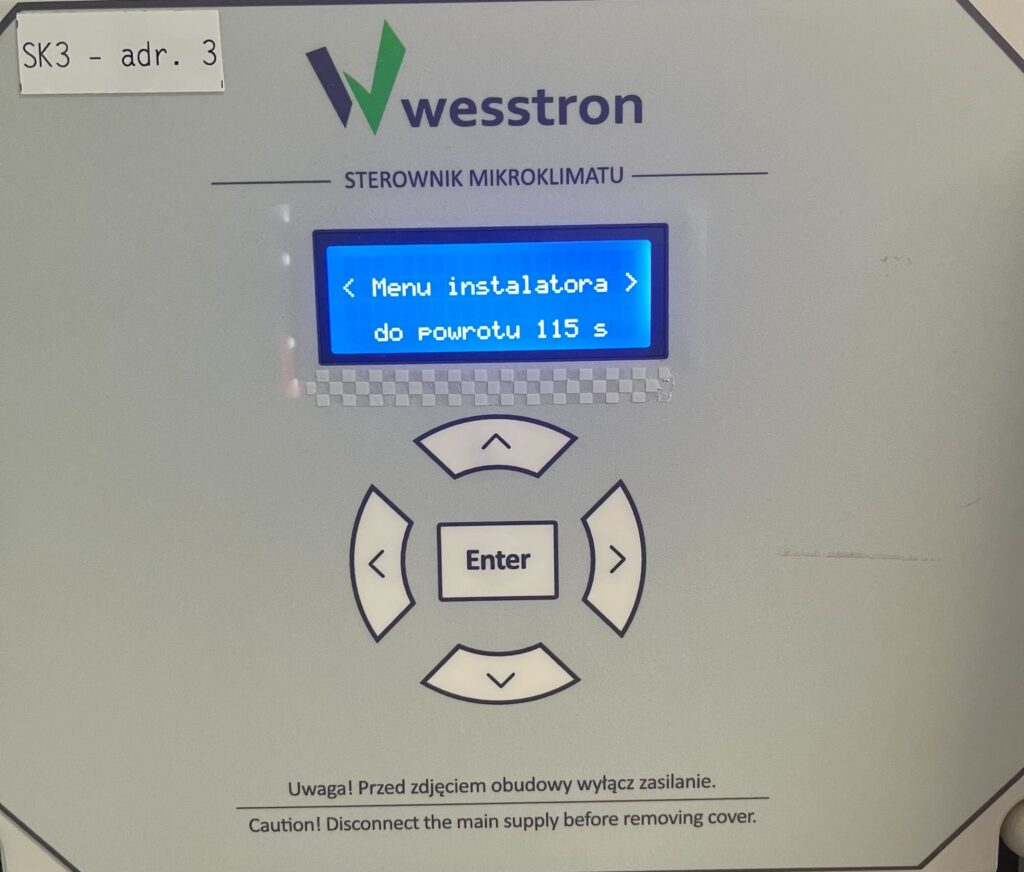
Photo of the SK-3 climate controller display showing the Menu instalatora (Installer Menu) screen, reached from the User Menu.

Again, use the right arrow to find the menu Calibration vigilance. CO2 and click Enter.
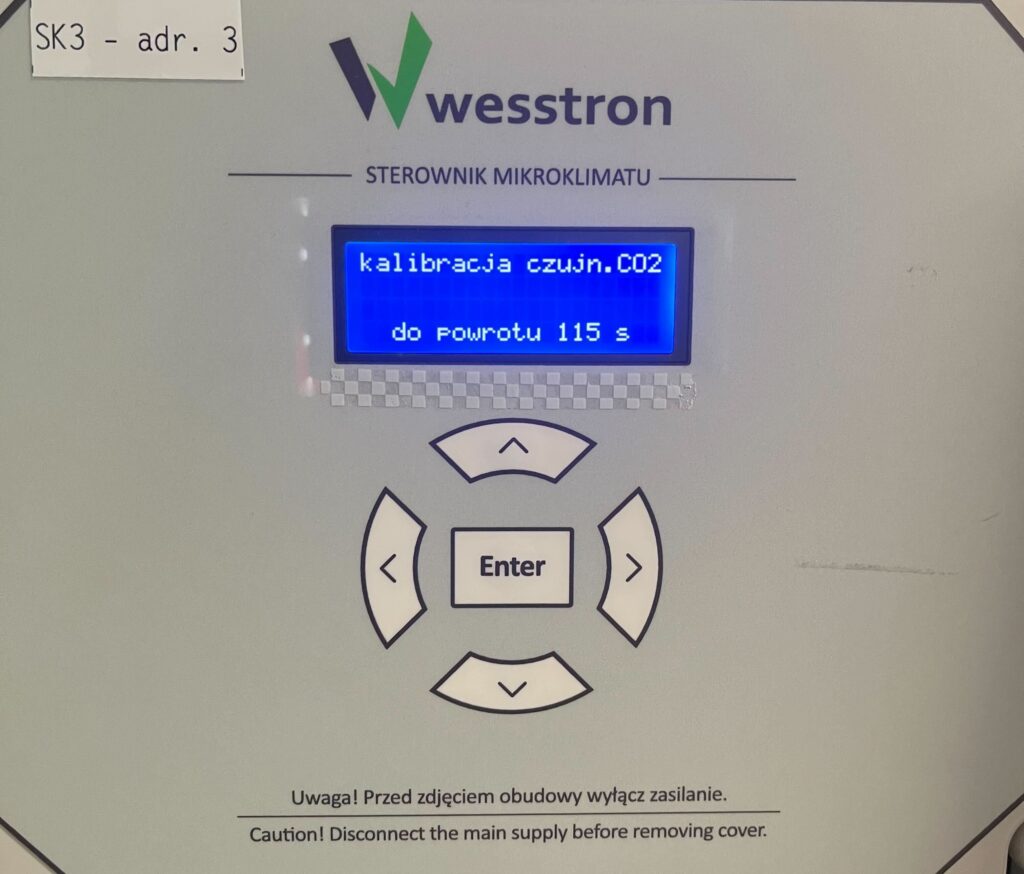
Photo of the SK-3 climate controller display showing the CO2 sensor calibration menu (kalibracja czujn. CO2).
Minimum CO2 sensor value for minimum voltage

Use the down / up arrows to change the value of this parameter and click Enter to save the changes.
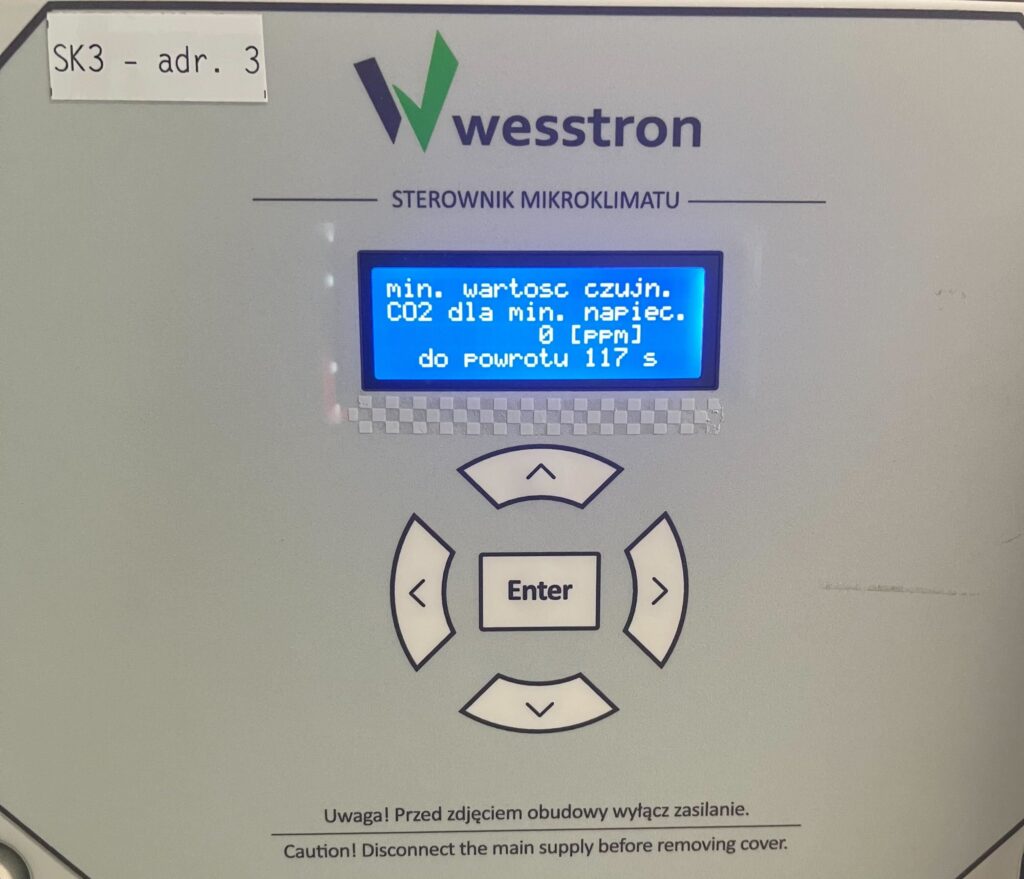
Photo of the SK-3 climate controller display showing the minimum CO2 sensor value for minimum voltage screen, set to 0 ppm.
Maximum value of CO2 sensor for maximum voltage

Use the right arrow to find the menu max. sensing value. CO2 for max. voltages. Then use the down / up arrows to change the value of this parameter and click Enter to save the changes.
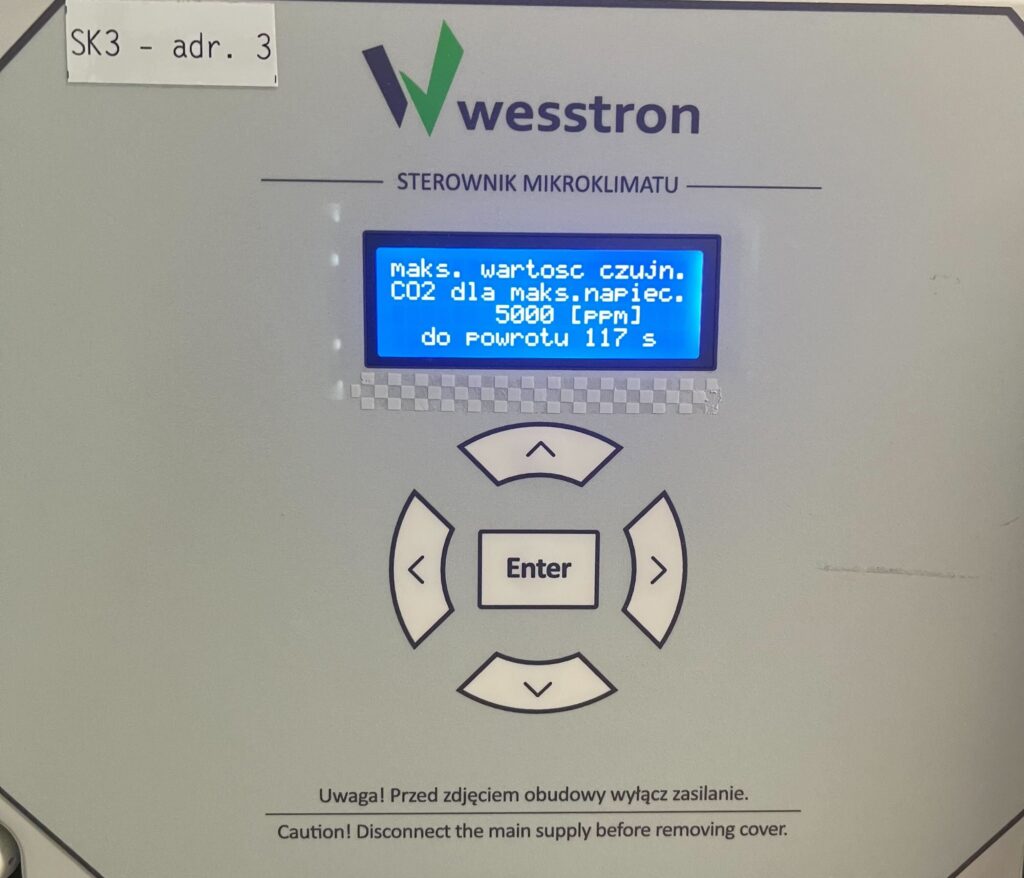
Photo of the SK-3 climate controller display showing the maximum CO2 sensor value for maximum voltage screen, set to 5000 ppm.
Minimum voltage for minimum CO2 sensor value

Use the right arrow to find the menu Min. voltage for min. sensor value. CO2. Then use the down / up arrows to change the value of this parameter and click Enter to save the changes.
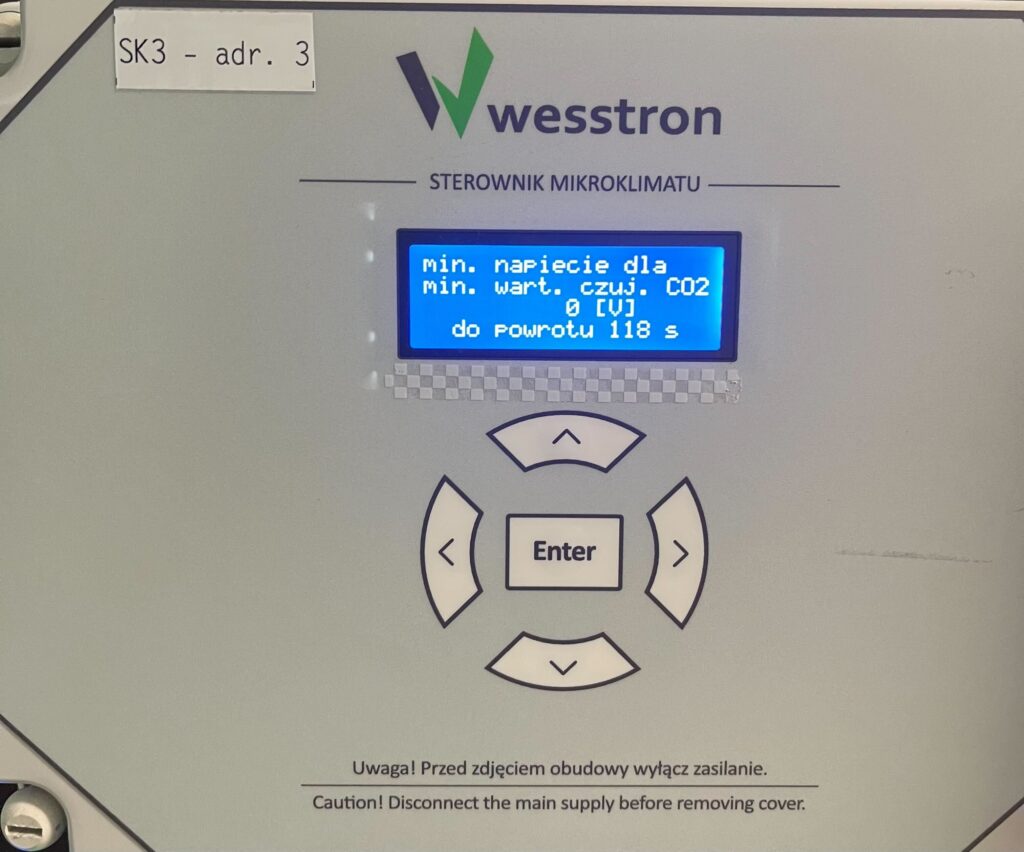
Photo of the SK-3 climate controller display showing the minimum voltage for the minimum CO2 sensor value screen, set to 0 V.
Maximum voltage for the maximum value of the CO2 sensor

Use the right arrow to find the menu Max. voltage for max. sensor value. CO2. Then use the down / up arrows to change the value of this parameter and click Enter to save the changes.
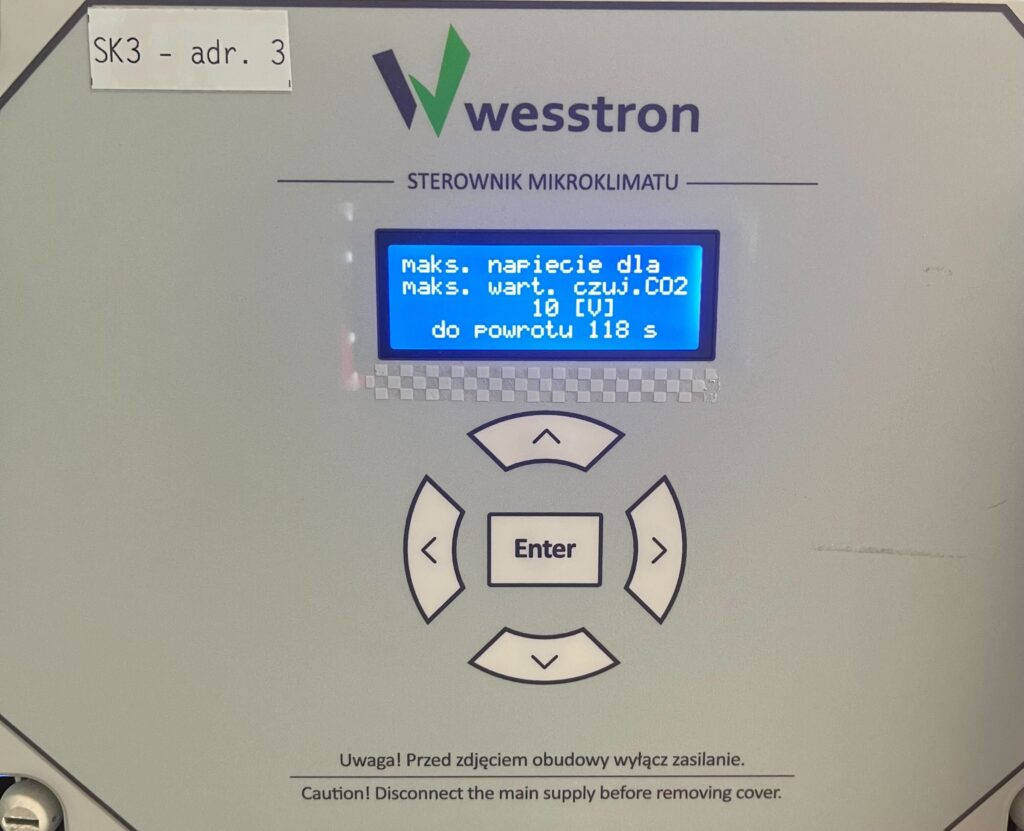
Photo of the SK-3 climate controller display showing the maximum voltage for the maximum CO2 sensor value screen, set to 10 V.

Settings of theCO2 sensor on the SK-4 controller

To directly set the settings of theCO2 sensor On the SK-4 controller you need to log on the climate controller. To do this, click the highlighted item.

Fetura CLOUD SK-4 climate controller touchscreen main view (Ogólne) with the padlock icon in the top right marked by a red arrow, tapped to log in. The screen shows six tiles: Tryb pracy = Automat, Średnia temperatura = 25.6°C, Wentylacja = 89.9% with 2 fan groups, Temperatura żądana = 21.0°C, Min. alarm = 17.0°C, Maks. alarm = 31.0°C. The bottom navigation bar contains: Ogólne, Wentylacja, Sensory, Chłodzenie, Grzanie, and a MYCIE tab is docked on the left edge; the top bar shows the clock, date, a bell icon and the padlock.

Enter the PIN you set, or swipe your card to log in.

Fetura CLOUD SK-4 climate controller Login dialog opened from the padlock icon: on the left a numeric keypad with digits 0-9 and a backspace key, on the right the field „Użytkownik” set to „Service” (dropdown with the available users) and the field „Wprowadź pin” next to the alternative „lub przyłóż kartę” with a card icon. The bottom navigation bar (Ogólne, Wentylacja, Sensory, Chłodzenie, Grzanie) stays visible behind the dialog.

Once you have logged in correctly, a gear icon will appear. Click it to go to the climate controller settings.

Fetura CLOUD SK-4 climate controller main view after logging in, with a red arrow pointing to the gear (settings) icon that has appeared in the top bar next to the bell and the open padlock; the top bar also shows the automatic logout countdown „Wylogowanie za 73 s”. The tiles now have arrows for editing and show: Tryb pracy = Automat, Średnia temperatura = 25.7°C, Wentylacja = 89.9%, Temperatura żądana = 21.0°C, Min. alarm = 17.0°C, Maks. alarm = 31.0°C.

In the new view, click the right arrow to move to the next page.
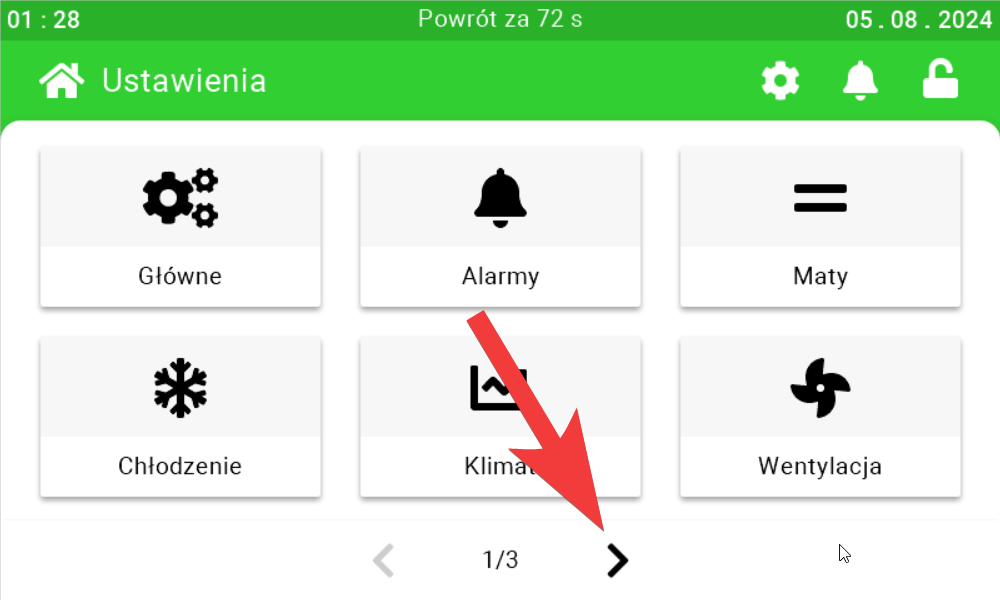
Fetura CLOUD SK-4 climate controller settings menu (Ustawienia, page 1 of 3) with a red arrow pointing to the next-page navigation arrow, used to reach page 2 of the menu. Page 1/3 contains the tiles: Główne, Alarmy, Maty, Chłodzenie, Klimat, Wentylacja.

Enter the Sensors tab and go to the second page.
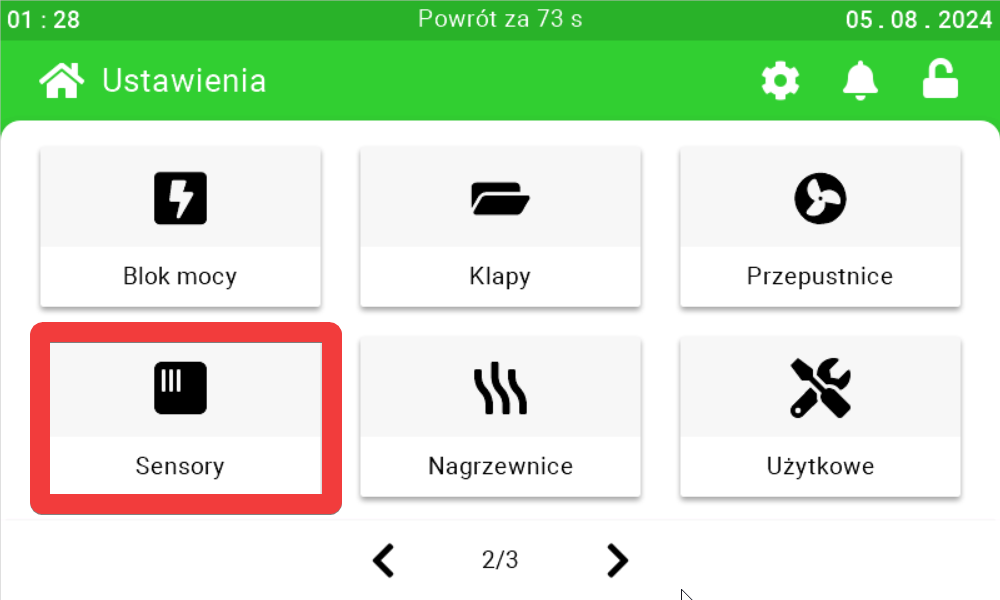
Fetura CLOUD SK-4 climate controller settings menu (Ustawienia, page 2 of 3) with the Sensory (Sensors) tile highlighted in red. Page 2/3 contains the tiles: Blok mocy, Klapy, Przepustnice, Sensory, Nagrzewnice, Użytkowe.

Use the sliders and buttons on their sides to configure the CO2 sensor.
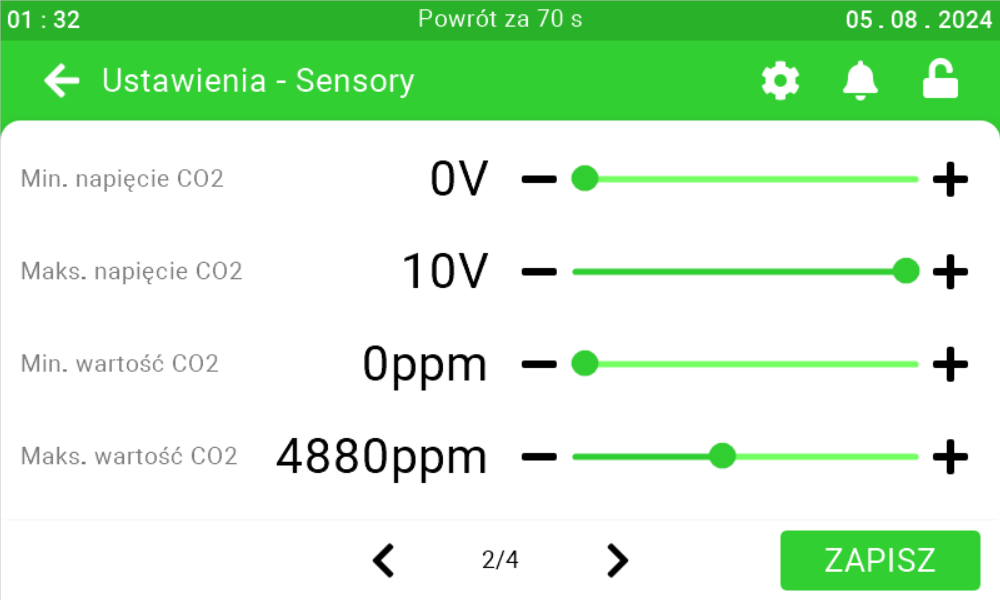
Fetura CLOUD SK-4 sensor settings screen (Ustawienia - Sensory, page 2 of 4) with the CO2 sensor sliders: Min. napięcie CO2 = 0V, Maks. napięcie CO2 = 10V, Min. wartość CO2 = 0ppm, Maks. wartość CO2 = 4880ppm. The green ZAPISZ (Save) button is in the bottom right corner.

NH3 sensor settings

On this panel you can set what is the maximum number of particles per million
for the sensor [1], what is the current intensity for 0 ppm [2], what is the intensity
for the maximum number of ppm [3]. After setting the parameters, click the save button.
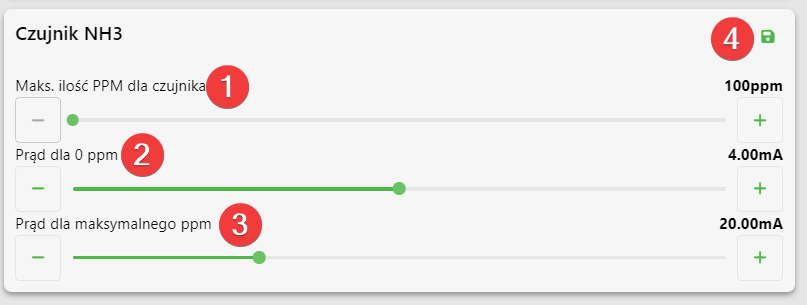
NH3 sensor settings panel (Czujnik NH3) in Fetura CLOUD with numbered red markers and the values shown on the sliders: Maks. ilość PPM dla czujnika nr 1 = 100ppm, Prąd dla 0 ppm nr 2 = 4.00mA, Prąd dla maksymalnego ppm nr 3 = 20.00mA, and the green save icon nr 4 in the top right corner.

NH3 sensor settings on SK-4 controller

To directly adjust the settings of the NH3 sensor On the SK-4 controller you need to log on the climate controller. To do this, click the highlighted item.

Fetura CLOUD SK-4 climate controller touchscreen main view (Ogólne) with the padlock icon in the top right marked by a red arrow, tapped to log in. The screen shows six tiles: Tryb pracy = Automat, Średnia temperatura = 25.6°C, Wentylacja = 89.9% with 2 fan groups, Temperatura żądana = 21.0°C, Min. alarm = 17.0°C, Maks. alarm = 31.0°C. The bottom navigation bar contains: Ogólne, Wentylacja, Sensory, Chłodzenie, Grzanie, and a MYCIE tab is docked on the left edge; the top bar shows the clock, date, a bell icon and the padlock.

Enter the PIN you set, or swipe your card to log in.

Fetura CLOUD SK-4 climate controller Login dialog opened from the padlock icon: on the left a numeric keypad with digits 0-9 and a backspace key, on the right the field „Użytkownik” set to „Service” (dropdown with the available users) and the field „Wprowadź pin” next to the alternative „lub przyłóż kartę” with a card icon. The bottom navigation bar (Ogólne, Wentylacja, Sensory, Chłodzenie, Grzanie) stays visible behind the dialog.

Once you have logged in correctly, a gear icon will appear. Click it to go to the climate controller settings.

Fetura CLOUD SK-4 climate controller main view after logging in, with a red arrow pointing to the gear (settings) icon that has appeared in the top bar next to the bell and the open padlock; the top bar also shows the automatic logout countdown „Wylogowanie za 73 s”. The tiles now have arrows for editing and show: Tryb pracy = Automat, Średnia temperatura = 25.7°C, Wentylacja = 89.9%, Temperatura żądana = 21.0°C, Min. alarm = 17.0°C, Maks. alarm = 31.0°C.

In the new view, click the right arrow to move to the next page.

Fetura CLOUD SK-4 climate controller settings menu (Ustawienia, page 1 of 3) with a red arrow pointing to the next-page navigation arrow, used to reach page 2 of the menu. Page 1/3 contains the tiles: Główne, Alarmy, Maty, Chłodzenie, Klimat, Wentylacja.

Go to the Sensors tab and turn to the last page.

Fetura CLOUD SK-4 climate controller settings menu (Ustawienia, page 2 of 3) with the Sensory (Sensors) tile highlighted in red. Page 2/3 contains the tiles: Blok mocy, Klapy, Przepustnice, Sensory, Nagrzewnice, Użytkowe.

Use the sliders and buttons on their sides to configure the NH3 sensor.
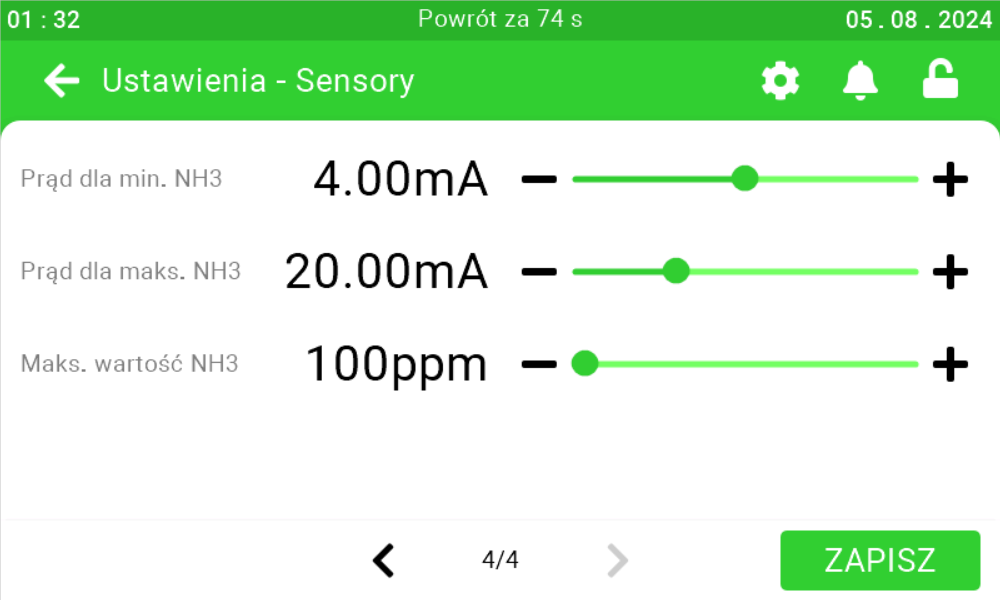
Fetura CLOUD SK-4 sensor settings screen (Ustawienia - Sensory, page 4 of 4) with the NH3 sensor sliders: Prąd dla min. NH3 = 4.00mA, Prąd dla maks. NH3 = 20.00mA, Maks. wartość NH3 = 100ppm. The green ZAPISZ (Save) button is in the bottom right corner.

Cooling settings

On this panel, you can set what mode you want the cooling to operate [1], at what temperature you want the controller to start cooling [2], whether humidity is to be taken into account for cooling control [3] and up to what maximum humidity the cooling can operate [4], whether pump pressure is to be taken into account for cooling control [5]
and in what pressure range the cooling will be fired [6][7], what is the operating time of the cooling [8] and how long will be the interval between cooling activation [9].
After setting the parameters, click the save button [10].
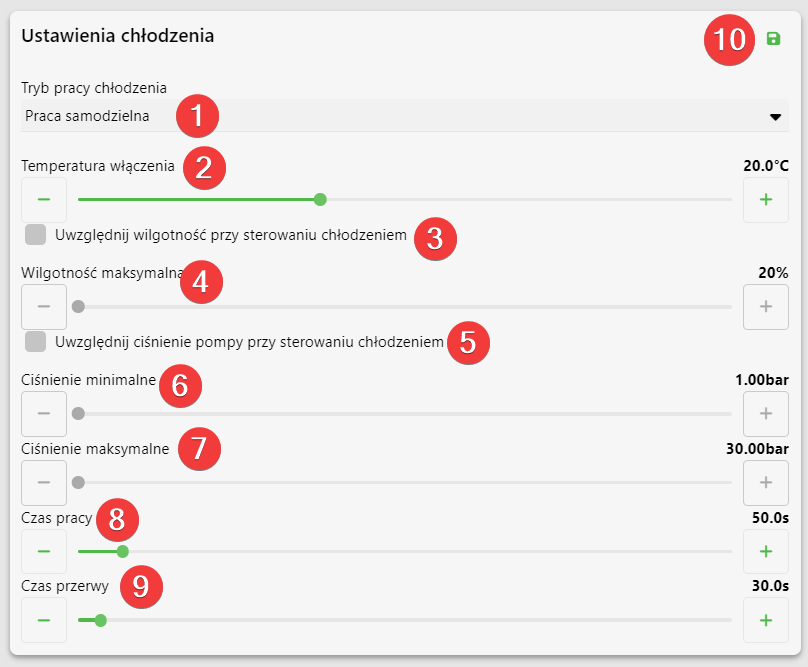
Cooling settings panel (Ustawienia chłodzenia) in Fetura CLOUD with numbered red markers: Tryb pracy chłodzenia nr 1 as a dropdown set to „Praca samodzielna”, Temperatura włączenia nr 2 = 20.0°C, checkbox „Uwzględnij wilgotność przy sterowaniu chłodzeniem” nr 3, Wilgotność maksymalna nr 4 = 20%, checkbox „Uwzględnij ciśnienie pompy przy sterowaniu chłodzeniem” nr 5, Ciśnienie minimalne nr 6 = 1.00bar, Ciśnienie maksymalne nr 7 = 30.00bar, Czas pracy nr 8 = 50.0s, Czas przerwy nr 9 = 30.0s, and the green save icon nr 10.

Cooling settings on the SK-3 controller

To directly set the cooling settings on the controller, click the highlighted Enter button on the controller.

Photo of the SK-3 climate controller front panel (labelled wesstron STEROWNIK MIKROKLIMATU, sticker SK3 - adr. 3) with the Enter button outlined in a red box, pressed to open the on-device menu. The LCD shows the main screen: first line „00 25  1 czuj. 22.6°”, second line „--- 22.6° --- --- ---”, third line „15.8% 0k. 0m. 31.6%”, bottom line „KNA   Menu   C”. Around the Enter button there are four arrow keys (up, down, left, right). At the bottom of the housing a warning: „Uwaga! Przed zdjęciem obudowy wyłącz zasilanie. / Caution! Disconnect the main supply before removing cover.”

Use the right arrow to go to the User Menu and click Enter.

Photo of the SK-3 climate controller display showing the User Menu screen, with the right arrow button outlined in red, used to move to the next menu item.
Cooling switch-on temperature

Use the right arrow to go to the menu cooling on temp. and use the down / up arrows to change the parameter. Click Enter to save your changes.
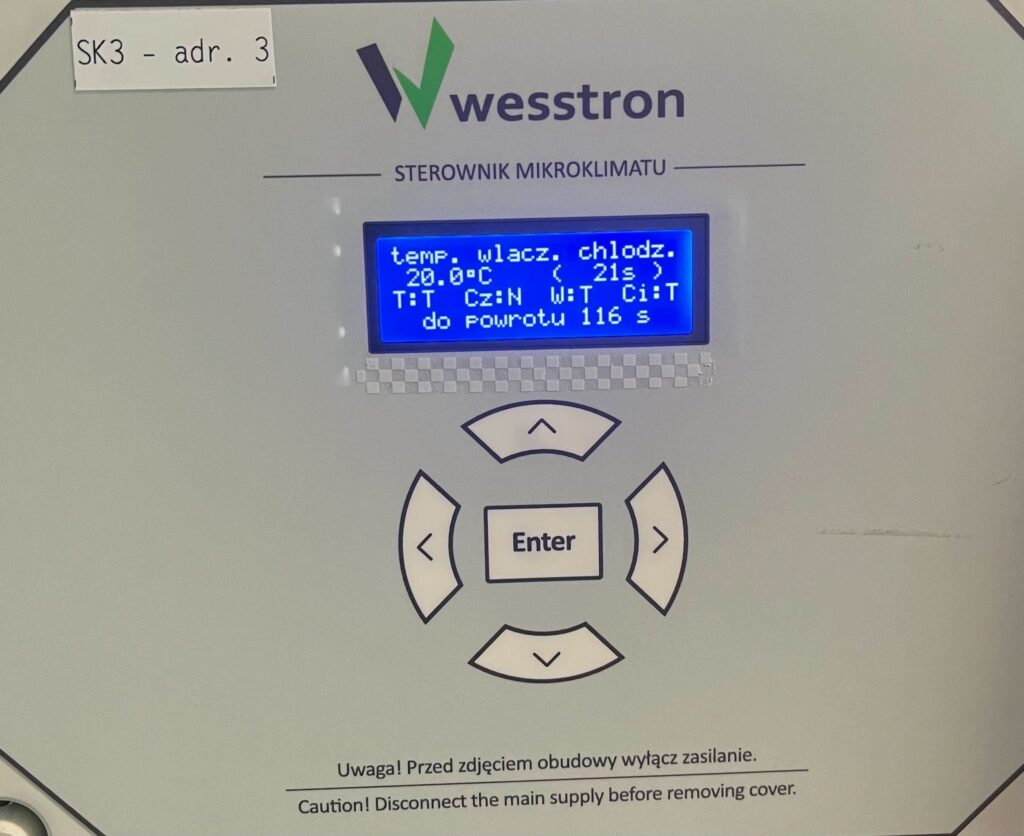
Photo of the SK-3 climate controller display showing the cooling switch-on temperature screen (temp. włacz. chłodz.) set to 20.0 degrees Celsius.
Cooling operating time

Use the right arrow to go to the chill time menu and use the down / up arrows to change the parameter . Click Enter to save the changes.
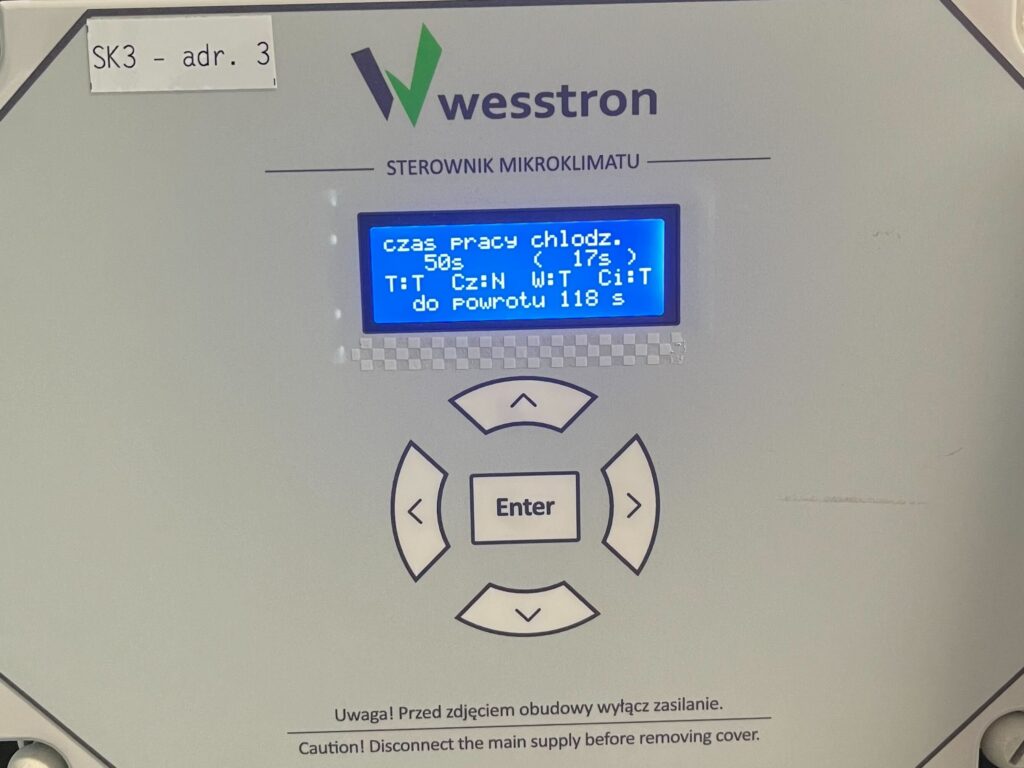
Photo of the SK-3 climate controller display showing the cooling operating time screen (czas pracy chłodz.) set to 50 seconds.
Cooling interval time

Use the right arrow to go to the chill interval time menu and use the down / up arrows to change the parameter . Click Enter to save the changes.
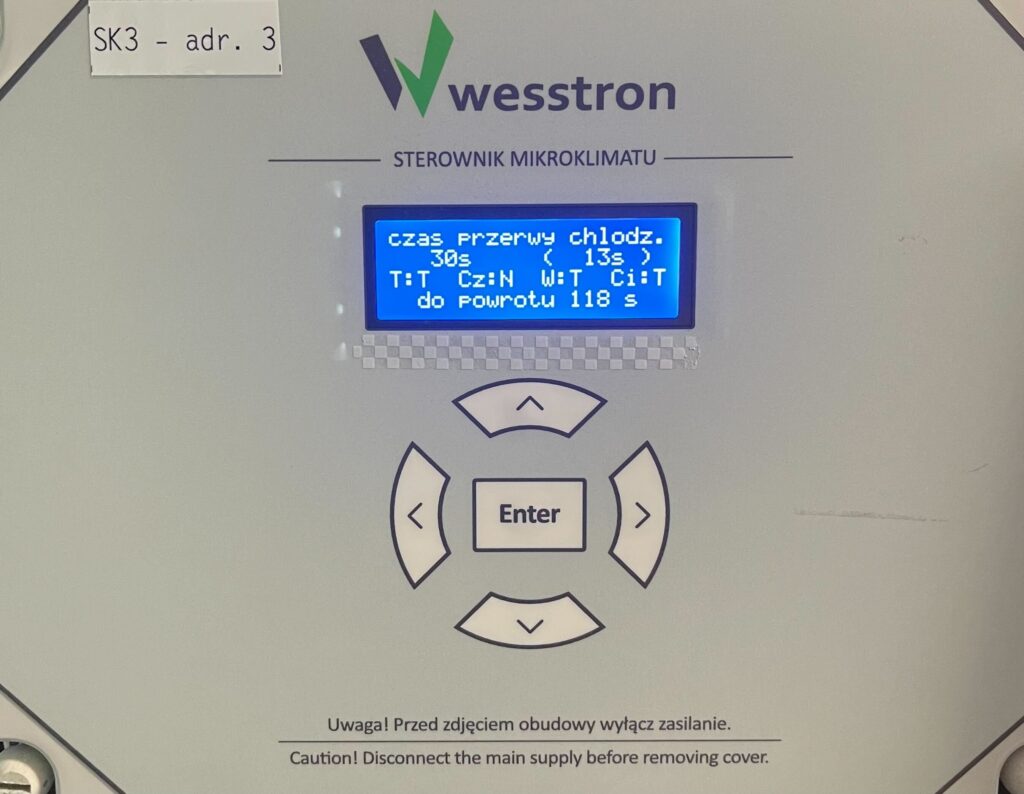
Photo of the SK-3 climate controller display showing the cooling interval time screen (czas przerwy chłodz.) set to 30 seconds.
Maximum humidity

Use the right arrow to go to the humidity max. menu and use the down / up arrows to change the parameter. Set the value to 100% if humidity is not to be taken into account during cooling. Click Enter to save the changes.
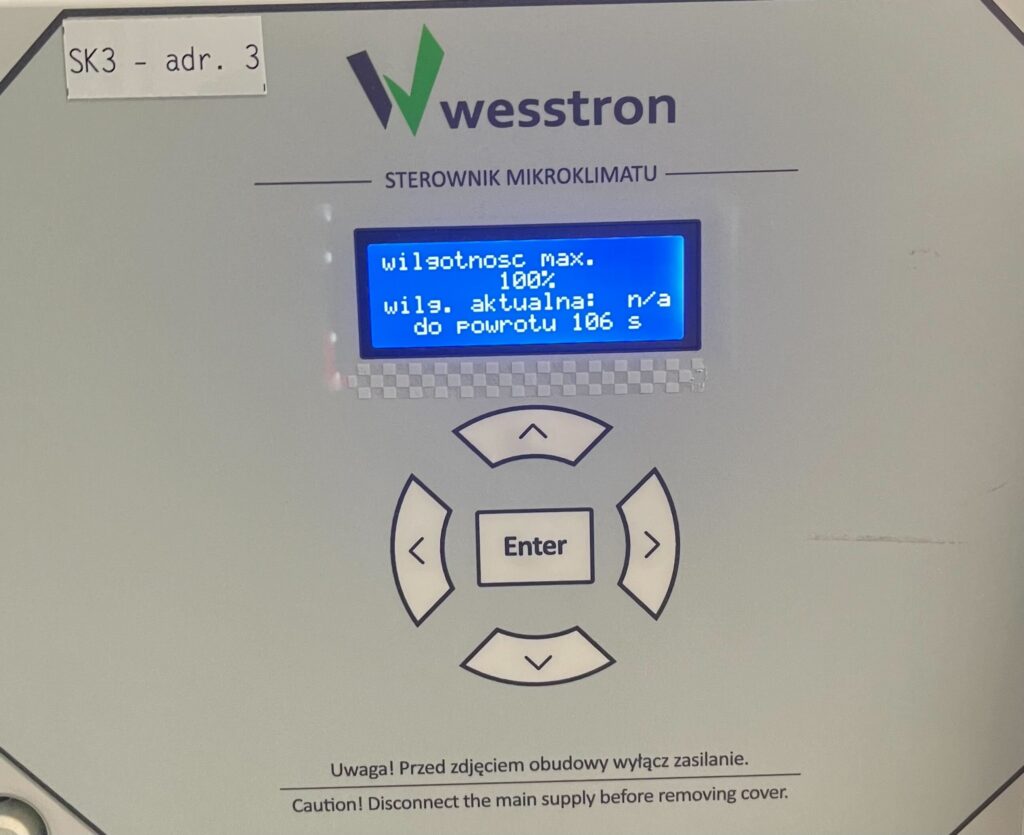
Photo of the SK-3 climate controller display showing the maximum humidity screen (wilgotność max.) set to 100 percent.
Minimum pressure

Use the right arrow to go to the minimum pressure menu and use the down / up arrows to change the parameter. Set the value to 0 bar if the pressure is not to be taken into account during cooling. Click Enter to save the changes.
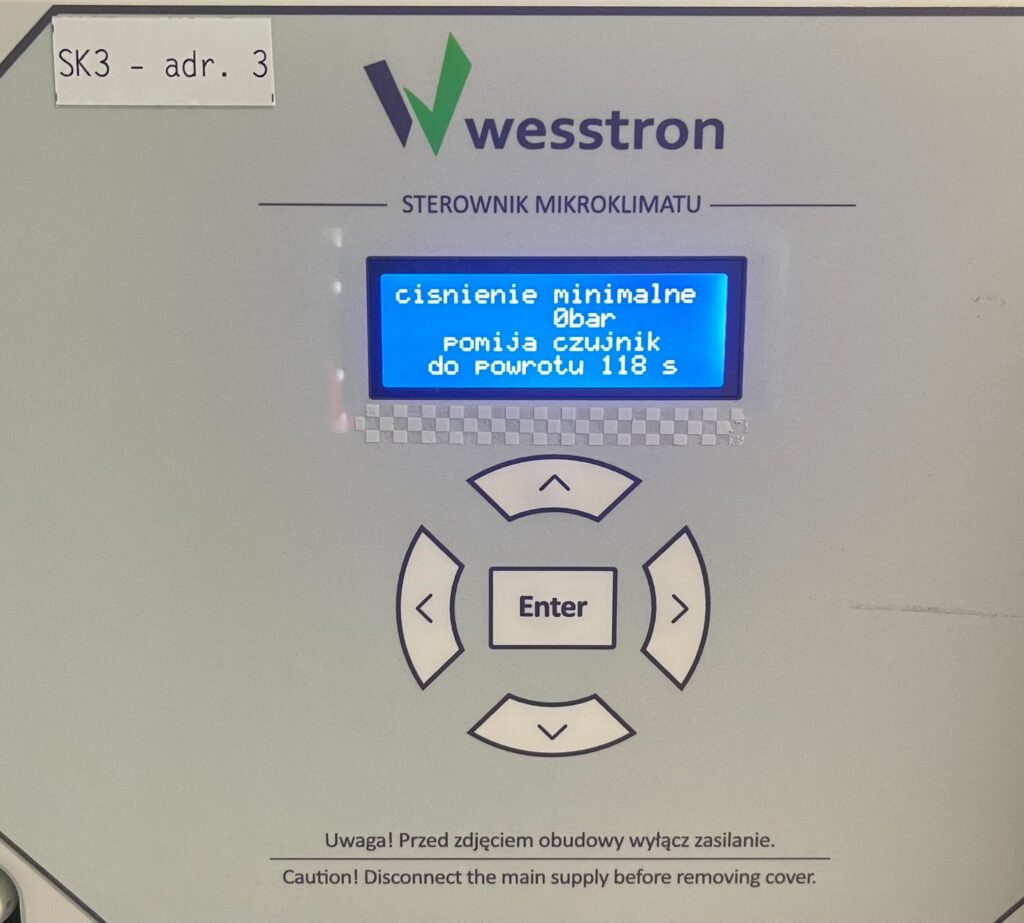
Photo of the SK-3 climate controller display showing the minimum pressure screen (ciśnienie minimalne) set to 0 bar, meaning the pressure sensor is bypassed.
Maximum pressure

Use the right arrow to go to the maximum pressure menu and use the down / up arrows to change the parameter. Click Enter to save the changes.
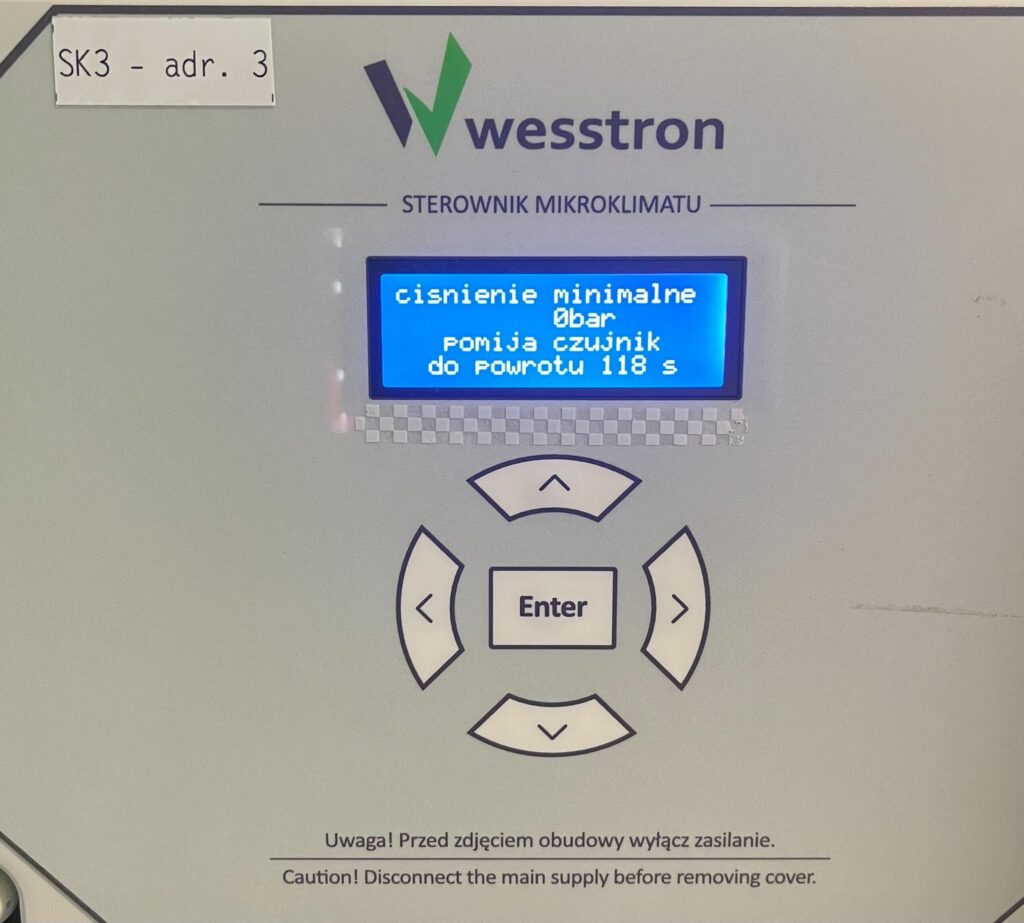
Photo of the SK-3 climate controller display showing the minimum pressure screen (ciśnienie minimalne) set to 0 bar, meaning the pressure sensor is bypassed.

Cooling settings on the SK-4 controller

To directly set the cooling settings On the SK-4 controller you need to log on the climate controller. To do this, click the highlighted item.

Fetura CLOUD SK-4 climate controller touchscreen main view (Ogólne) with the padlock icon in the top right marked by a red arrow, tapped to log in. The screen shows six tiles: Tryb pracy = Automat, Średnia temperatura = 25.6°C, Wentylacja = 89.9% with 2 fan groups, Temperatura żądana = 21.0°C, Min. alarm = 17.0°C, Maks. alarm = 31.0°C. The bottom navigation bar contains: Ogólne, Wentylacja, Sensory, Chłodzenie, Grzanie, and a MYCIE tab is docked on the left edge; the top bar shows the clock, date, a bell icon and the padlock.

Enter the PIN you set, or swipe your card to log in.

Fetura CLOUD SK-4 climate controller Login dialog opened from the padlock icon: on the left a numeric keypad with digits 0-9 and a backspace key, on the right the field „Użytkownik” set to „Service” (dropdown with the available users) and the field „Wprowadź pin” next to the alternative „lub przyłóż kartę” with a card icon. The bottom navigation bar (Ogólne, Wentylacja, Sensory, Chłodzenie, Grzanie) stays visible behind the dialog.

Once you have logged in correctly, a gear icon will appear. Click it to go to the climate controller settings.

Fetura CLOUD SK-4 climate controller main view after logging in, with a red arrow pointing to the gear (settings) icon that has appeared in the top bar next to the bell and the open padlock; the top bar also shows the automatic logout countdown „Wylogowanie za 73 s”. The tiles now have arrows for editing and show: Tryb pracy = Automat, Średnia temperatura = 25.7°C, Wentylacja = 89.9%, Temperatura żądana = 21.0°C, Min. alarm = 17.0°C, Maks. alarm = 31.0°C.

In the new view, go to the cooling tab .
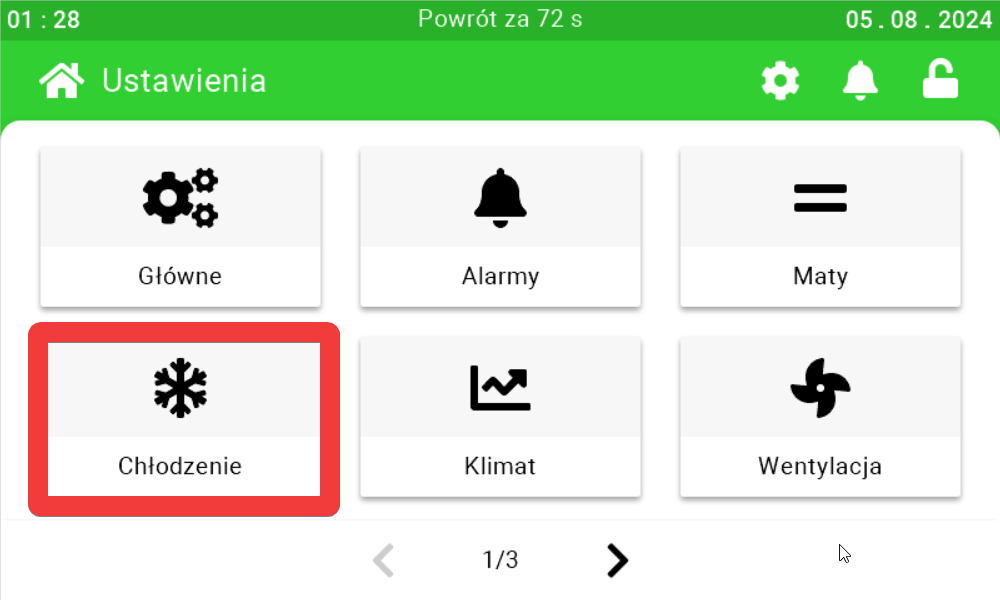
Fetura CLOUD SK-4 climate controller settings menu (Ustawienia, page 1 of 3) with the Chłodzenie (Cooling) tile highlighted in red. Page 1/3 contains the tiles: Główne, Alarmy, Maty, Chłodzenie, Klimat, Wentylacja.

Use the sliders and buttons on their sides to configure cooling settings.
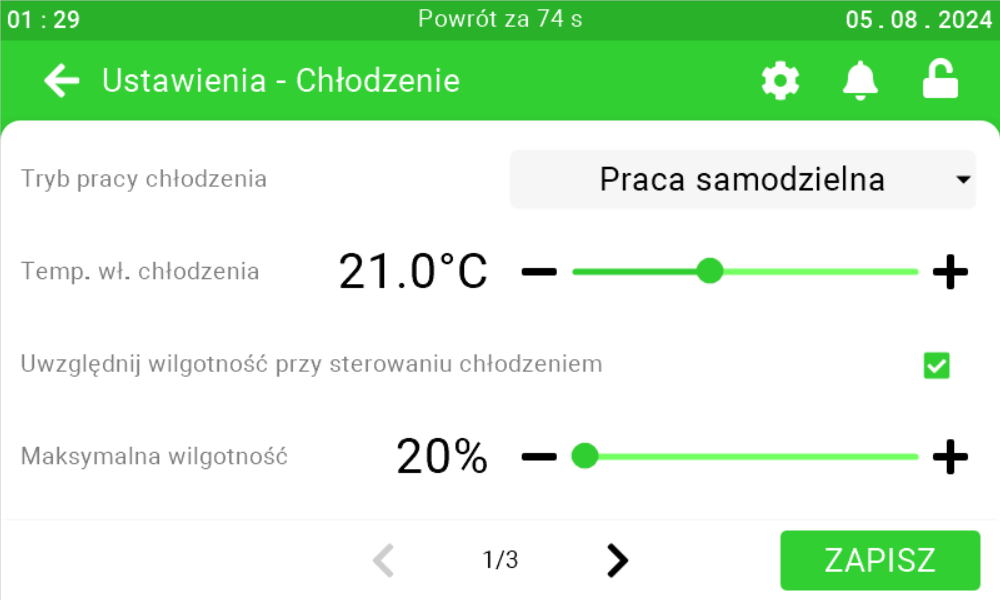
Fetura CLOUD SK-4 cooling settings screen (Ustawienia - Chłodzenie, page 1 of 3) showing: Tryb pracy chłodzenia as a dropdown set to „Praca samodzielna”, Temp. wł. chłodzenia = 21.0°C, the ticked checkbox „Uwzględnij wilgotność przy sterowaniu chłodzeniem”, and Maksymalna wilgotność = 20%. The green ZAPISZ (Save) button is in the bottom right corner.
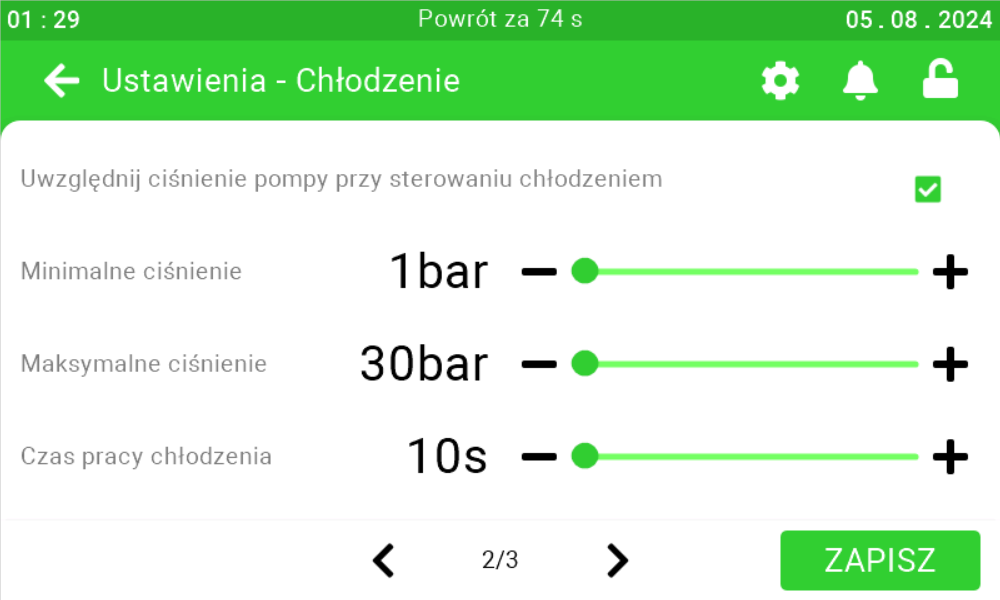
Fetura CLOUD SK-4 cooling settings screen (Ustawienia - Chłodzenie, page 2 of 3) showing the ticked checkbox „Uwzględnij ciśnienie pompy przy sterowaniu chłodzeniem” and the sliders: Minimalne ciśnienie = 1bar, Maksymalne ciśnienie = 30bar, Czas pracy chłodzenia = 10s. The green ZAPISZ (Save) button is in the bottom right corner.
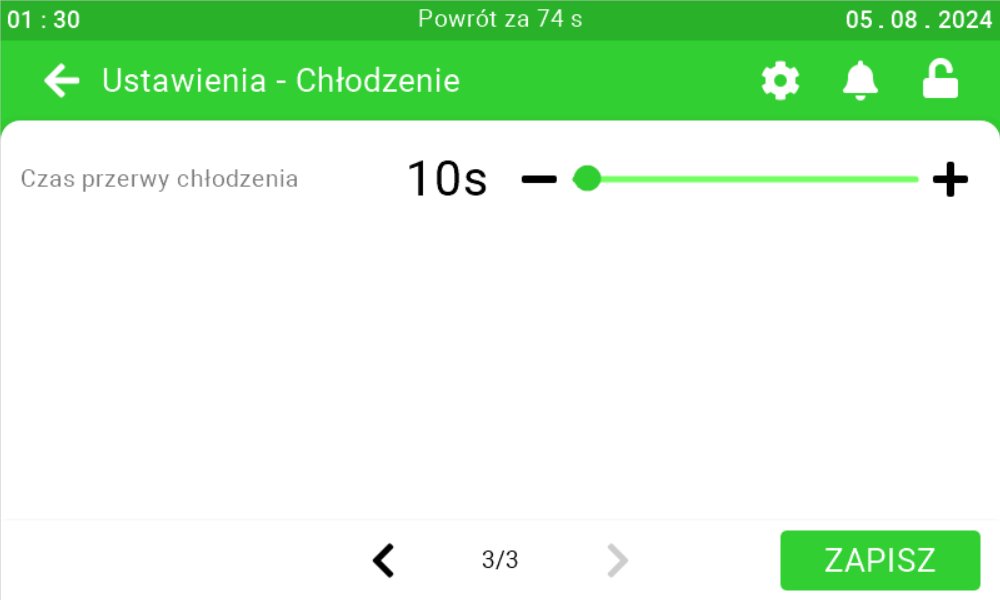
Fetura CLOUD SK-4 cooling settings screen (page 3 of 3) showing the cooling interval (break) time slider, with a Zapisz (Save) button.

Flap settings

On this panel, set what voltage will be driven for the corresponding current ventilation [1]. After setting the parameters, click the save button [2].
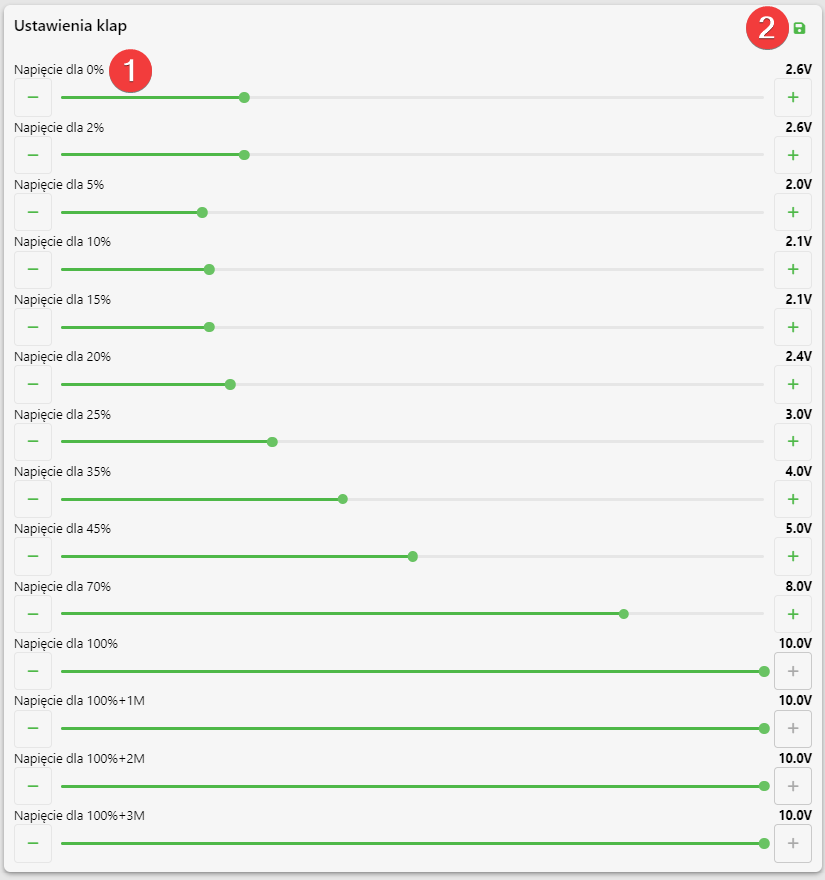
Flap curve voltage settings panel (Ustawienia klap) in Fetura CLOUD, with the voltage sliders marked nr 1 and the green save icon nr 2. The panel contains one slider per ventilation level, with the values shown: Napięcie dla 0% = 2.6V, dla 2% = 2.6V, dla 5% = 2.0V, dla 10% = 2.1V, dla 15% = 2.1V, dla 20% = 2.4V, dla 25% = 3.0V, dla 35% = 4.0V, dla 45% = 5.0V, dla 70% = 8.0V, dla 100% = 10.0V, dla 100%+1M = 10.0V, dla 100%+2M = 10.0V, dla 100%+3M = 10.0V.

Flap settings on the SK-3 controller

To directly set the flap settings on the controller, click the highlighted Enter button on the controller.

Photo of the SK-3 climate controller front panel (labelled wesstron STEROWNIK MIKROKLIMATU, sticker SK3 - adr. 3) with the Enter button outlined in a red box, pressed to open the on-device menu. The LCD shows the main screen: first line „00 25  1 czuj. 22.6°”, second line „--- 22.6° --- --- ---”, third line „15.8% 0k. 0m. 31.6%”, bottom line „KNA   Menu   C”. Around the Enter button there are four arrow keys (up, down, left, right). At the bottom of the housing a warning: „Uwaga! Przed zdjęciem obudowy wyłącz zasilanie. / Caution! Disconnect the main supply before removing cover.”

Use the right arrow to go to the Installer Menu and click Enter.

Photo of the SK-3 climate controller display showing the Menu instalatora (Installer Menu) screen, reached from the User Menu.

Use the right arrow to go to the Flap Curve menu and click Enter.
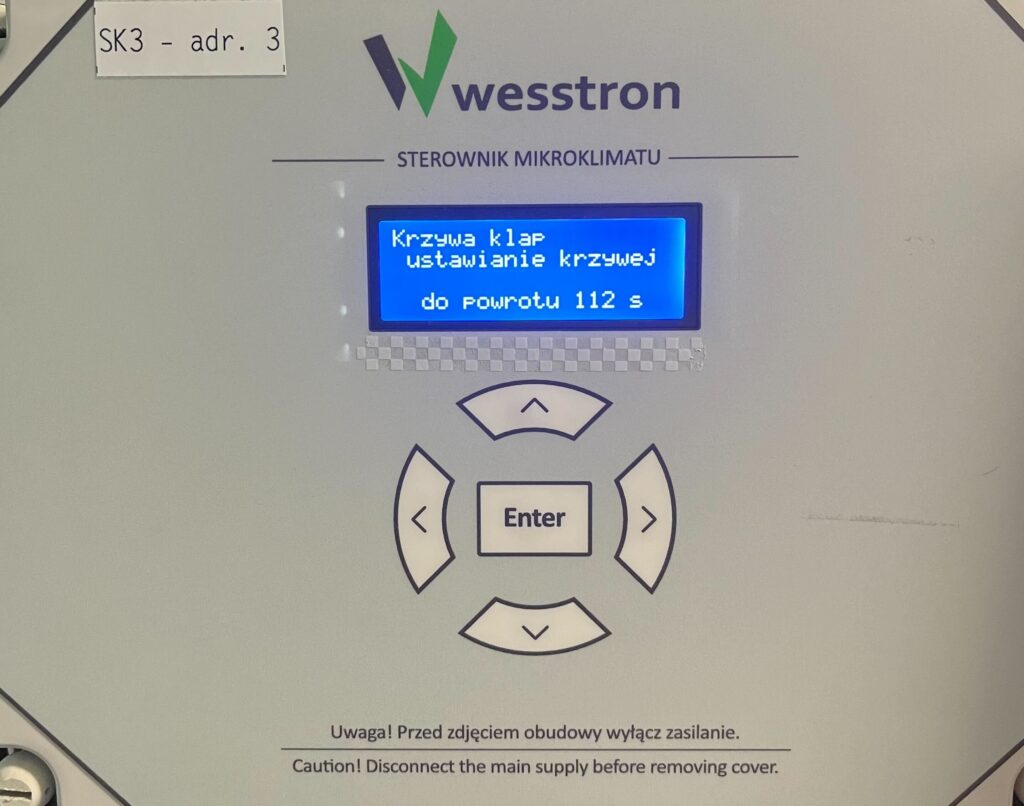
Photo of the SK-3 climate controller display showing the flap curve menu (Krzywa klap, ustawianie krzywej), reached from the Installer Menu.

Set the voltage for the corresponding % flap opening with the down / up arrows, use the right arrow to move to the next % flap opening. Click Enter to save your changes .
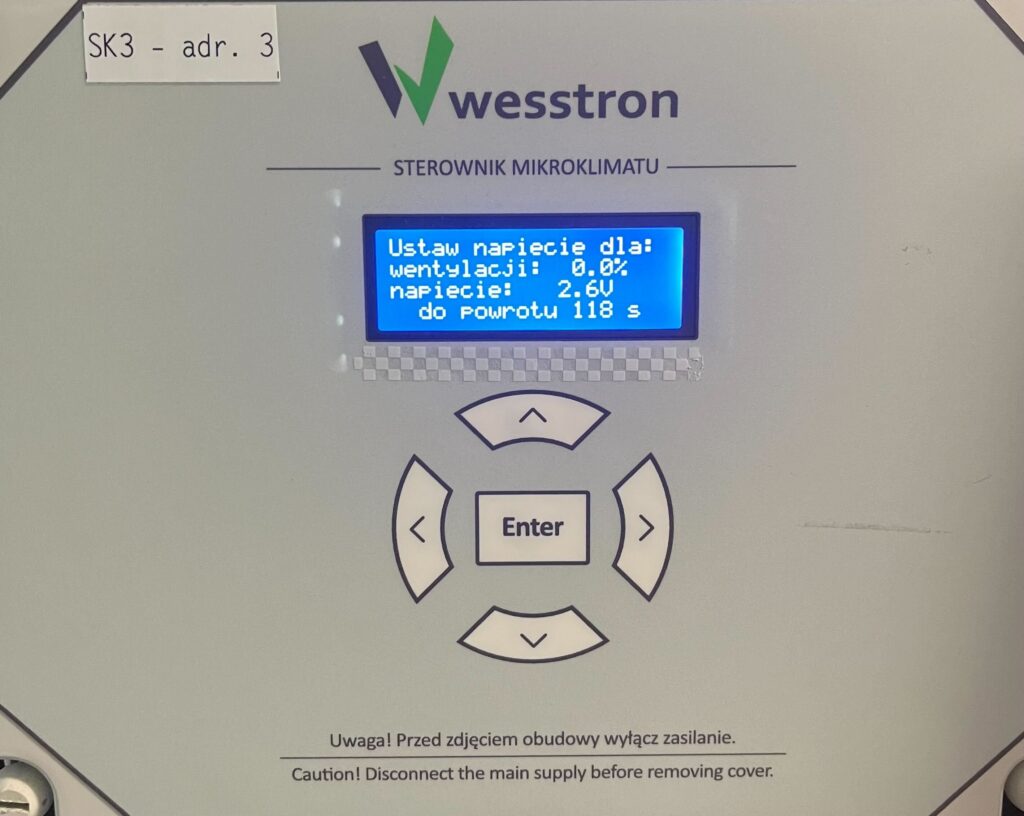
Photo of the SK-3 climate controller display showing the flap curve voltage screen for 0 percent ventilation, set to 2.6 V.

Flap settings on the SK-4 controller

In order to directly set the flap settings on the SK-4 controller, you need to log on the climate controller. To do this, click the highlighted item.

Fetura CLOUD SK-4 climate controller touchscreen main view (Ogólne) with the padlock icon in the top right marked by a red arrow, tapped to log in. The screen shows six tiles: Tryb pracy = Automat, Średnia temperatura = 25.6°C, Wentylacja = 89.9% with 2 fan groups, Temperatura żądana = 21.0°C, Min. alarm = 17.0°C, Maks. alarm = 31.0°C. The bottom navigation bar contains: Ogólne, Wentylacja, Sensory, Chłodzenie, Grzanie, and a MYCIE tab is docked on the left edge; the top bar shows the clock, date, a bell icon and the padlock.

Enter the PIN you set, or swipe your card to log in.

Fetura CLOUD SK-4 climate controller Login dialog opened from the padlock icon: on the left a numeric keypad with digits 0-9 and a backspace key, on the right the field „Użytkownik” set to „Service” (dropdown with the available users) and the field „Wprowadź pin” next to the alternative „lub przyłóż kartę” with a card icon. The bottom navigation bar (Ogólne, Wentylacja, Sensory, Chłodzenie, Grzanie) stays visible behind the dialog.

Once you have logged in correctly, a gear icon will appear. Click it to go to the climate controller settings.

Fetura CLOUD SK-4 climate controller main view after logging in, with a red arrow pointing to the gear (settings) icon that has appeared in the top bar next to the bell and the open padlock; the top bar also shows the automatic logout countdown „Wylogowanie za 73 s”. The tiles now have arrows for editing and show: Tryb pracy = Automat, Średnia temperatura = 25.7°C, Wentylacja = 89.9%, Temperatura żądana = 21.0°C, Min. alarm = 17.0°C, Maks. alarm = 31.0°C.

In the new view, go to the second page and enter the Flaps tab .
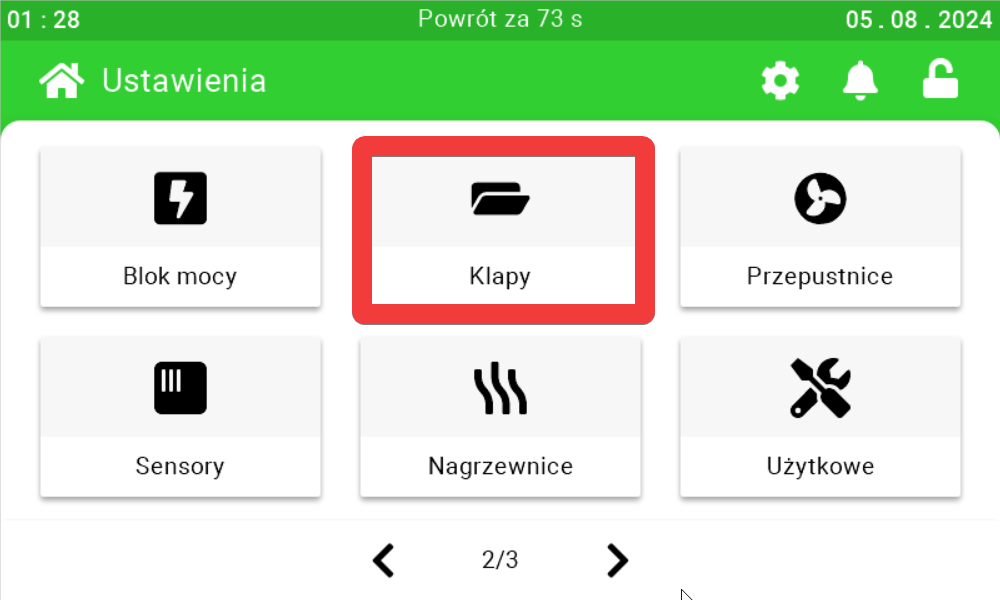
Fetura CLOUD SK-4 climate controller settings menu (Ustawienia, page 2 of 3) with the Klapy (Flaps) tile highlighted in red. Page 2/3 contains the tiles: Blok mocy, Klapy, Przepustnice, Sensory, Nagrzewnice, Użytkowe.

Use the sliders and buttons on their sides to configure the flap settings.
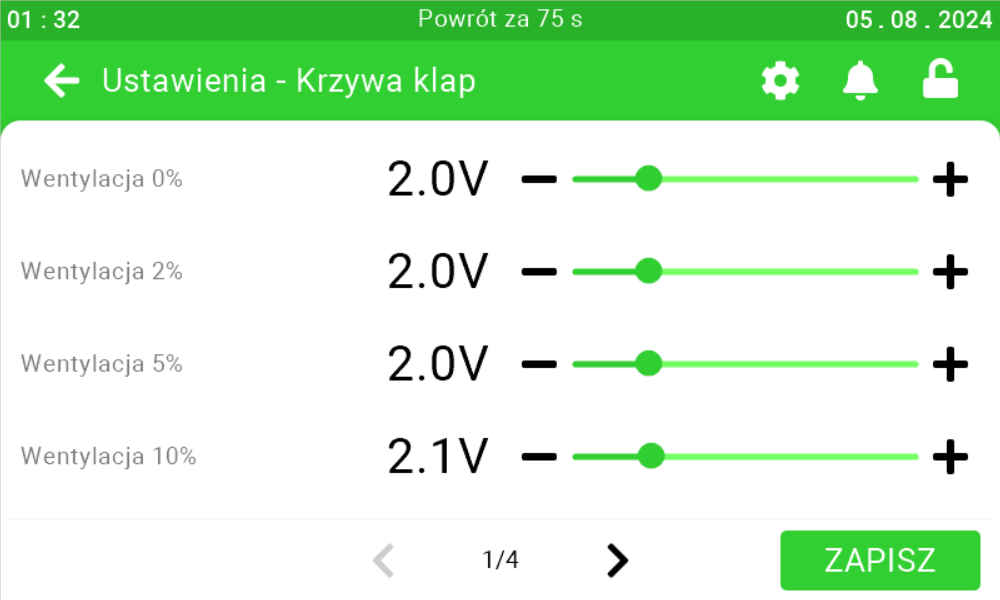
Fetura CLOUD SK-4 flap curve settings screen (Ustawienia - Krzywa klap, page 1 of 4) with the voltage sliders for the first ventilation levels: Wentylacja 0% = 2.0V, Wentylacja 2% = 2.0V, Wentylacja 5% = 2.0V, Wentylacja 10% = 2.1V. Further ventilation levels are on pages 2 to 4; the green ZAPISZ (Save) button is in the bottom right corner.
Heater settings

On this panel, you can set how many degrees below the desired temperature the temperature must fall for the heater to turn on [1], what is the operating time of the heater [2], how long should be the interval between turning on the heater [3]. After setting the parameters, click the save button [4].
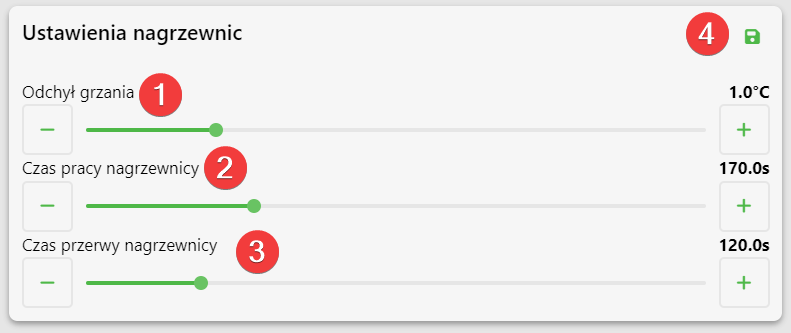
Heater settings panel (Ustawienia nagrzewnic) in Fetura CLOUD with numbered red markers and the values shown on the sliders: Odchył grzania nr 1 = 1.0°C, Czas pracy nagrzewnicy nr 2 = 170.0s, Czas przerwy nagrzewnicy nr 3 = 120.0s, and the green save icon nr 4 in the top right corner.

Heater settings on the SK-3 controller

Heating deviation

To directly set the heat deflection on the controller, click the highlighted Enter button on the controller.

Photo of the SK-3 climate controller front panel (labelled wesstron STEROWNIK MIKROKLIMATU, sticker SK3 - adr. 3) with the Enter button outlined in a red box, pressed to open the on-device menu. The LCD shows the main screen: first line „00 25  1 czuj. 22.6°”, second line „--- 22.6° --- --- ---”, third line „15.8% 0k. 0m. 31.6%”, bottom line „KNA   Menu   C”. Around the Enter button there are four arrow keys (up, down, left, right). At the bottom of the housing a warning: „Uwaga! Przed zdjęciem obudowy wyłącz zasilanie. / Caution! Disconnect the main supply before removing cover.”

Use the right arrow to go to the User Menu and click Enter.

Photo of the SK-3 climate controller display showing the User Menu screen, with the right arrow button outlined in red, used to move to the next menu item.

Use the right arrow to go to the heat deviation menu and use the down / up arrows to change the parameter value. Click Enter to save the changes .
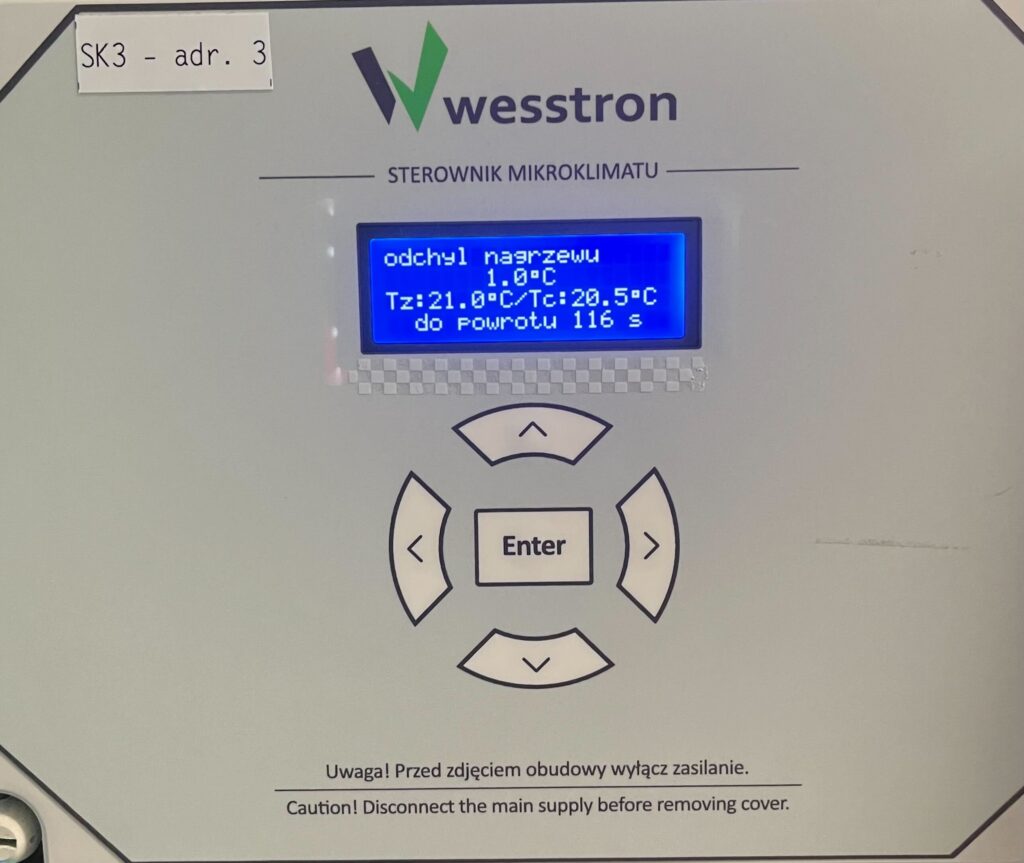
Photo of the SK-3 climate controller display showing the heating deviation screen. The LCD reads: „odchyl nagrzewu”, „1.0°C”, „Tz:21.0°C/Tc:20.5°C”, „do powrotu 116 s” - the heating deviation is 1.0°C, Tz is the desired temperature (21.0°C) and Tc the current temperature (20.5°C). The value is changed with the up and down arrows and confirmed with Enter.
Rewarm operating time and breaks

To directly set the operating time and heating interval on the controller, click the highlighted Enter button on the controller.

Photo of the SK-3 climate controller front panel (labelled wesstron STEROWNIK MIKROKLIMATU, sticker SK3 - adr. 3) with the Enter button outlined in a red box, pressed to open the on-device menu. The LCD shows the main screen: first line „00 25  1 czuj. 22.6°”, second line „--- 22.6° --- --- ---”, third line „15.8% 0k. 0m. 31.6%”, bottom line „KNA   Menu   C”. Around the Enter button there are four arrow keys (up, down, left, right). At the bottom of the housing a warning: „Uwaga! Przed zdjęciem obudowy wyłącz zasilanie. / Caution! Disconnect the main supply before removing cover.”

Use the right arrow to go to the Installer Menu and click Enter.

Photo of the SK-3 climate controller display showing the Menu instalatora (Installer Menu) screen, reached from the User Menu.

Use the right arrow to go to the reheat time menu and use the down / up arrows to change the parameter. After making changes, click the Enter button .
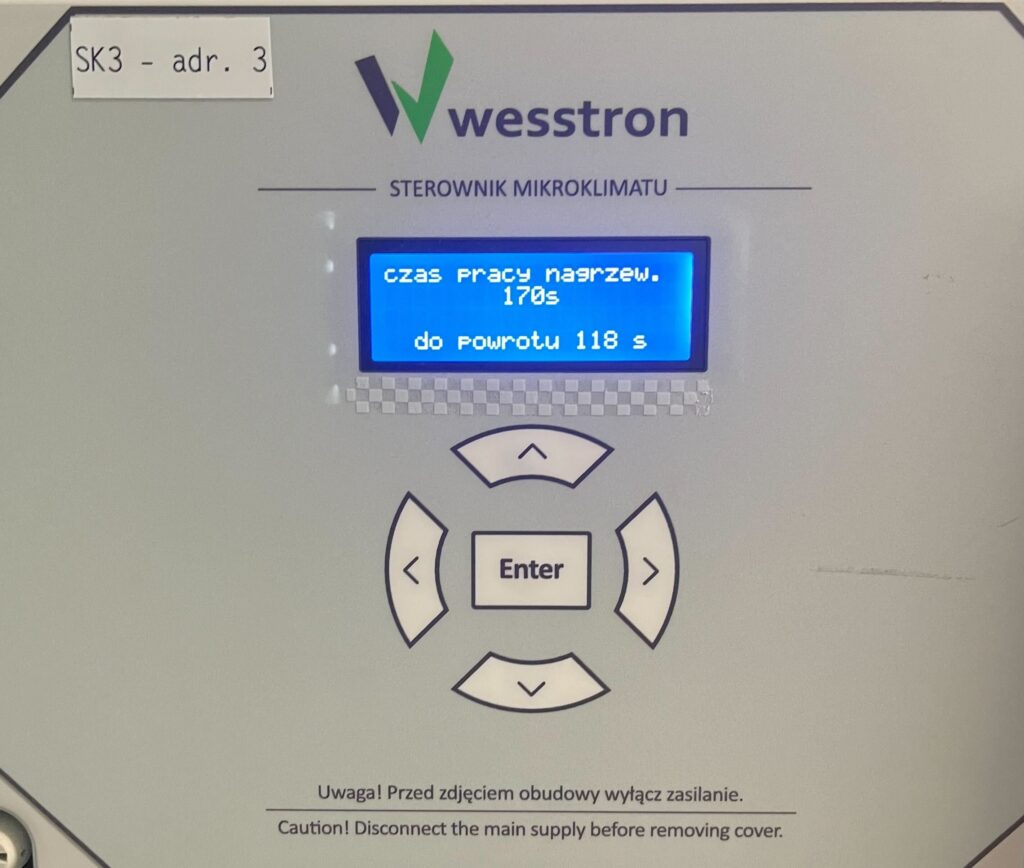
Photo of the SK-3 climate controller display showing the heater operating time screen (czas pracy nagrzew.) set to 170 seconds.

Use the right arrow to go to the heat interval time menu and use the down / up arrows to change the parameter. After making changes, click the Enter button .
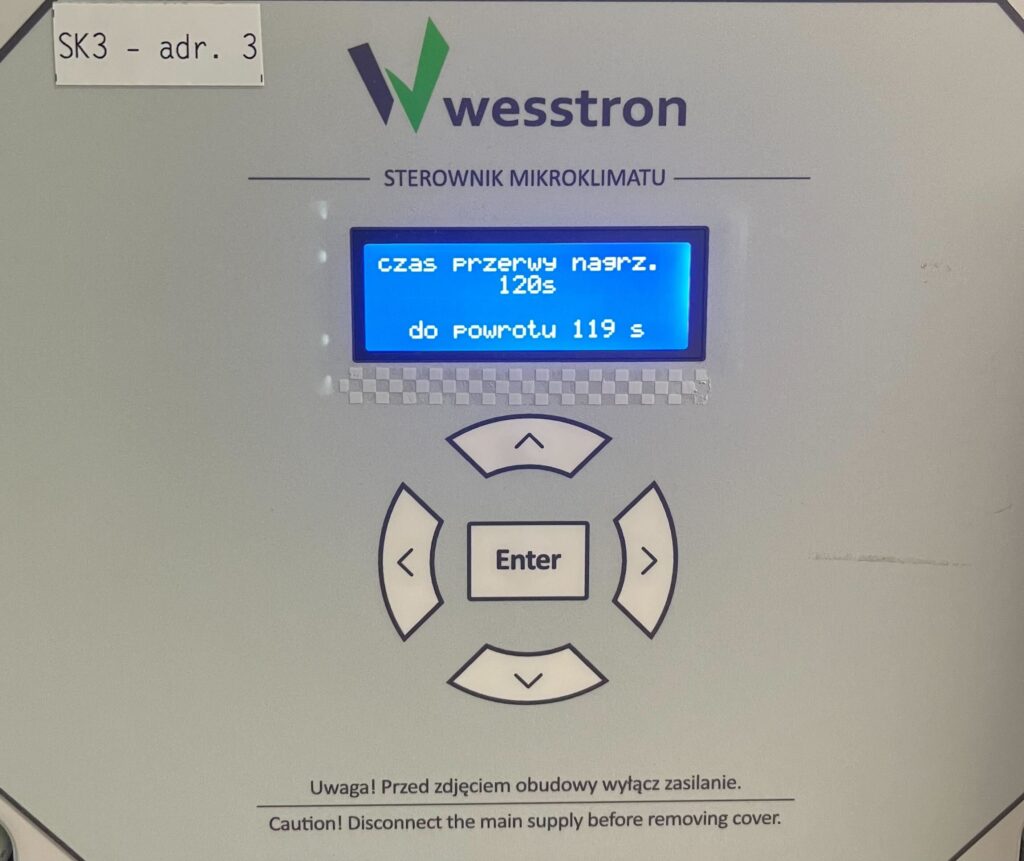
Photo of the SK-3 climate controller display showing the heater interval time screen (czas przerwy nagrz.) set to 120 seconds.

Heater settings on the SK-4 controller

In order to directly set the heater settings on the SK-4 controller, you need to log on the climate controller. To do this, click the highlighted item.

Fetura CLOUD SK-4 climate controller touchscreen main view (Ogólne) with the padlock icon in the top right marked by a red arrow, tapped to log in. The screen shows six tiles: Tryb pracy = Automat, Średnia temperatura = 25.6°C, Wentylacja = 89.9% with 2 fan groups, Temperatura żądana = 21.0°C, Min. alarm = 17.0°C, Maks. alarm = 31.0°C. The bottom navigation bar contains: Ogólne, Wentylacja, Sensory, Chłodzenie, Grzanie, and a MYCIE tab is docked on the left edge; the top bar shows the clock, date, a bell icon and the padlock.

Enter the PIN you set, or swipe your card to log in.

Fetura CLOUD SK-4 climate controller Login dialog opened from the padlock icon: on the left a numeric keypad with digits 0-9 and a backspace key, on the right the field „Użytkownik” set to „Service” (dropdown with the available users) and the field „Wprowadź pin” next to the alternative „lub przyłóż kartę” with a card icon. The bottom navigation bar (Ogólne, Wentylacja, Sensory, Chłodzenie, Grzanie) stays visible behind the dialog.

Once you have logged in correctly, a gear icon will appear. Click it to go to the climate controller settings.

Fetura CLOUD SK-4 climate controller main view after logging in, with a red arrow pointing to the gear (settings) icon that has appeared in the top bar next to the bell and the open padlock; the top bar also shows the automatic logout countdown „Wylogowanie za 73 s”. The tiles now have arrows for editing and show: Tryb pracy = Automat, Średnia temperatura = 25.7°C, Wentylacja = 89.9%, Temperatura żądana = 21.0°C, Min. alarm = 17.0°C, Maks. alarm = 31.0°C.

In the new view, go to the second page and enter the Heaters tab .
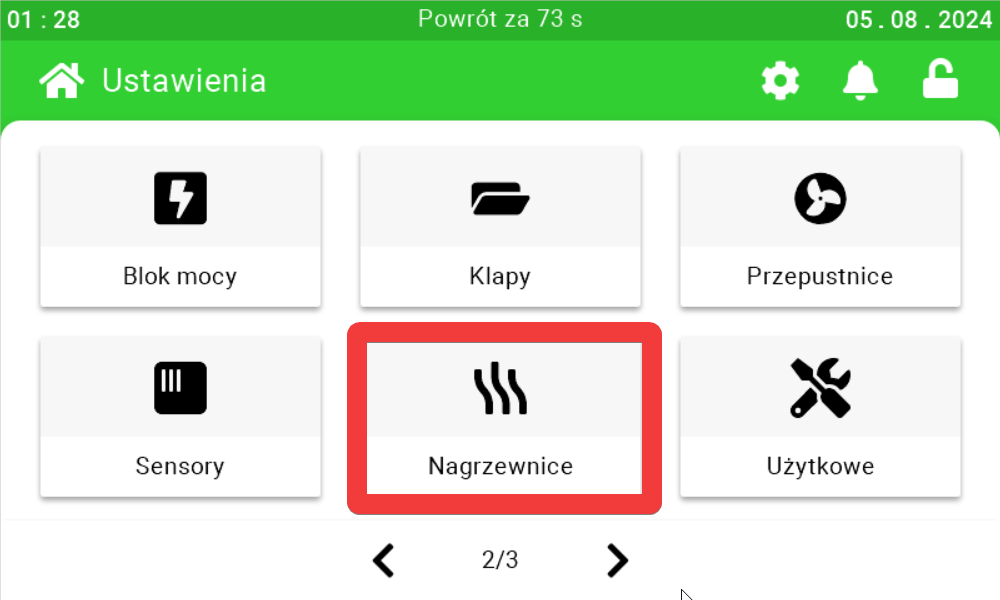
Fetura CLOUD SK-4 climate controller settings menu (Ustawienia, page 2 of 3) with the Nagrzewnice (Heaters) tile highlighted in red. Page 2/3 contains the tiles: Blok mocy, Klapy, Przepustnice, Sensory, Nagrzewnice, Użytkowe.

Use the sliders and buttons on their sides to configure the heater settings.
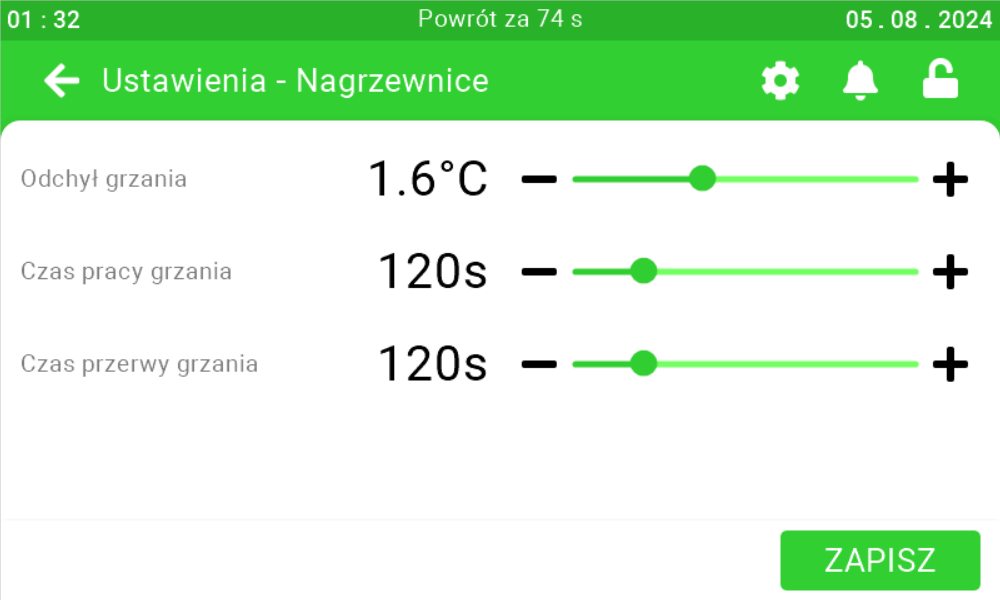
Fetura CLOUD SK-4 heater settings screen (Ustawienia - Nagrzewnice) with the sliders: Odchył grzania = 1.6°C, Czas pracy grzania = 120s, Czas przerwy grzania = 120s. The green ZAPISZ (Save) button is in the bottom right corner.

Calibration of temperature sensors

On this panel you can change the percentage of the value returned by the temperature sensors [1]. After setting the parameters, click the save button [2].

Example

Sensor 1 is calibrated at 95%, and the sensor has detected a temperature of 20°C. In this case, the climate controller will show a value of 19°C.
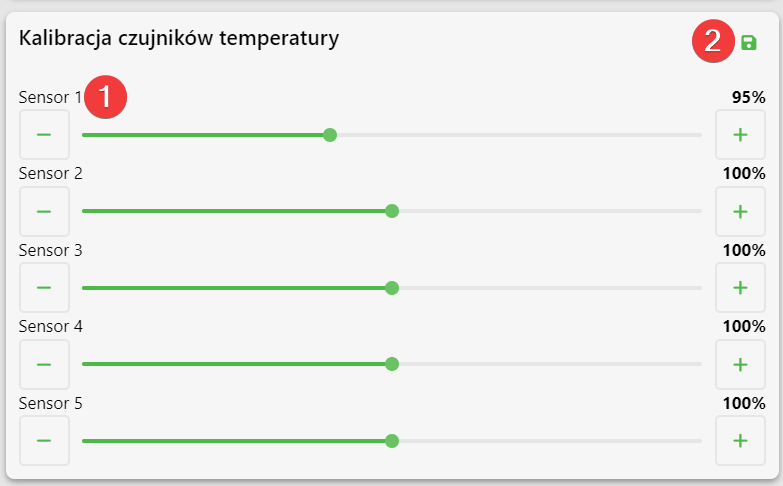
Temperature sensor calibration panel (Kalibracja czujników temperatury) in Fetura CLOUD with the per-sensor calibration sliders marked nr 1 and the green save icon nr 2. The panel lists five sliders with the values shown: Sensor 1 = 95%, Sensor 2 = 100%, Sensor 3 = 100%, Sensor 4 = 100%, Sensor 5 = 100%; each slider has minus and plus buttons.

Calibration of temperature sensors on SK-3 controller

To directly set the calibration of temperature sensors on the controller, click on the marked Enter button on the controller.

Photo of the SK-3 climate controller front panel (labelled wesstron STEROWNIK MIKROKLIMATU, sticker SK3 - adr. 3) with the Enter button outlined in a red box, pressed to open the on-device menu. The LCD shows the main screen: first line „00 25  1 czuj. 22.6°”, second line „--- 22.6° --- --- ---”, third line „15.8% 0k. 0m. 31.6%”, bottom line „KNA   Menu   C”. Around the Enter button there are four arrow keys (up, down, left, right). At the bottom of the housing a warning: „Uwaga! Przed zdjęciem obudowy wyłącz zasilanie. / Caution! Disconnect the main supply before removing cover.”

Use the right arrow to go to the Installer Menu and click Enter.

Photo of the SK-3 climate controller display showing the Menu instalatora (Installer Menu) screen, reached from the User Menu.

Click Enter to proceed to calibrate the temperature sensors.
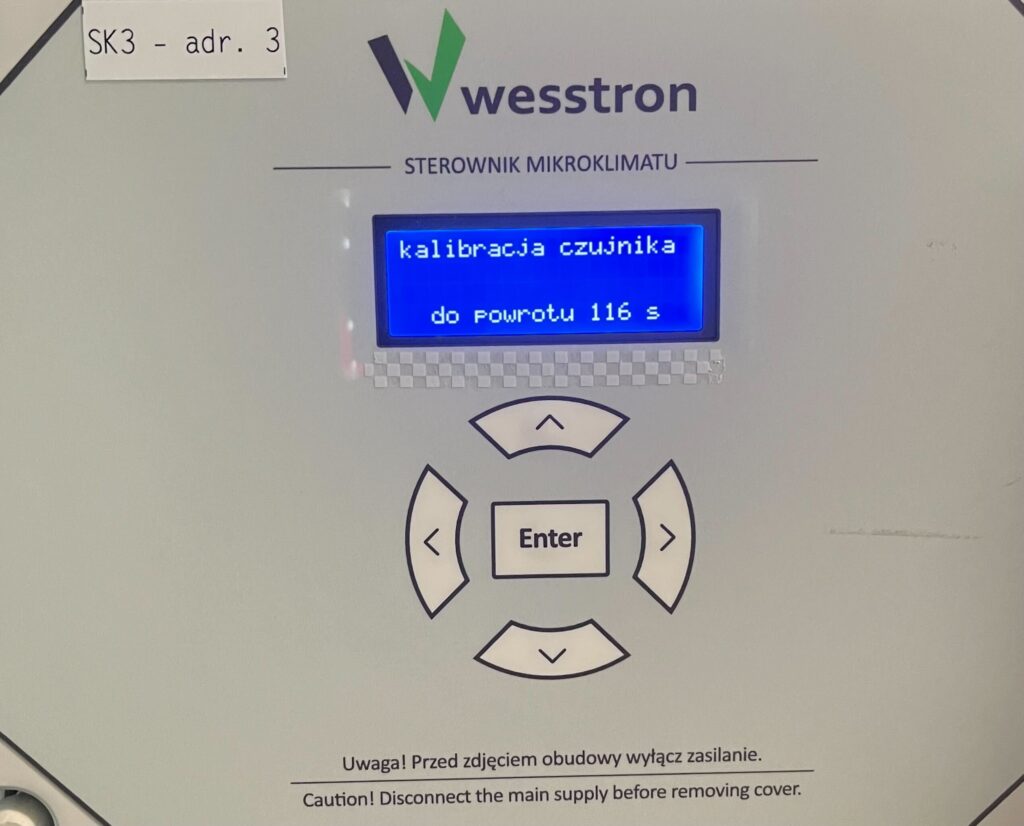
Photo of the SK-3 climate controller display showing the sensor calibration menu (kalibracja czujnika), reached from the Installer Menu.

Use the down / up arrows to change the value for the sensor. Click Enter to save your changes. Use the right arrow to move to the next sensor.
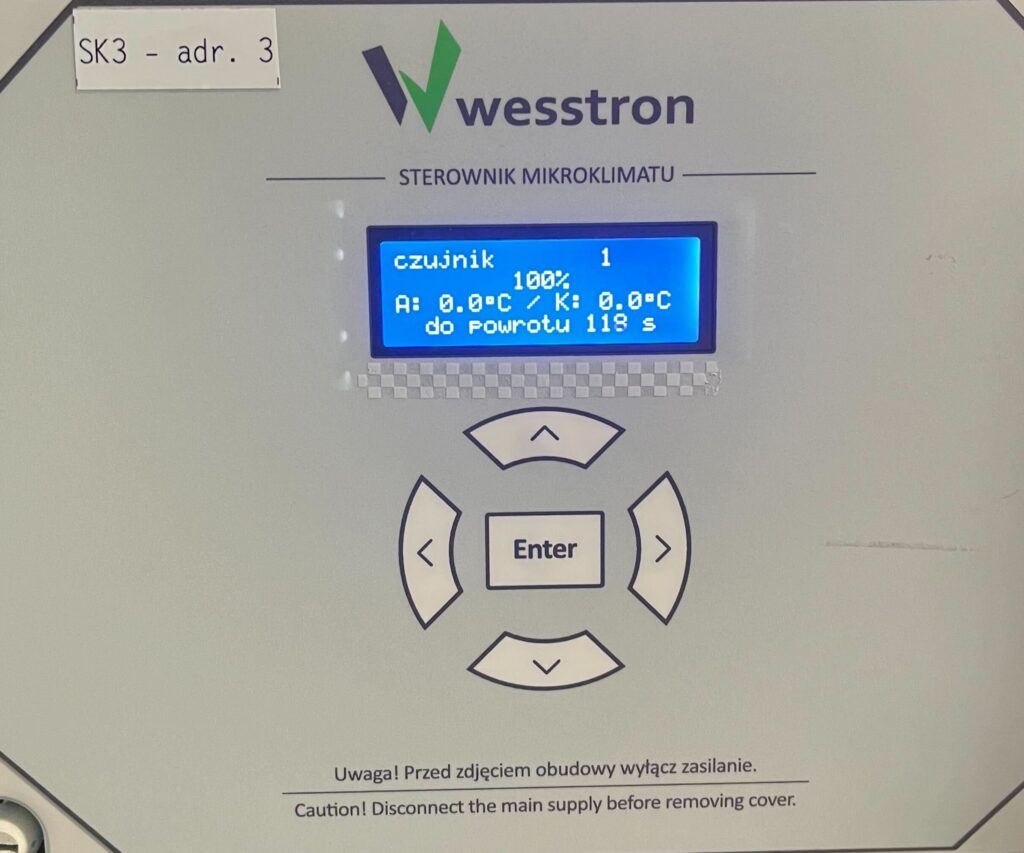
Photo of the SK-3 climate controller display showing the sensor calibration screen. The LCD reads: „czujnik   1”, „100%”, „A: 0.0°C / K: 0.0°C”, „do powrotu 118 s” - sensor number 1 is calibrated at 100%, with the actual reading A and the calibrated reading K both 0.0°C. The value is changed with the up and down arrows and confirmed with Enter.

Temperature sensor calibration settings on SK-4 controller

In order to directly set the heater settings on the SK-4 controller, you need to log on the climate controller. To do this, click the highlighted item.

Fetura CLOUD SK-4 climate controller touchscreen main view (Ogólne) with the padlock icon in the top right marked by a red arrow, tapped to log in. The screen shows six tiles: Tryb pracy = Automat, Średnia temperatura = 25.6°C, Wentylacja = 89.9% with 2 fan groups, Temperatura żądana = 21.0°C, Min. alarm = 17.0°C, Maks. alarm = 31.0°C. The bottom navigation bar contains: Ogólne, Wentylacja, Sensory, Chłodzenie, Grzanie, and a MYCIE tab is docked on the left edge; the top bar shows the clock, date, a bell icon and the padlock.

Enter the PIN you set, or swipe your card to log in.

Fetura CLOUD SK-4 climate controller Login dialog opened from the padlock icon: on the left a numeric keypad with digits 0-9 and a backspace key, on the right the field „Użytkownik” set to „Service” (dropdown with the available users) and the field „Wprowadź pin” next to the alternative „lub przyłóż kartę” with a card icon. The bottom navigation bar (Ogólne, Wentylacja, Sensory, Chłodzenie, Grzanie) stays visible behind the dialog.

Once you have logged in correctly, a gear icon will appear. Click it to go to the climate controller settings.

Fetura CLOUD SK-4 climate controller main view after logging in, with a red arrow pointing to the gear (settings) icon that has appeared in the top bar next to the bell and the open padlock; the top bar also shows the automatic logout countdown „Wylogowanie za 73 s”. The tiles now have arrows for editing and show: Tryb pracy = Automat, Średnia temperatura = 25.7°C, Wentylacja = 89.9%, Temperatura żądana = 21.0°C, Min. alarm = 17.0°C, Maks. alarm = 31.0°C.

In the new view, go to the second page and enter the Sensors tab .
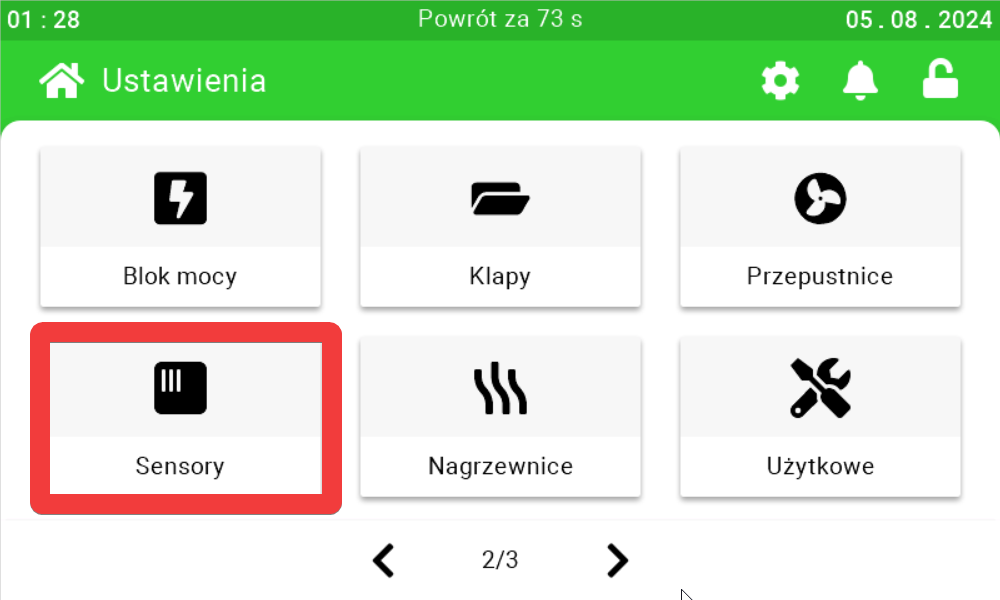
Fetura CLOUD SK-4 climate controller settings menu (Ustawienia, page 2 of 3) with the Sensory (Sensors) tile highlighted in red, used here to open the temperature sensor calibration. Page 2/3 contains the tiles: Blok mocy, Klapy, Przepustnice, Sensory, Nagrzewnice, Użytkowe.

On the first page , use the sliders and buttons on their sides to calibrate the sensors.
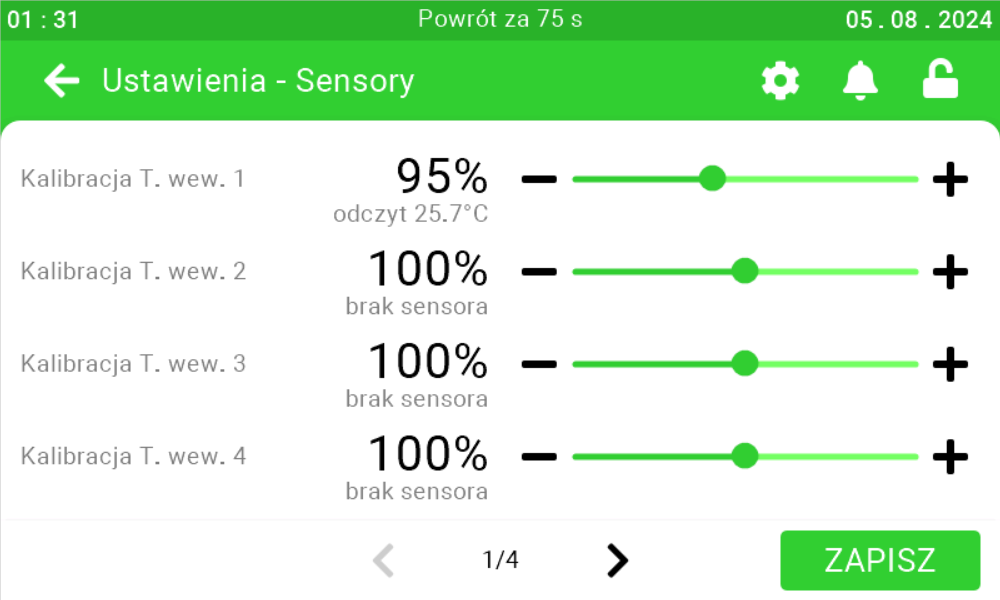
Fetura CLOUD SK-4 sensor settings screen (Ustawienia - Sensory, page 1 of 4) with the temperature sensor calibration sliders: Kalibracja T. wew. 1 = 95% with the note „odczyt 25.7°C”, Kalibracja T. wew. 2 = 100% with „brak sensora”, Kalibracja T. wew. 3 = 100% with „brak sensora”, Kalibracja T. wew. 4 = 100% with „brak sensora”. The green ZAPISZ (Save) button is in the bottom right corner.

Throttle settings

On this panel you can set what is the voltage at which the actuator will completely close the damper in the chimney [1], what is the voltage at which the actuator will completely open the damper in the chimney [2]. After setting the parameters, click the save button [3].
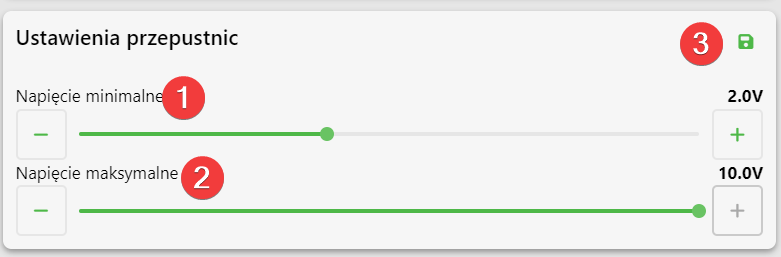
Damper (throttle) settings panel (Ustawienia przepustnic) in Fetura CLOUD with numbered red markers and the values shown on the sliders: Napięcie minimalne nr 1 = 2.0V, Napięcie maksymalne nr 2 = 10.0V, and the green save icon nr 3 in the top right corner.

Calibration of dampers on SK-3 controller

To directly set the throttle settings on the controller, click the highlighted Enter button on the controller.

Photo of the SK-3 climate controller front panel (labelled wesstron STEROWNIK MIKROKLIMATU, sticker SK3 - adr. 3) with the Enter button outlined in a red box, pressed to open the on-device menu. The LCD shows the main screen: first line „00 25  1 czuj. 22.6°”, second line „--- 22.6° --- --- ---”, third line „15.8% 0k. 0m. 31.6%”, bottom line „KNA   Menu   C”. Around the Enter button there are four arrow keys (up, down, left, right). At the bottom of the housing a warning: „Uwaga! Przed zdjęciem obudowy wyłącz zasilanie. / Caution! Disconnect the main supply before removing cover.”

Use the right arrow to go to the Installer Menu and click Enter.

Photo of the SK-3 climate controller display showing the Menu instalatora (Installer Menu) screen, reached from the User Menu.
Minimum throttle voltage

Use the down / up arrows to change the value of the parameter. Click Enter to save your changes.
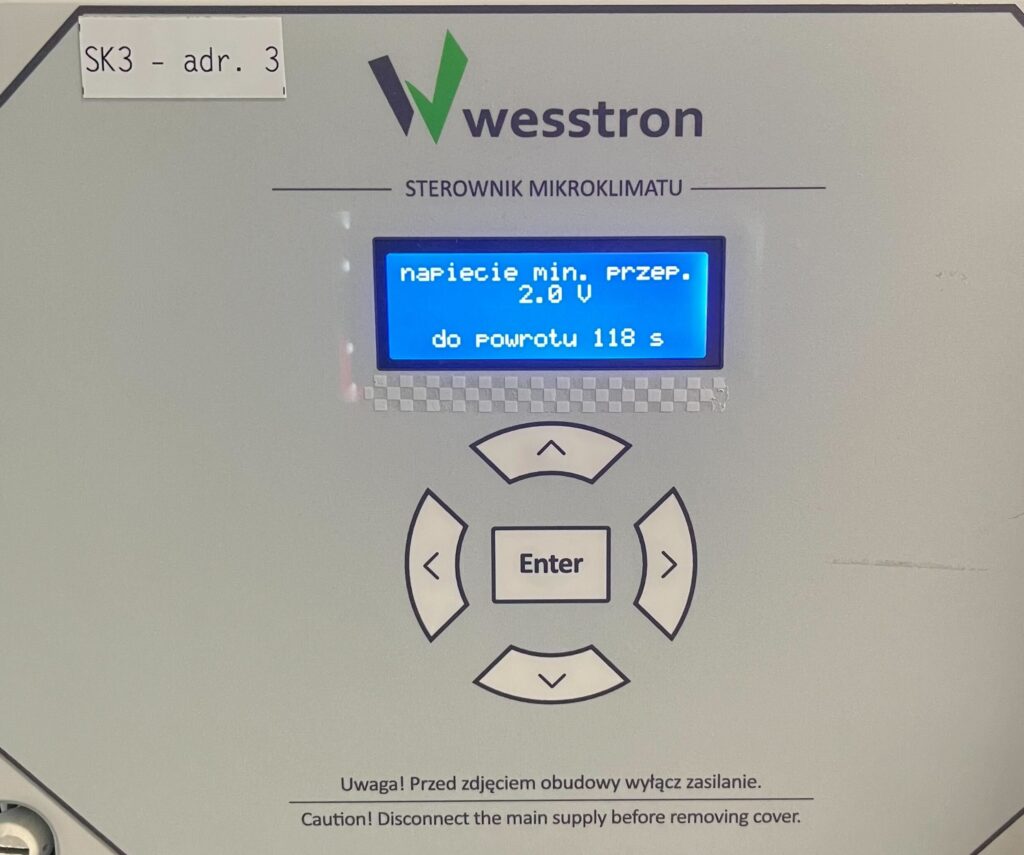
Photo of the SK-3 climate controller display showing the minimum damper voltage screen (napięcie min. przep.) set to 2.0 V.
Maximum throttle voltage

Use the down / up arrows to change the value of the parameter. Click Enter to save your changes.
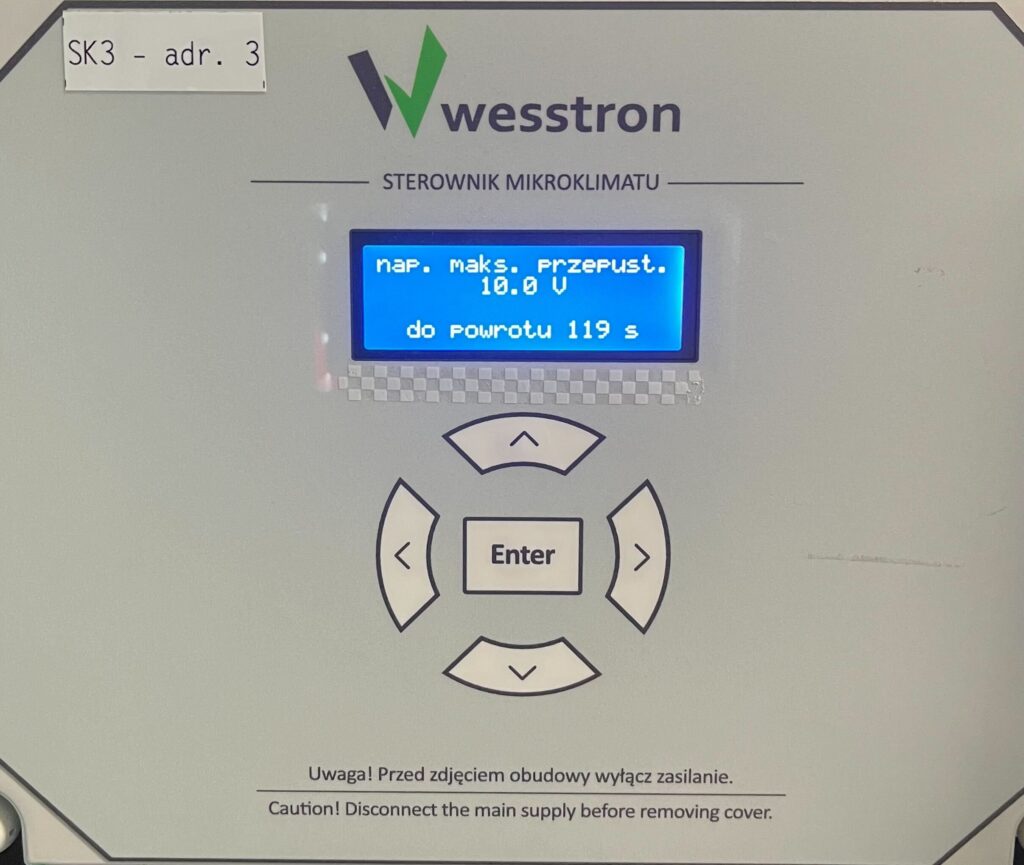
Photo of the SK-3 climate controller display showing the maximum damper voltage screen (nap. maks. przepust.) set to 10.0 V.

Throttle calibration settings on SK-4 controller

In order to directly set damper settings on the SK-4 controller, you need to log on to the climate controller. To do this, click the highlighted item.

Fetura CLOUD SK-4 climate controller touchscreen main view (Ogólne) with the padlock icon in the top right marked by a red arrow, tapped to log in. The screen shows six tiles: Tryb pracy = Automat, Średnia temperatura = 25.6°C, Wentylacja = 89.9% with 2 fan groups, Temperatura żądana = 21.0°C, Min. alarm = 17.0°C, Maks. alarm = 31.0°C. The bottom navigation bar contains: Ogólne, Wentylacja, Sensory, Chłodzenie, Grzanie, and a MYCIE tab is docked on the left edge; the top bar shows the clock, date, a bell icon and the padlock.

Enter the PIN you set, or swipe your card to log in.

Fetura CLOUD SK-4 climate controller Login dialog opened from the padlock icon: on the left a numeric keypad with digits 0-9 and a backspace key, on the right the field „Użytkownik” set to „Service” (dropdown with the available users) and the field „Wprowadź pin” next to the alternative „lub przyłóż kartę” with a card icon. The bottom navigation bar (Ogólne, Wentylacja, Sensory, Chłodzenie, Grzanie) stays visible behind the dialog.

Once you have logged in correctly, a gear icon will appear. Click it to go to the climate controller settings.

Fetura CLOUD SK-4 climate controller main view after logging in, with a red arrow pointing to the gear (settings) icon that has appeared in the top bar next to the bell and the open padlock; the top bar also shows the automatic logout countdown „Wylogowanie za 73 s”. The tiles now have arrows for editing and show: Tryb pracy = Automat, Średnia temperatura = 25.7°C, Wentylacja = 89.9%, Temperatura żądana = 21.0°C, Min. alarm = 17.0°C, Maks. alarm = 31.0°C.

In the new view, go to the second page and enter the Dampers tab .
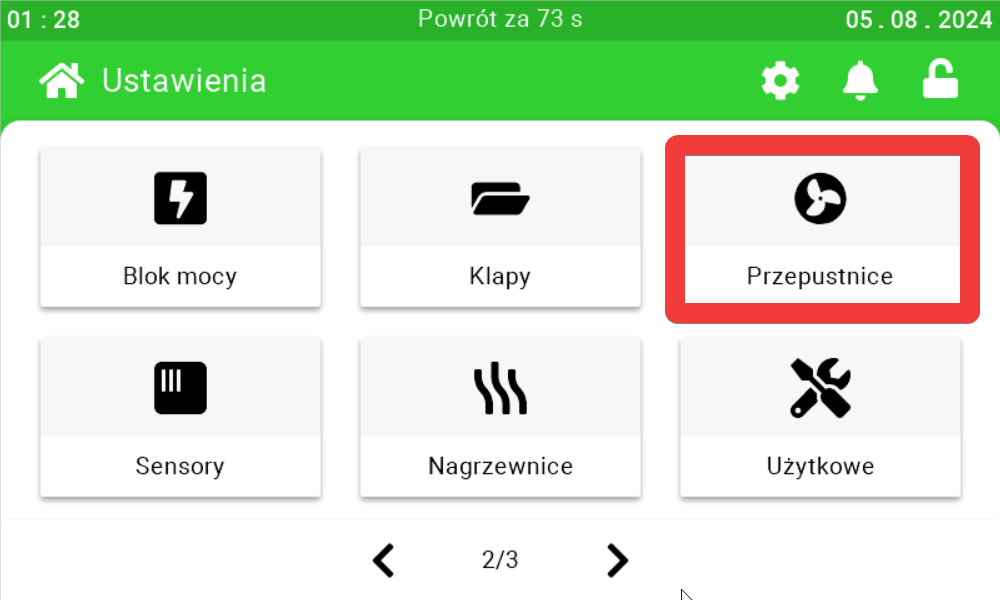
Fetura CLOUD SK-4 climate controller settings menu (Ustawienia, page 2 of 3) with the Przepustnice (Dampers) tile highlighted in red. Page 2/3 contains the tiles: Blok mocy, Klapy, Przepustnice, Sensory, Nagrzewnice, Użytkowe.

On the first page , use the sliders and buttons on their sides to calibrate the dampers.
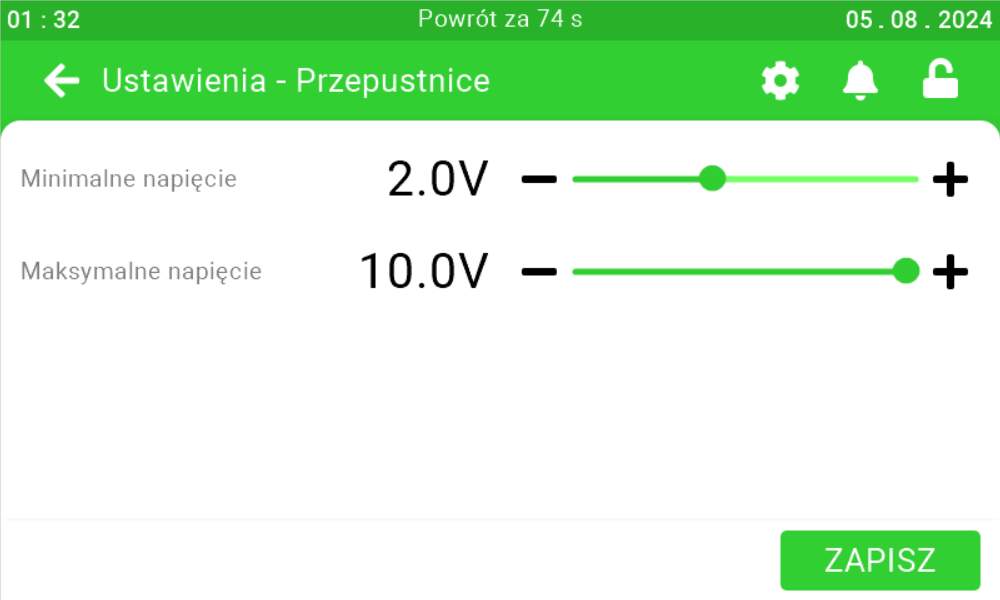
Fetura CLOUD SK-4 damper settings screen (Ustawienia - Przepustnice) with the sliders: Minimalne napięcie = 2.0V and Maksymalne napięcie = 10.0V, each with minus and plus buttons. The green ZAPISZ (Save) button is in the bottom right corner.

Ventilation settings

On this panel it is possible to set the fan speed during ventilation [1], for how long the dampers are to open during ventilation [2], after what time from the opening of electrically controlled dampers the fans are to turn on [3], how many masters are connected to the controller [4], how many chimney fans are connected
[5], after what time the climate in the room is stabilized after a sudden change of at least one parameter [6], at how many degrees higher than the desired temperature the controller is to achieve maximum ventilation [7], at what temperatures the appropriate masters are to turn on [8][9][10].
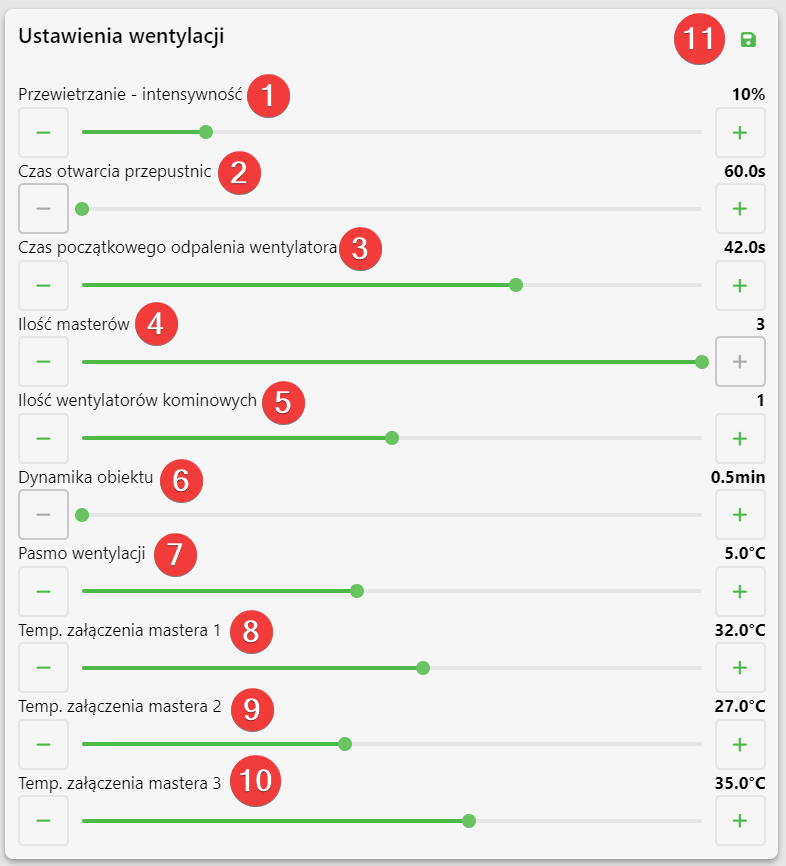
Ventilation settings panel (Ustawienia wentylacji) in Fetura CLOUD with numbered red markers and the values shown on the sliders: Przewietrzanie - intensywność nr 1 = 10%, Czas otwarcia przepustnic nr 2 = 60.0s, Czas początkowego odpalenia wentylatora nr 3 = 42.0s, Ilość masterów nr 4 = 3, Ilość wentylatorów kominowych nr 5 = 1, Dynamika obiektu nr 6 = 0.5min, Pasmo wentylacji nr 7 = 5.0°C, Temp. załączenia mastera 1 nr 8 = 32.0°C, Temp. załączenia mastera 2 nr 9 = 27.0°C, Temp. załączenia mastera 3 nr 10 = 35.0°C, and the green save icon nr 11.

Ventilation settings on the SK-3 controller

Ventilation band and master switch-on temperature

In order to directly set the ventilation band and master switch-on temperature on the controller, click the marked Enter button on the controller.

Photo of the SK-3 climate controller front panel (labelled wesstron STEROWNIK MIKROKLIMATU, sticker SK3 - adr. 3) with the Enter button outlined in a red box, pressed to open the on-device menu. The LCD shows the main screen: first line „00 25  1 czuj. 22.6°”, second line „--- 22.6° --- --- ---”, third line „15.8% 0k. 0m. 31.6%”, bottom line „KNA   Menu   C”. Around the Enter button there are four arrow keys (up, down, left, right). At the bottom of the housing a warning: „Uwaga! Przed zdjęciem obudowy wyłącz zasilanie. / Caution! Disconnect the main supply before removing cover.”

Use the right arrow to go to the User Menu and click Enter.

Photo of the SK-3 climate controller display showing the User Menu screen, with the right arrow button outlined in red, used to move to the next menu item.

Use the right arrow to go to the Ventilation Band menu. Use the down / up arrows to set the ventilation band. Click Enter to save your changes .
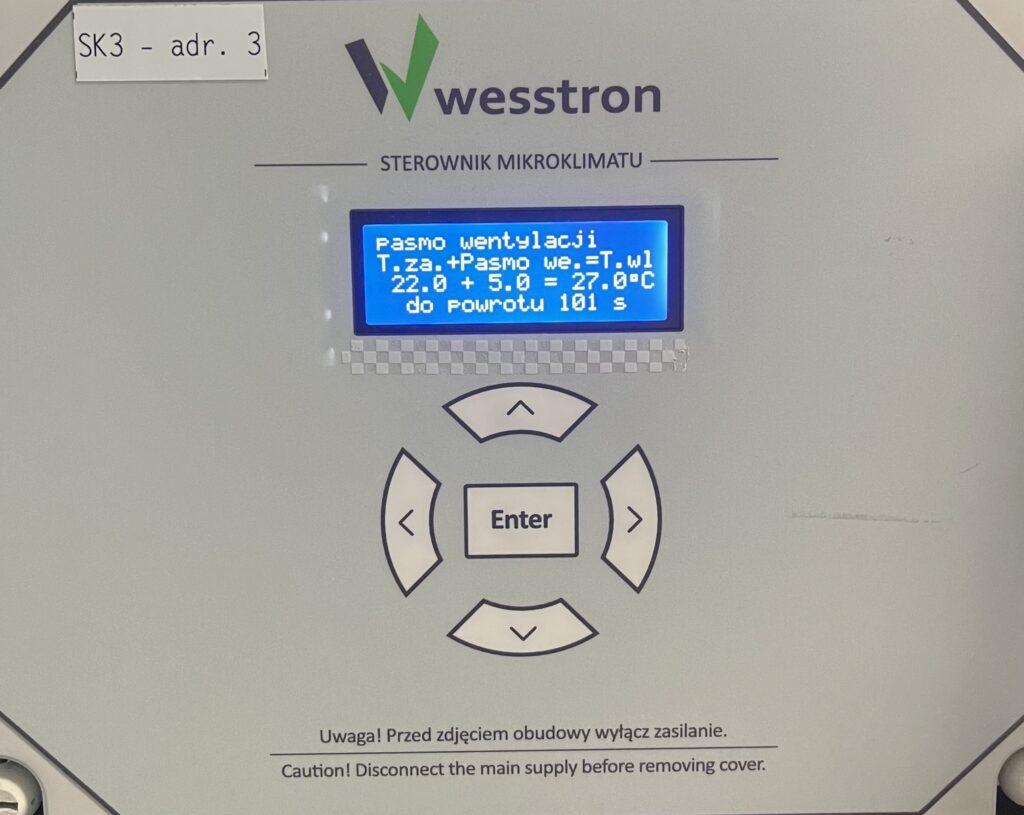
Photo of the SK-3 climate controller display showing the ventilation band screen. The LCD reads: „pasmo wentylacji”, „T.za.+Pasmo we.=T.wl”, „22.0 + 5.0 = 27.0°C”, „do powrotu 101 s” - the temperature of maximum ventilation is the desired temperature plus the ventilation band (here 22.0°C + 5.0°C = 27.0°C). The value is changed with the up and down arrows and confirmed with Enter.

Use the right arrow to go to the menu temp. master on and click Enter.
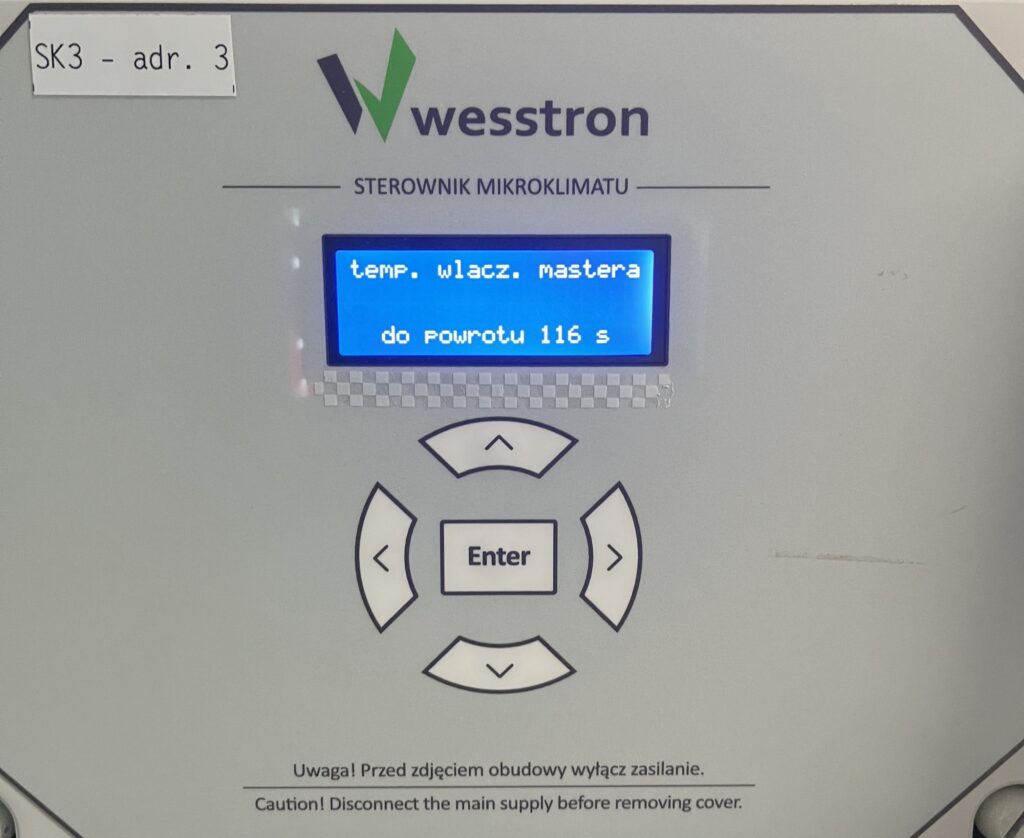
Photo of the SK-3 climate controller display showing the master switch-on temperature menu heading (temp. włacz. mastera), before a value is set.

For each master, set the parameter using the down / up arrows, to move between masters use the left / right arrows. To save the changes , click Enter.

Number of masters, chimney fans and initial fan on time

To set the parameters on the controller directly, click the highlighted Enter button on the controller.

Photo of the SK-3 climate controller front panel (labelled wesstron STEROWNIK MIKROKLIMATU, sticker SK3 - adr. 3) with the Enter button outlined in a red box, pressed to open the on-device menu. The LCD shows the main screen: first line „00 25  1 czuj. 22.6°”, second line „--- 22.6° --- --- ---”, third line „15.8% 0k. 0m. 31.6%”, bottom line „KNA   Menu   C”. Around the Enter button there are four arrow keys (up, down, left, right). At the bottom of the housing a warning: „Uwaga! Przed zdjęciem obudowy wyłącz zasilanie. / Caution! Disconnect the main supply before removing cover.”

Use the right arrow to go to the Installer Menu and click Enter.

Photo of the SK-3 climate controller display showing the Menu instalatora (Installer Menu) screen, reached from the User Menu.

Use the right arrow to go to the throttle opening time menu, then use the down / up arrows to change the value of the parameter. Click the Enter button to save the changes.
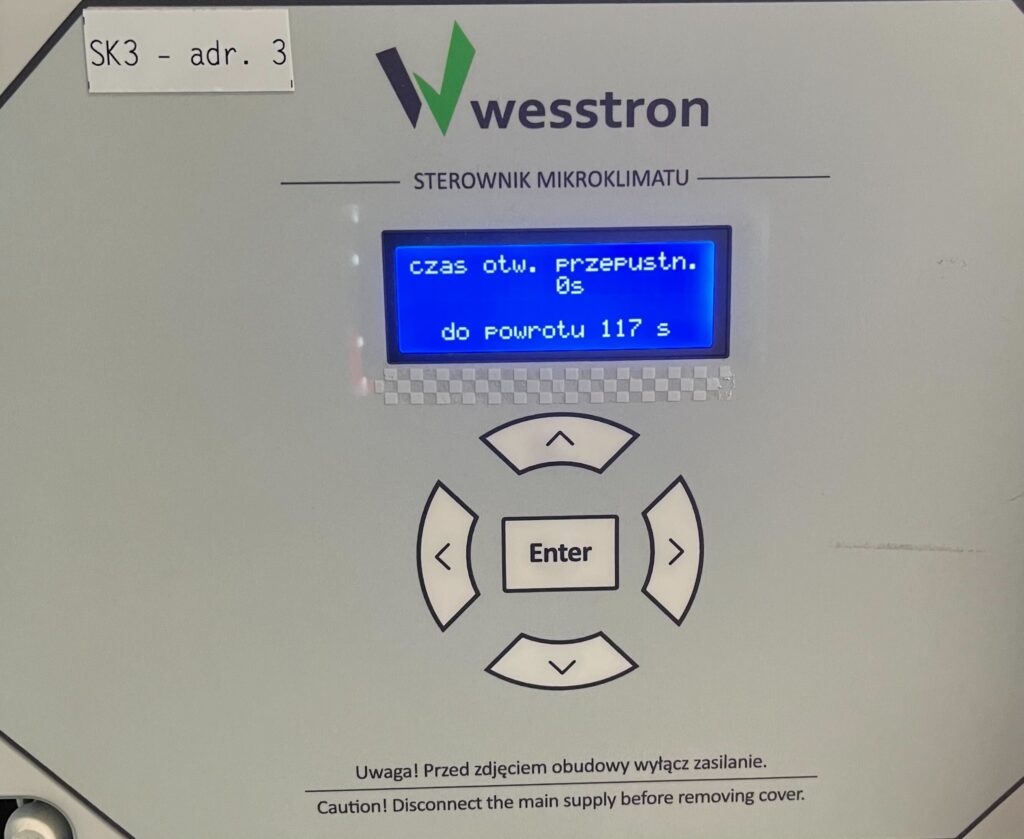
Photo of the SK-3 climate controller display showing the damper opening time screen (czas otw. przepustn.) set to 0 seconds.

Use the right arrow to go to the number of masters menu, then use the down / up arrows to change the number of masters. Click the Enter button to save your changes.
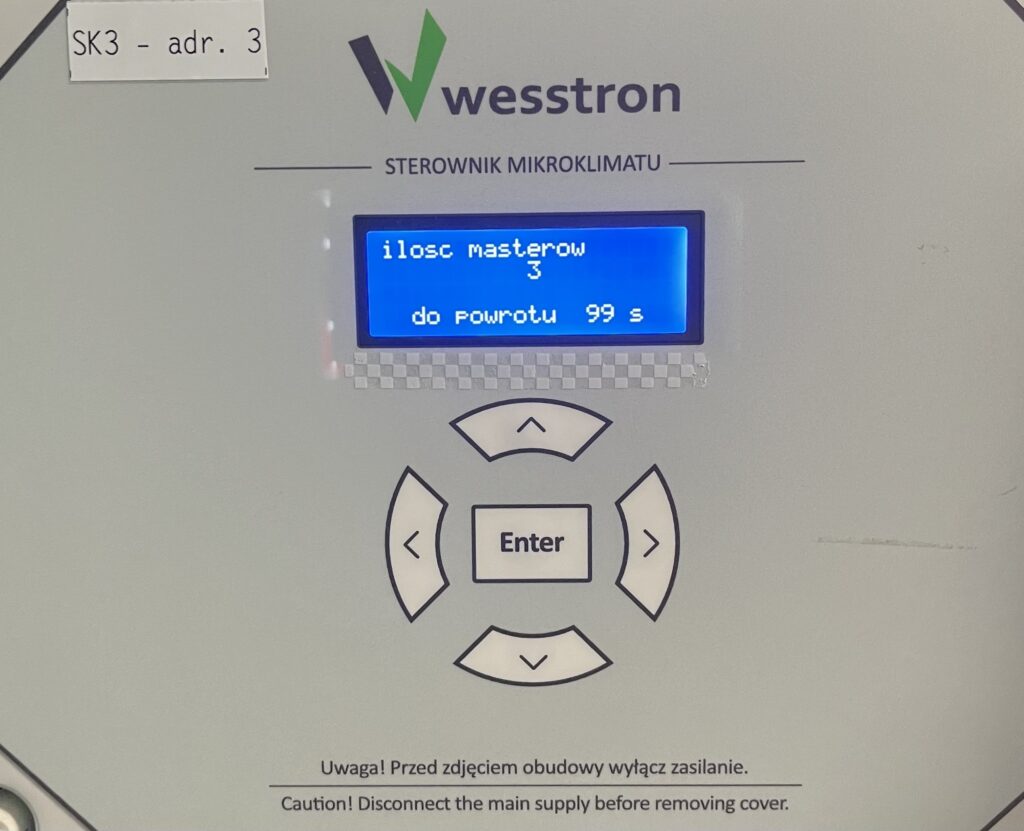
Photo of the SK-3 climate controller display showing the number of masters screen (ilość masterów) set to 3.

Use the right arrow to go to the number of chimneys menu, then use the down / up arrows to change the number of chimneys. Click the Enter button to save your changes.
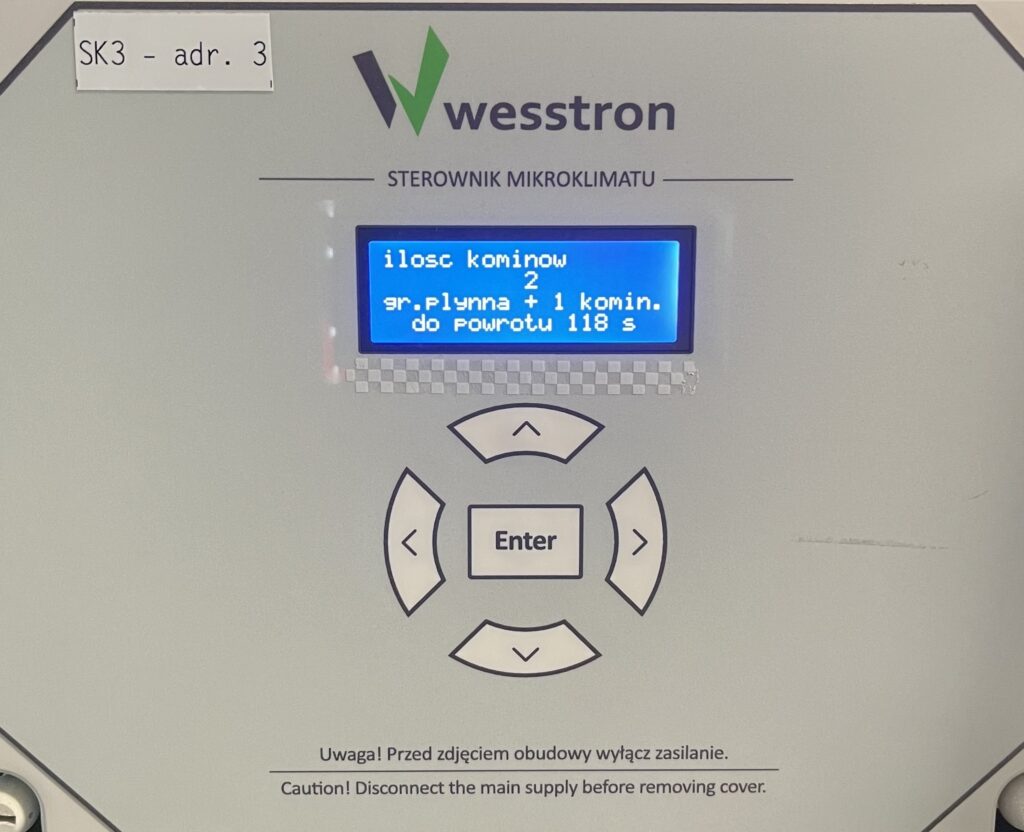
Photo of the SK-3 climate controller display showing the number of chimney fans screen (ilość kominów) set to 2, one liquid group plus one chimney fan.

Ventilation settings on the SK-4 controller

In order to directly set ventilation settings on the SK-4 controller, you need to log on the climate controller. To do this, click the highlighted item.

Fetura CLOUD SK-4 climate controller touchscreen main view (Ogólne) with the padlock icon in the top right marked by a red arrow, tapped to log in. The screen shows six tiles: Tryb pracy = Automat, Średnia temperatura = 25.6°C, Wentylacja = 89.9% with 2 fan groups, Temperatura żądana = 21.0°C, Min. alarm = 17.0°C, Maks. alarm = 31.0°C. The bottom navigation bar contains: Ogólne, Wentylacja, Sensory, Chłodzenie, Grzanie, and a MYCIE tab is docked on the left edge; the top bar shows the clock, date, a bell icon and the padlock.

Enter the PIN you set, or swipe your card to log in.

Fetura CLOUD SK-4 climate controller Login dialog opened from the padlock icon: on the left a numeric keypad with digits 0-9 and a backspace key, on the right the field „Użytkownik” set to „Service” (dropdown with the available users) and the field „Wprowadź pin” next to the alternative „lub przyłóż kartę” with a card icon. The bottom navigation bar (Ogólne, Wentylacja, Sensory, Chłodzenie, Grzanie) stays visible behind the dialog.

Once you have logged in correctly, a gear icon will appear. Click it to go to the climate controller settings.

Fetura CLOUD SK-4 climate controller main view after logging in, with a red arrow pointing to the gear (settings) icon that has appeared in the top bar next to the bell and the open padlock; the top bar also shows the automatic logout countdown „Wylogowanie za 73 s”. The tiles now have arrows for editing and show: Tryb pracy = Automat, Średnia temperatura = 25.7°C, Wentylacja = 89.9%, Temperatura żądana = 21.0°C, Min. alarm = 17.0°C, Maks. alarm = 31.0°C.

In the new view, go to the Ventilation tab .
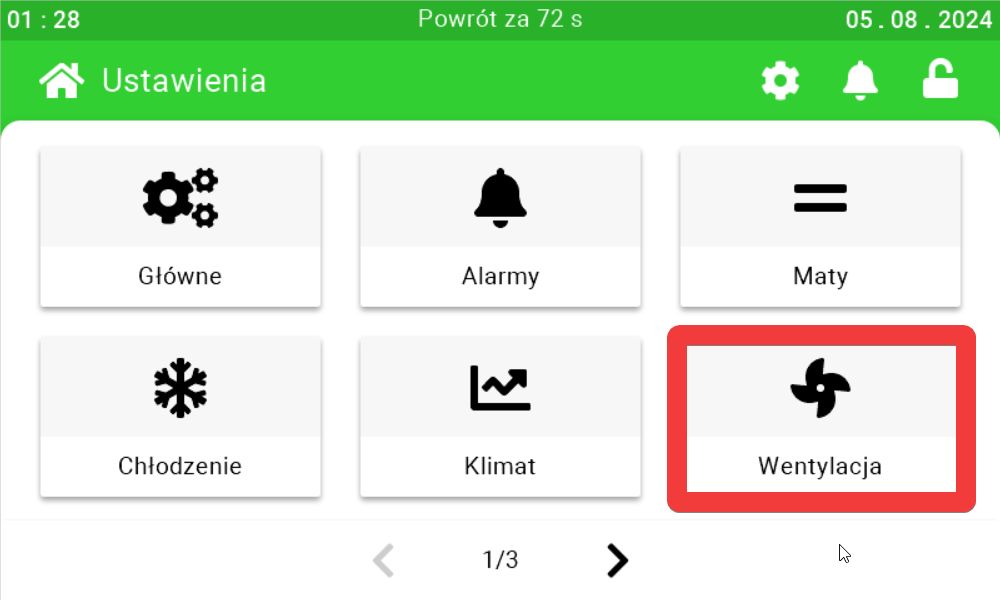
Fetura CLOUD SK-4 climate controller settings menu (Ustawienia, page 1 of 3) with the Wentylacja (Ventilation) tile highlighted in red. Page 1/3 contains the tiles: Główne, Alarmy, Maty, Chłodzenie, Klimat, Wentylacja.

Use the sliders and buttons on their sides to configure the ventilation.
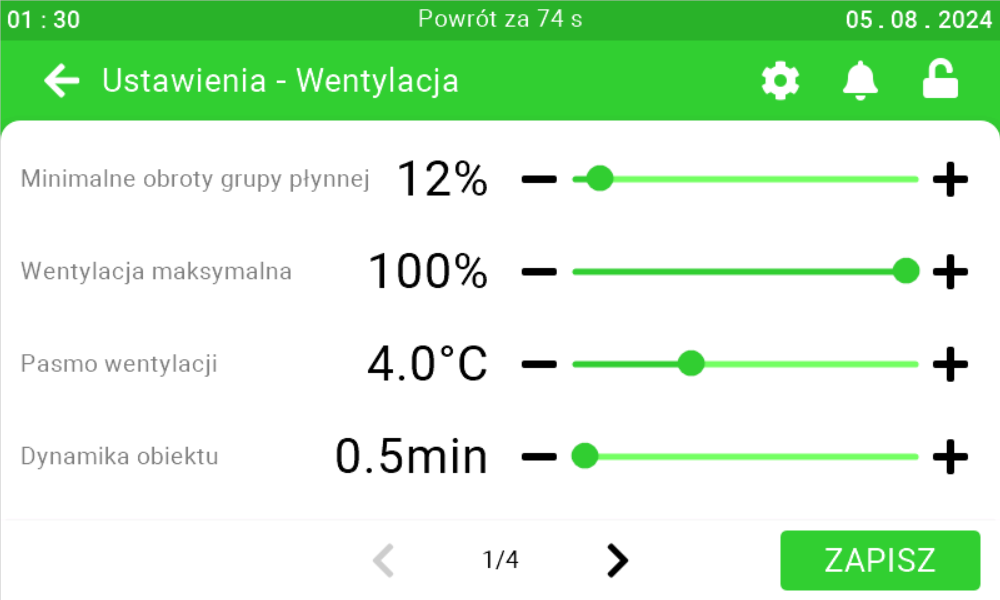
Fetura CLOUD SK-4 ventilation settings screen (Ustawienia - Wentylacja, page 1 of 4) with the sliders: Minimalne obroty grupy płynnej = 12%, Wentylacja maksymalna = 100%, Pasmo wentylacji = 4.0°C, Dynamika obiektu = 0.5min. The green ZAPISZ (Save) button is in the bottom right corner.

Go to the third and fourth pages to configure the masters, ventilation delay and fan start-up time.
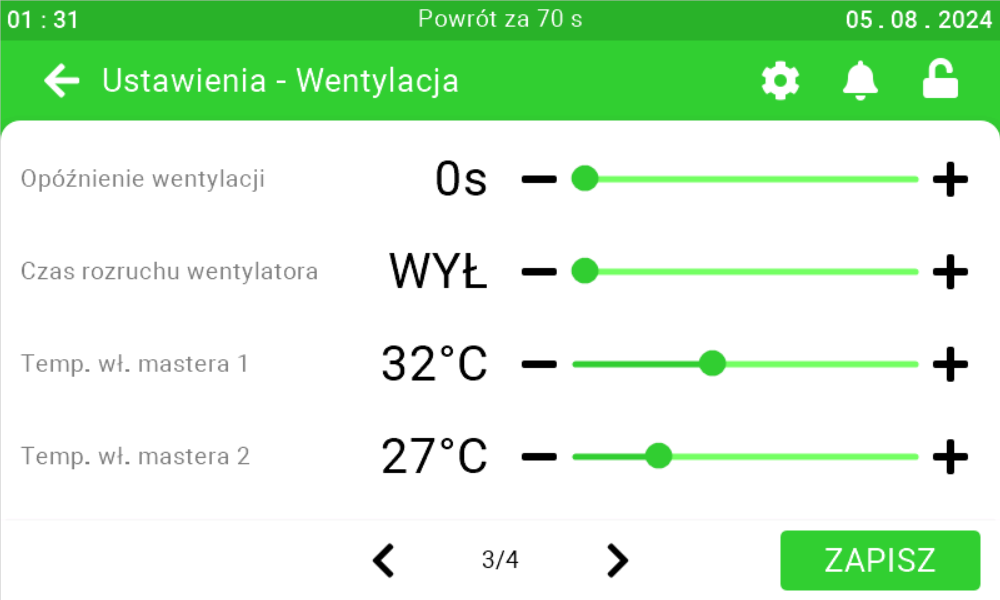
Fetura CLOUD SK-4 ventilation settings screen (Ustawienia - Wentylacja, page 3 of 4) with the sliders: Opóźnienie wentylacji = 0s, Czas rozruchu wentylatora = WYŁ (off), Temp. wł. mastera 1 = 32°C, Temp. wł. mastera 2 = 27°C. The green ZAPISZ (Save) button is in the bottom right corner.

Venting

On this panel, you can set whether the controller is to enter the ventilation mode [1],
what is the duration of ventilation operation [2], how long is the interval between ventilation activations [3], with what power the fans are to operate in ventilation mode [4]. After setting the parameters, click the save button [5].

Special case
If the operating time is set to 0s, the controller will not exit the ventilation mode until the temperature stabilizes.
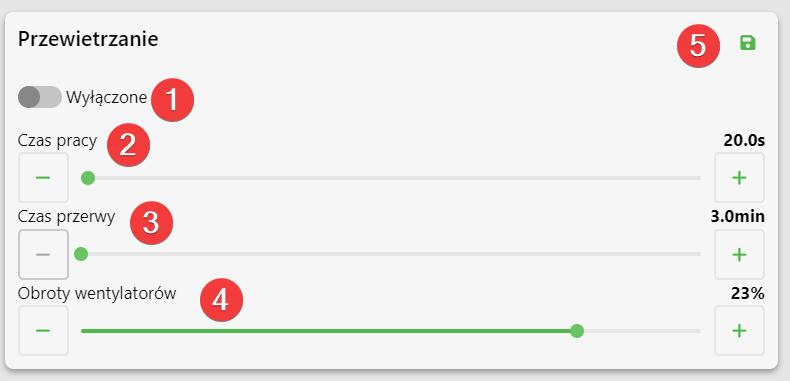
Venting (airing) settings panel (Przewietrzanie) in Fetura CLOUD with a toggle nr 1 currently set to „Wyłączone” (off) that enables venting mode, and the values shown on the sliders: Czas pracy nr 2 = 20.0s, Czas przerwy nr 3 = 3.0min, Obroty wentylatorów nr 4 = 23%, and the green save icon nr 5 in the top right corner.

Ventilation settings

To set the parameters on the controller directly, click the highlighted Enter button on the controller.

Photo of the SK-3 climate controller front panel (labelled wesstron STEROWNIK MIKROKLIMATU, sticker SK3 - adr. 3) with the Enter button outlined in a red box, pressed to open the on-device menu. The LCD shows the main screen: first line „00 25  1 czuj. 22.6°”, second line „--- 22.6° --- --- ---”, third line „15.8% 0k. 0m. 31.6%”, bottom line „KNA   Menu   C”. Around the Enter button there are four arrow keys (up, down, left, right). At the bottom of the housing a warning: „Uwaga! Przed zdjęciem obudowy wyłącz zasilanie. / Caution! Disconnect the main supply before removing cover.”

Use the right arrow to go to Venting menu and click Enter.
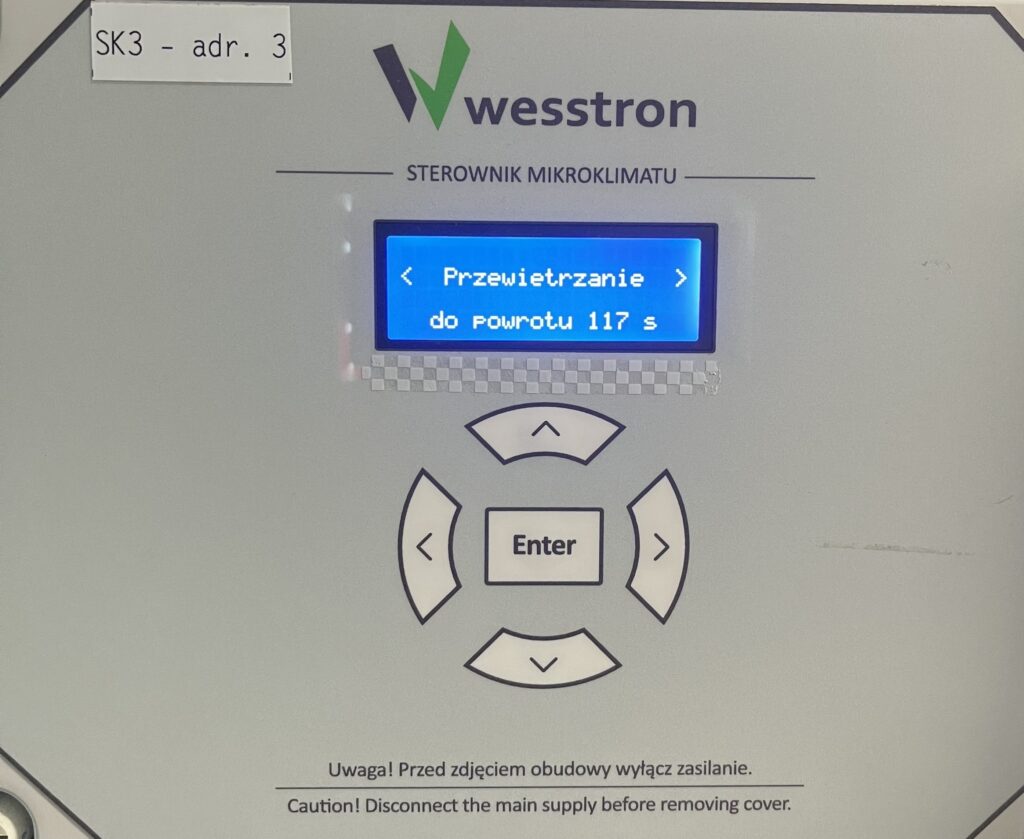
Photo of the SK-3 climate controller display showing the venting menu heading (Przewietrzanie), reached with the right arrow.
Ventilation operating time

Use the down / up arrows to change the ventilation operating time. Click Enter to save the changes.
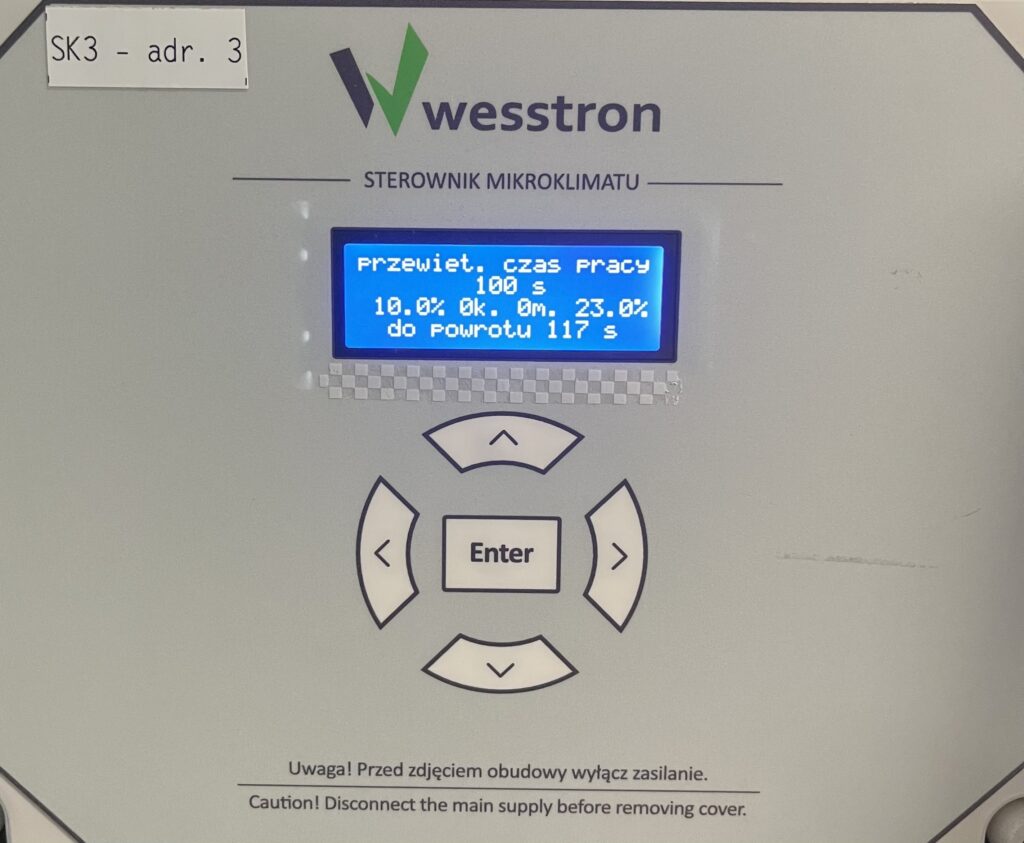
Photo of the SK-3 climate controller display showing the venting operating time screen (Przewiet. czas pracy) set to 100 seconds.
Ventilation interval time

To using the right arrow go to menu lead time . Use the down / up arrows to change the value of the parameter. Click Enter to save the changes.
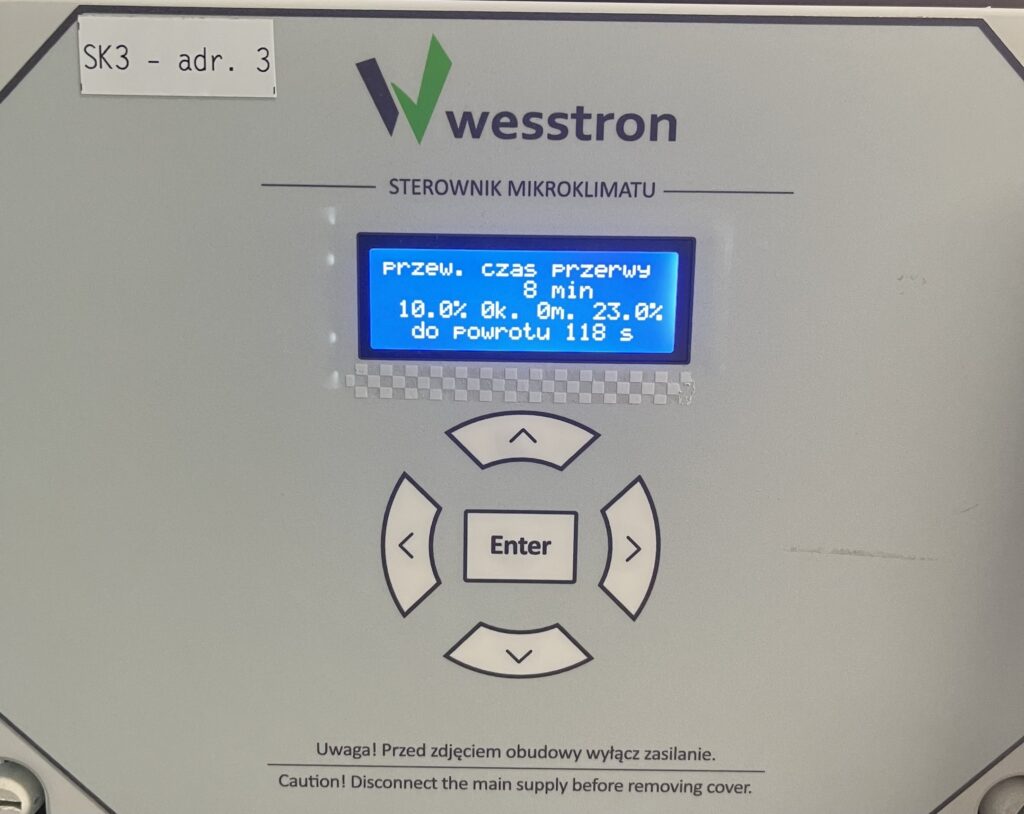
Photo of the SK-3 climate controller display showing the venting interval time screen (Przew. czas przerwy) set to 8 minutes.
Fan rotation

To using the right arrow go to menu vent. speed . Use the down / up arrows to change the value of the parameter. Click Enter to save the changes.
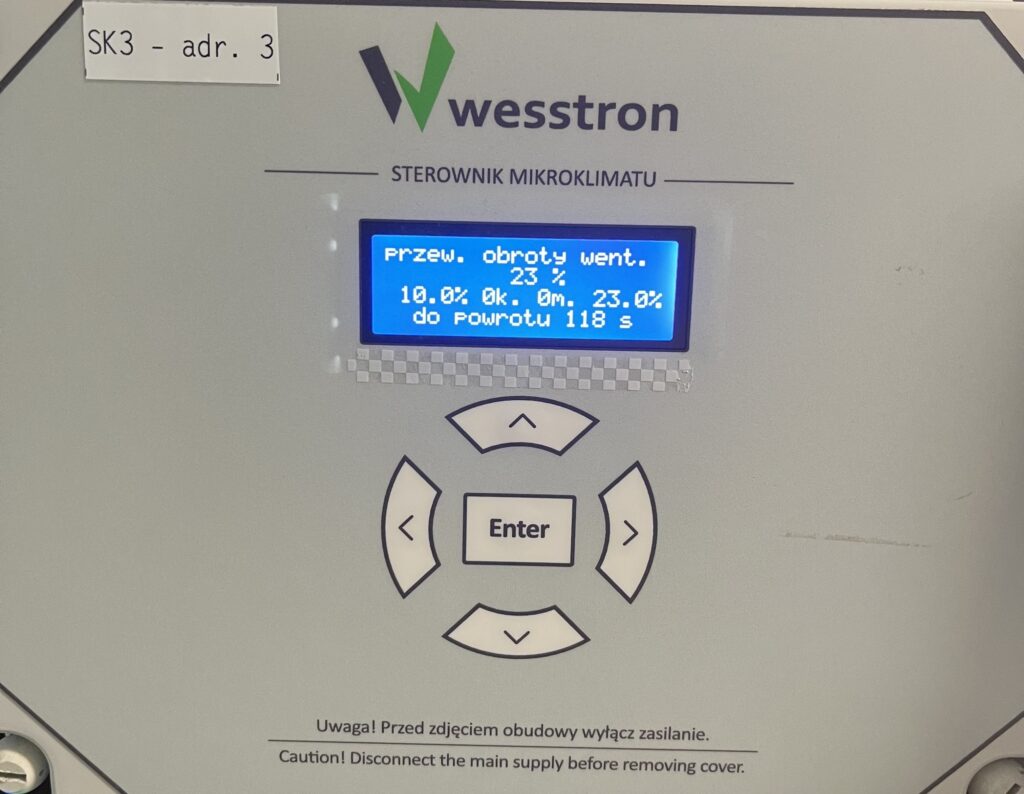
Photo of the SK-3 climate controller display showing the venting fan speed screen (Przew. obroty went.) set to 23 percent.
Turn ventilation on/off

To using the right arrow go to menu ventilate. in/out . Use the down / up arrows to change the value of the parameter. On airing has a value of 1, and off airing has a value of 0. Click Enter to save the changes.
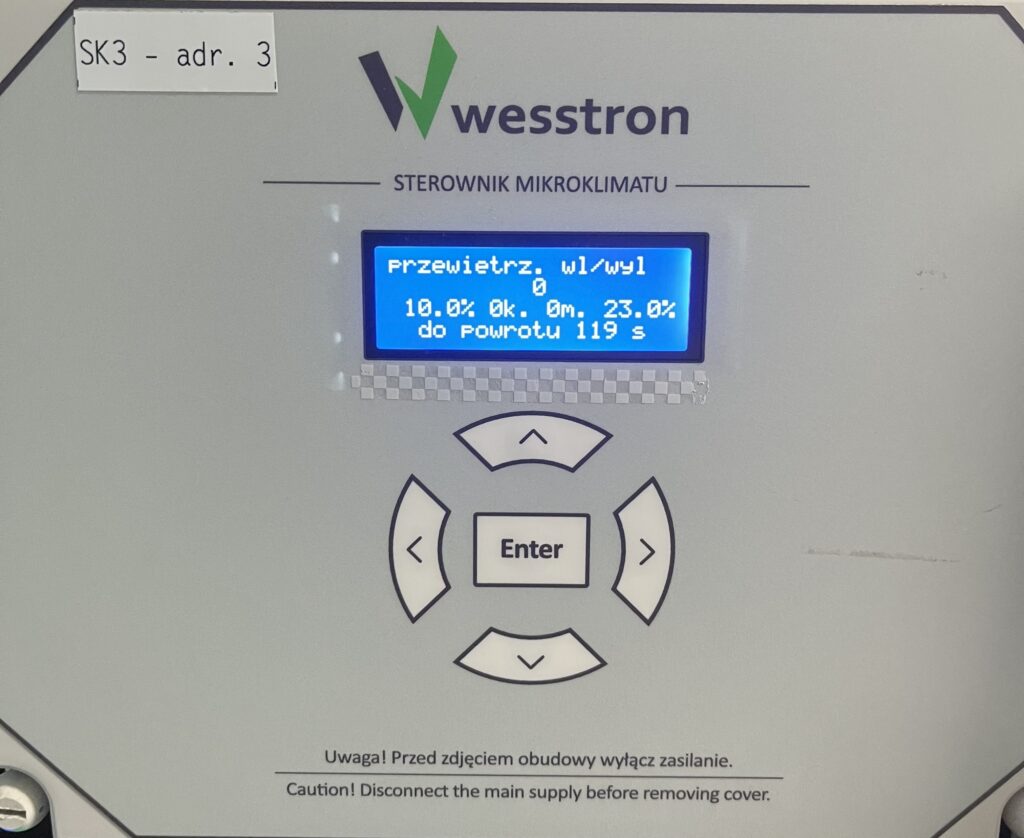
Photo of the SK-3 climate controller display showing the venting on/off screen (Przewietrz. wł/wył) set to 0, meaning venting is turned off.

Ventilation settings on the SK-4 controller

In order to directly set ventilation settings on the SK-4 controller, you need to log on the climate controller. To do this, click the highlighted item.

Fetura CLOUD SK-4 climate controller touchscreen main view (Ogólne) with the padlock icon in the top right marked by a red arrow, tapped to log in. The screen shows six tiles: Tryb pracy = Automat, Średnia temperatura = 25.6°C, Wentylacja = 89.9% with 2 fan groups, Temperatura żądana = 21.0°C, Min. alarm = 17.0°C, Maks. alarm = 31.0°C. The bottom navigation bar contains: Ogólne, Wentylacja, Sensory, Chłodzenie, Grzanie, and a MYCIE tab is docked on the left edge; the top bar shows the clock, date, a bell icon and the padlock.

Enter the PIN you set, or swipe your card to log in.

Fetura CLOUD SK-4 climate controller Login dialog opened from the padlock icon: on the left a numeric keypad with digits 0-9 and a backspace key, on the right the field „Użytkownik” set to „Service” (dropdown with the available users) and the field „Wprowadź pin” next to the alternative „lub przyłóż kartę” with a card icon. The bottom navigation bar (Ogólne, Wentylacja, Sensory, Chłodzenie, Grzanie) stays visible behind the dialog.

Once you have logged in correctly, a gear icon will appear. Click it to go to the climate controller settings.

Fetura CLOUD SK-4 climate controller main view after logging in, with a red arrow pointing to the gear (settings) icon that has appeared in the top bar next to the bell and the open padlock; the top bar also shows the automatic logout countdown „Wylogowanie za 73 s”. The tiles now have arrows for editing and show: Tryb pracy = Automat, Średnia temperatura = 25.7°C, Wentylacja = 89.9%, Temperatura żądana = 21.0°C, Min. alarm = 17.0°C, Maks. alarm = 31.0°C.

In the new view, go to the Ventilation tab .

Fetura CLOUD SK-4 climate controller settings menu (Ustawienia, page 1 of 3) with the Wentylacja (Ventilation) tile highlighted in red. Page 1/3 contains the tiles: Główne, Alarmy, Maty, Chłodzenie, Klimat, Wentylacja.

Go to the second page and use the sliders and buttons on their sides to configure ventilation.
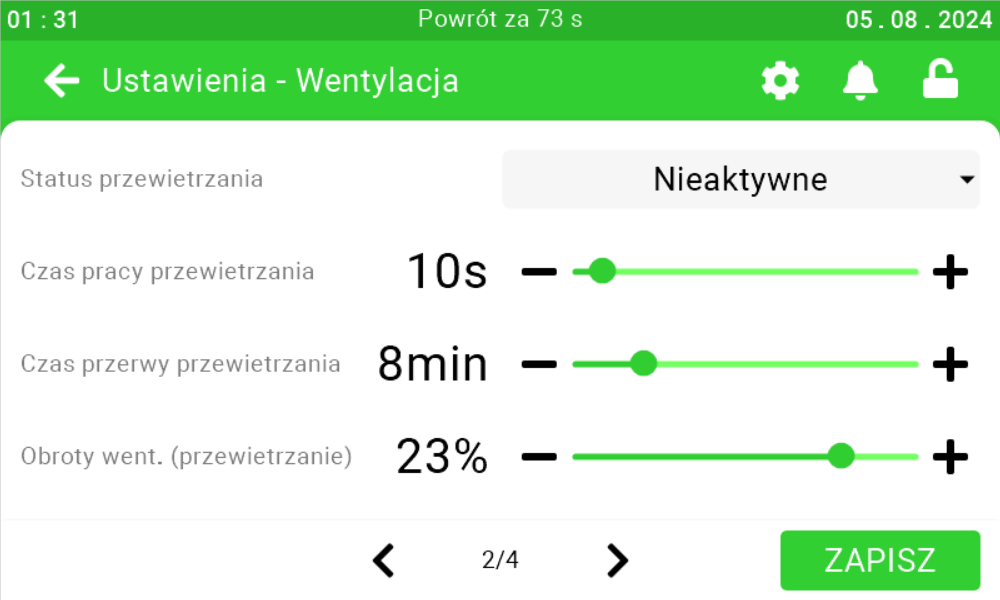
Fetura CLOUD SK-4 ventilation settings screen (Ustawienia - Wentylacja, page 2 of 4) showing the venting parameters: Status przewietrzania as a dropdown set to „Nieaktywne”, Czas pracy przewietrzania = 10s, Czas przerwy przewietrzania = 8min, Obroty went. (przewietrzanie) = 23%. The green ZAPISZ (Save) button is in the bottom right corner.

Electric mat settings

On this panel it is possible to set every how many degrees the level of electric mats should decrease by 1 [1], that is, if the deviation is set to 2, the desired temperature is equal to 20°C, then only when the temperature rises to 22°Cthe power deviation of the mat will decrease by 1 level, if the temperature is equal to 24°Cthe power deviation of the mat will decrease by 2 levels. For mats connected to a specific input, it is possible to change the current day of the curve without changing the day of the climate controller curve [2], and also to change the deviation for selected mats [3].
Attention!
The deviation of the mats is not set for a specific day, instead each day the selected deviation will be set.
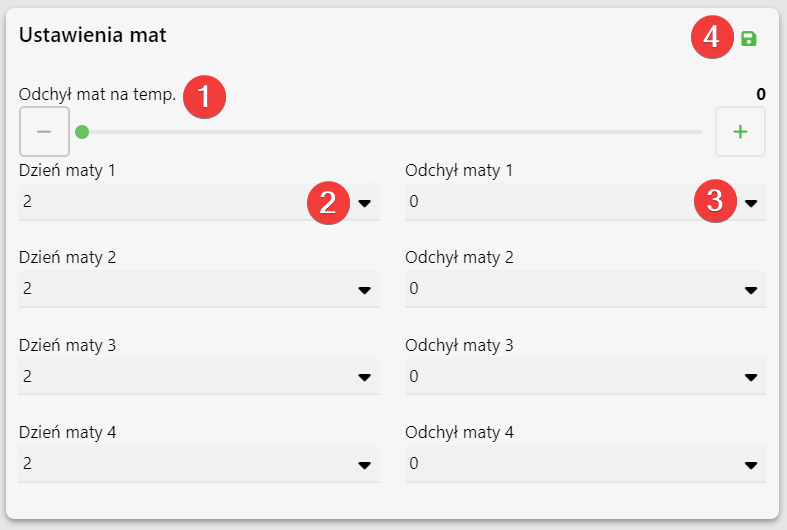
Electric mat settings panel (Ustawienia mat) in Fetura CLOUD with numbered red markers: Odchył mat na temp. nr 1 as a slider set to 0, the Dzień maty dropdowns nr 2 and the Odchył maty dropdowns nr 3, plus the green save icon nr 4. The panel contains a pair of dropdowns for each of the four mats, with the values shown: Dzień maty 1 = 2 and Odchył maty 1 = 0, Dzień maty 2 = 2 and Odchył maty 2 = 0, Dzień maty 3 = 2 and Odchył maty 3 = 0, Dzień maty 4 = 2 and Odchył maty 4 = 0.

Electrical mat settings on the SK-3 controller

To set the parameters on the controller directly, click the highlighted Enter button on the controller.

Photo of the SK-3 climate controller front panel (labelled wesstron STEROWNIK MIKROKLIMATU, sticker SK3 - adr. 3) with the Enter button outlined in a red box, pressed to open the on-device menu. The LCD shows the main screen: first line „00 25  1 czuj. 22.6°”, second line „--- 22.6° --- --- ---”, third line „15.8% 0k. 0m. 31.6%”, bottom line „KNA   Menu   C”. Around the Enter button there are four arrow keys (up, down, left, right). At the bottom of the housing a warning: „Uwaga! Przed zdjęciem obudowy wyłącz zasilanie. / Caution! Disconnect the main supply before removing cover.”

Use the right arrow to go to the Mat Menu and click Enter.
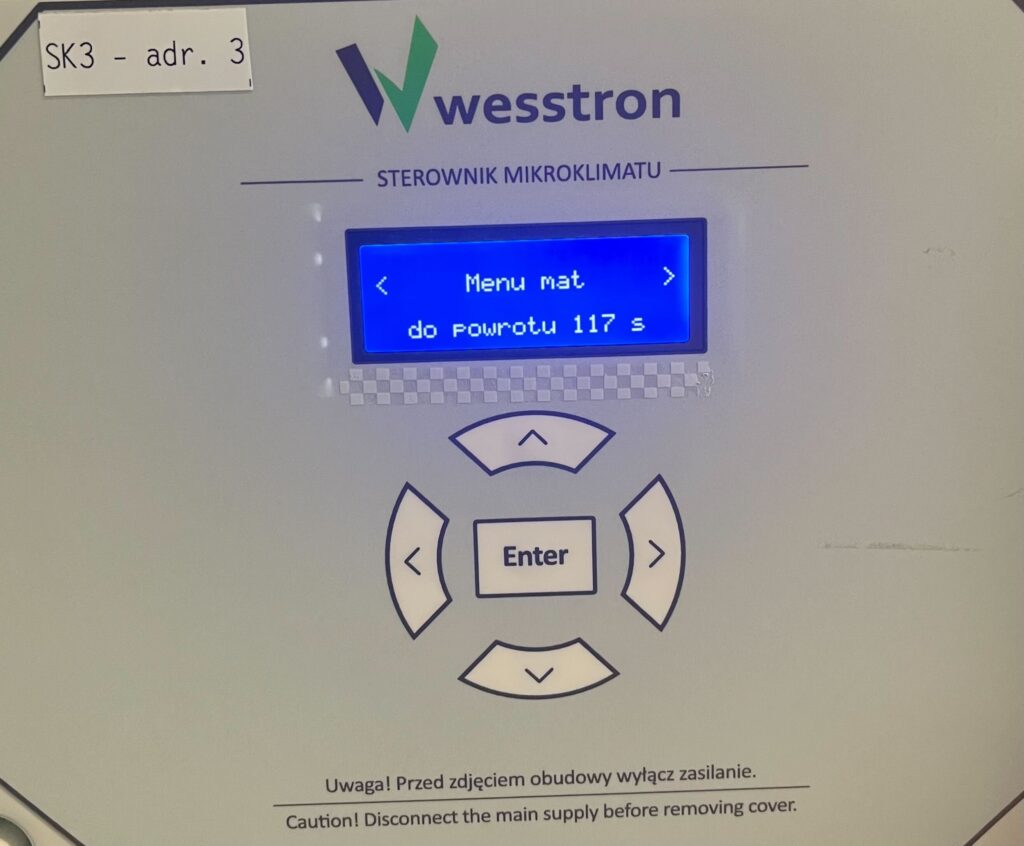
Photo of the SK-3 climate controller display showing the Menu mat (Mat menu) heading, reached from the User Menu.

Use the down / up arrows to select which parameter you want to change, then click the right arrow to select on which mat you want to change the parameter value. To save the changes , click Enter.
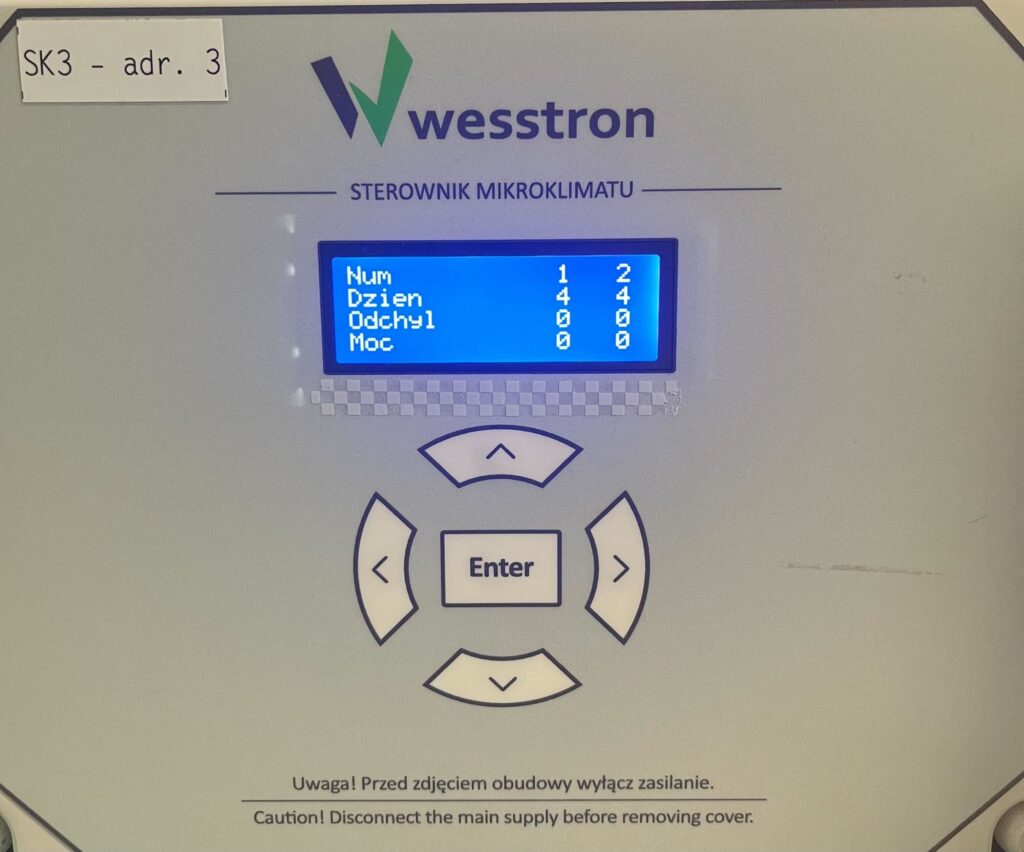
Photo of the SK-3 climate controller display showing the electric mat parameters for two mats as a table. The LCD reads column by column: „Num 1 2”, „Dzien 4 4”, „Odchyl 0 0”, „Moc 0 0” - that is mat number, curve day (Dzien), deviation (Odchyl) and power (Moc) for mat 1 and mat 2. Values are changed with the up and down arrows and confirmed with Enter.

Electrical mat settings on the SK-4 controller

In order to directly set the settings of the electrical mats on the SK-4 controller, you need to log on the climate controller. To do this, click the highlighted item.

Fetura CLOUD SK-4 climate controller touchscreen main view (Ogólne) with the padlock icon in the top right marked by a red arrow, tapped to log in. The screen shows six tiles: Tryb pracy = Automat, Średnia temperatura = 25.6°C, Wentylacja = 89.9% with 2 fan groups, Temperatura żądana = 21.0°C, Min. alarm = 17.0°C, Maks. alarm = 31.0°C. The bottom navigation bar contains: Ogólne, Wentylacja, Sensory, Chłodzenie, Grzanie, and a MYCIE tab is docked on the left edge; the top bar shows the clock, date, a bell icon and the padlock.

Enter the PIN you set, or swipe your card to log in.

Fetura CLOUD SK-4 climate controller Login dialog opened from the padlock icon: on the left a numeric keypad with digits 0-9 and a backspace key, on the right the field „Użytkownik” set to „Service” (dropdown with the available users) and the field „Wprowadź pin” next to the alternative „lub przyłóż kartę” with a card icon. The bottom navigation bar (Ogólne, Wentylacja, Sensory, Chłodzenie, Grzanie) stays visible behind the dialog.

Once you have logged in correctly, a gear icon will appear. Click it to go to the climate controller settings.

Fetura CLOUD SK-4 climate controller main view after logging in, with a red arrow pointing to the gear (settings) icon that has appeared in the top bar next to the bell and the open padlock; the top bar also shows the automatic logout countdown „Wylogowanie za 73 s”. The tiles now have arrows for editing and show: Tryb pracy = Automat, Średnia temperatura = 25.7°C, Wentylacja = 89.9%, Temperatura żądana = 21.0°C, Min. alarm = 17.0°C, Maks. alarm = 31.0°C.

In the new view, go to the Mats tab .
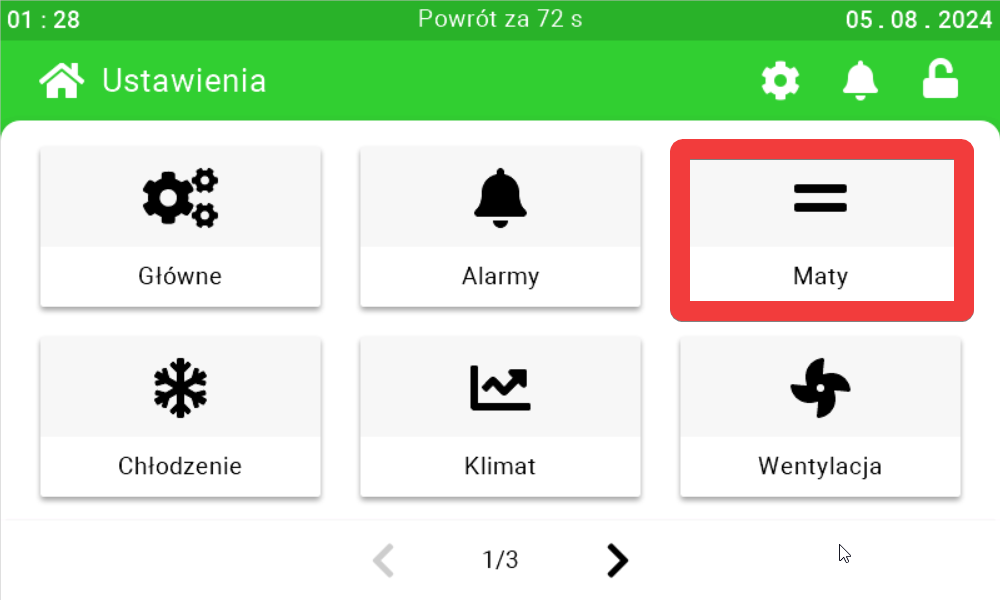
Fetura CLOUD SK-4 climate controller settings menu (Ustawienia, page 1 of 3) with the Maty (Mats) tile highlighted in red. Page 1/3 contains the tiles: Główne, Alarmy, Maty, Chłodzenie, Klimat, Wentylacja.

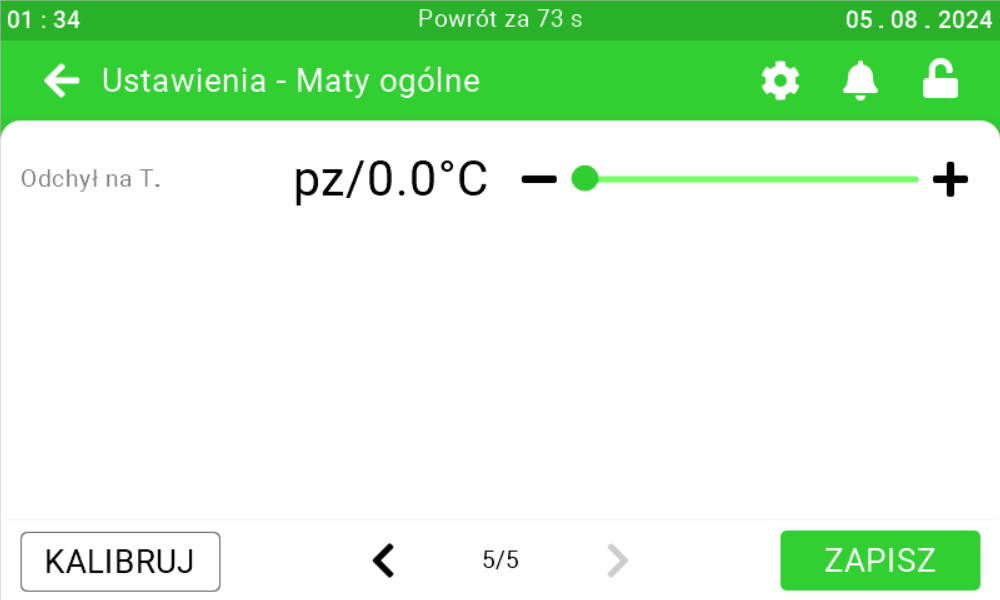
Go to the second page and use the sliders and buttons on their sides to configure the electric mats. Each mat is configured on a separate page. On the last page, it is possible to configure the temperature deflection of the mats.
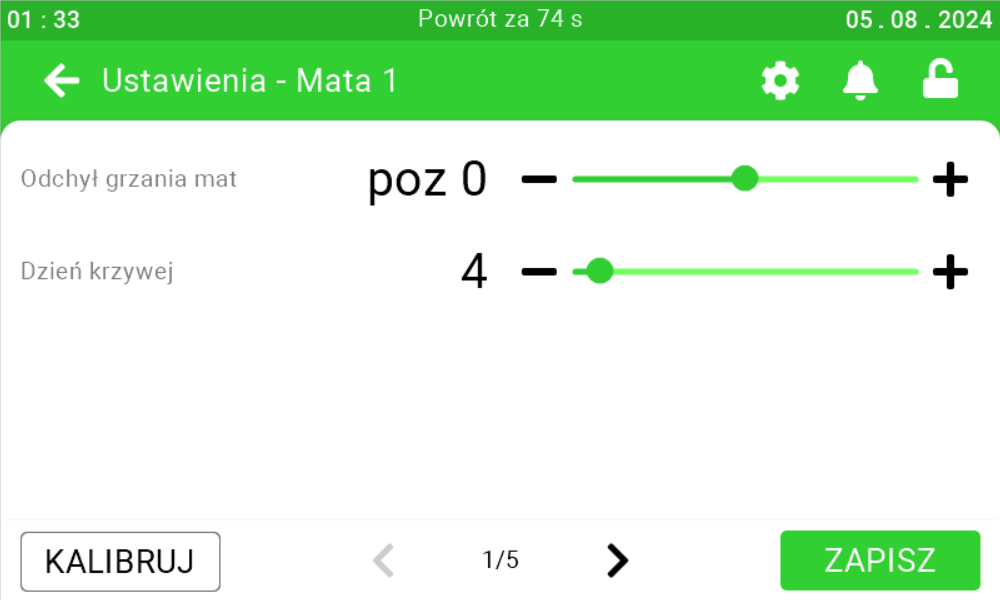
Fetura CLOUD SK-4 Mata 1 settings screen (Ustawienia - Mata 1, page 1 of 5) with the sliders: Odchył grzania mat = poz 0 and Dzień krzywej = 4. The KALIBRUJ (Calibrate) button is in the bottom left corner and the green ZAPISZ (Save) button in the bottom right; pages 2 to 5 hold the settings of the remaining mats and the general mat settings.
Fetura CLOUD SK-4 Maty ogólne (General mats) settings screen (page 5 of 5) showing the deviation-per-temperature slider, with a Kalibruj (Calibrate) button and a Zapisz (Save) button.

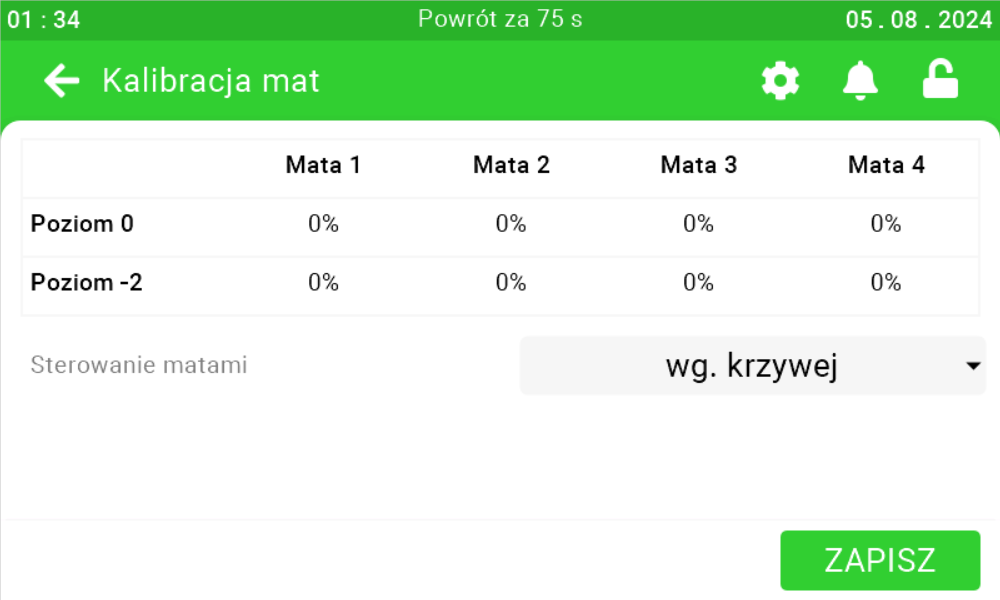
If there is a need to calibrate the mats, click the highlighted button and calibrate the mats accordingly.
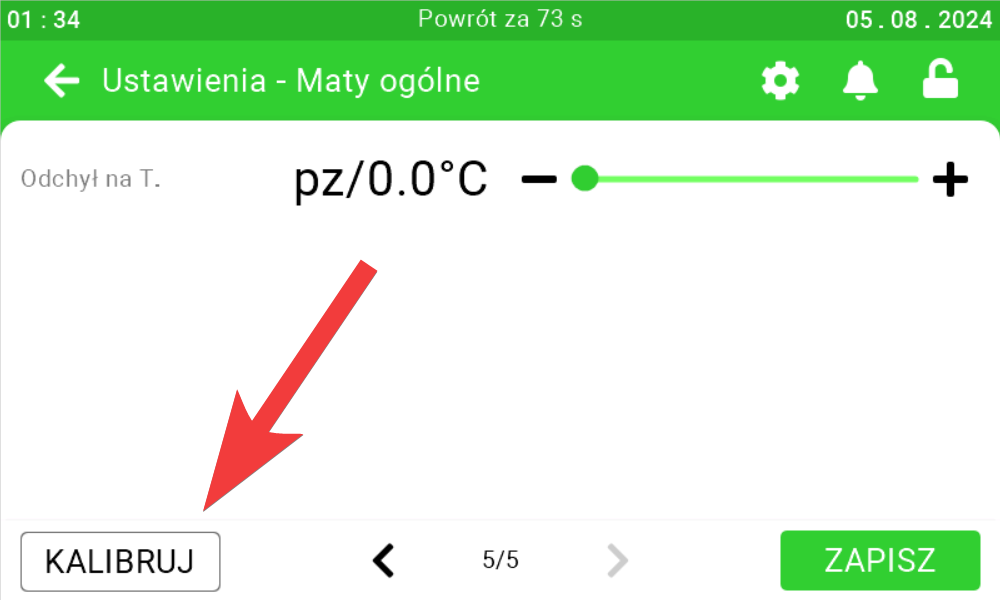
Fetura CLOUD SK-4 Maty ogólne (General mats) settings screen (page 5 of 5) with a red arrow pointing to the Kalibruj (Calibrate) button, used to open mat calibration.
Fetura CLOUD Kalibracja mat (Mat calibration) screen on the SK-4 with a table whose columns are Mata 1, Mata 2, Mata 3 and Mata 4 and whose rows are the power levels Poziom 0 and Poziom -2; in this example every cell is set to 0%. Below the table the dropdown Sterowanie matami (Mat control) is set to „wg. krzywej” (according to the curve) and the green ZAPISZ (Save) button is in the bottom right corner.

Water mat settings

On this panel it is possible to set at what temperature the floor temperature alarm will be set too low [1], at what temperature the floor temperature alarm will be set too high [2], what the floor temperature should be [3], by how much higher
the desired floor temperature should be for each day of the curve [4], by how much
the desired floor temperature should decrease if the air temperature is higher
than the floor temperature by a specific number of degrees [5]. If you set the deviation of the water mats for the temperature to 1°Cand the air temperature increases by 2°Cthen the desired floor temperature will decrease by twice the set deviation, which in this case is 2°C, if the deviation was set to 1.2°Cthen the desired temperature would decrease by 2.4°C. The dynamics of the collector [6] determines how long it takes for the temperature indicated by the third sensor to stabilize from the moment the position of the three-way valve is changed. In order to protect against too high a floor temperature, the maximum collector temperature [7] should be specified 2 – 6 degrees higher than the desired floor temperature. If the supply manifold sensor is not located directly
after the three-way valve, or the water flow in the floor is too slow, unstable operation of the controller may occur. In this case, reduce the valve voltage control resolution [8] to 25%, and if this does not help then even lower. For the instantaneous control factor [9], follow the same procedure. After setting the parameters, click the save button [10].
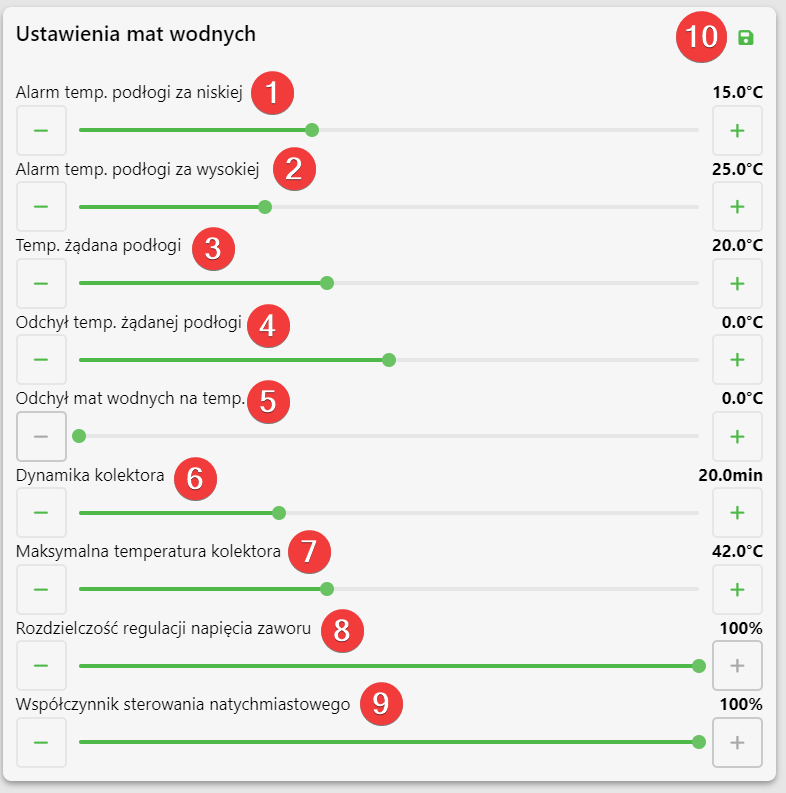
Water mat settings panel (Ustawienia mat wodnych) in Fetura CLOUD with numbered red markers and the values shown on the sliders: Alarm temp. podłogi za niskiej nr 1 = 15.0°C, Alarm temp. podłogi za wysokiej nr 2 = 25.0°C, Temp. żądana podłogi nr 3 = 20.0°C, Odchył temp. żądanej podłogi nr 4 = 0.0°C, Odchył mat wodnych na temp. nr 5 = 0.0°C, Dynamika kolektora nr 6 = 20.0min, Maksymalna temperatura kolektora nr 7 = 42.0°C, Rozdzielczość regulacji napięcia zaworu nr 8 = 100%, Współczynnik sterowania natychmiastowego nr 9 = 100%, and the green save icon nr 10.

Water mat settings on the SK-3 controller

Collector dynamics

To set the collector dynamics on the controller directly, click the highlighted Enter button on the controller.

Photo of the SK-3 climate controller front panel (labelled wesstron STEROWNIK MIKROKLIMATU, sticker SK3 - adr. 3) with the Enter button outlined in a red box, pressed to open the on-device menu. The LCD shows the main screen: first line „00 25  1 czuj. 22.6°”, second line „--- 22.6° --- --- ---”, third line „15.8% 0k. 0m. 31.6%”, bottom line „KNA   Menu   C”. Around the Enter button there are four arrow keys (up, down, left, right). At the bottom of the housing a warning: „Uwaga! Przed zdjęciem obudowy wyłącz zasilanie. / Caution! Disconnect the main supply before removing cover.”

Use the right arrow to go to the Installer Menu and click Enter.

Photo of the SK-3 climate controller display showing the Menu instalatora (Installer Menu) screen, reached from the User Menu.

Use the right arrow to go to the menu param. mat water collector dynamics and click Enter.
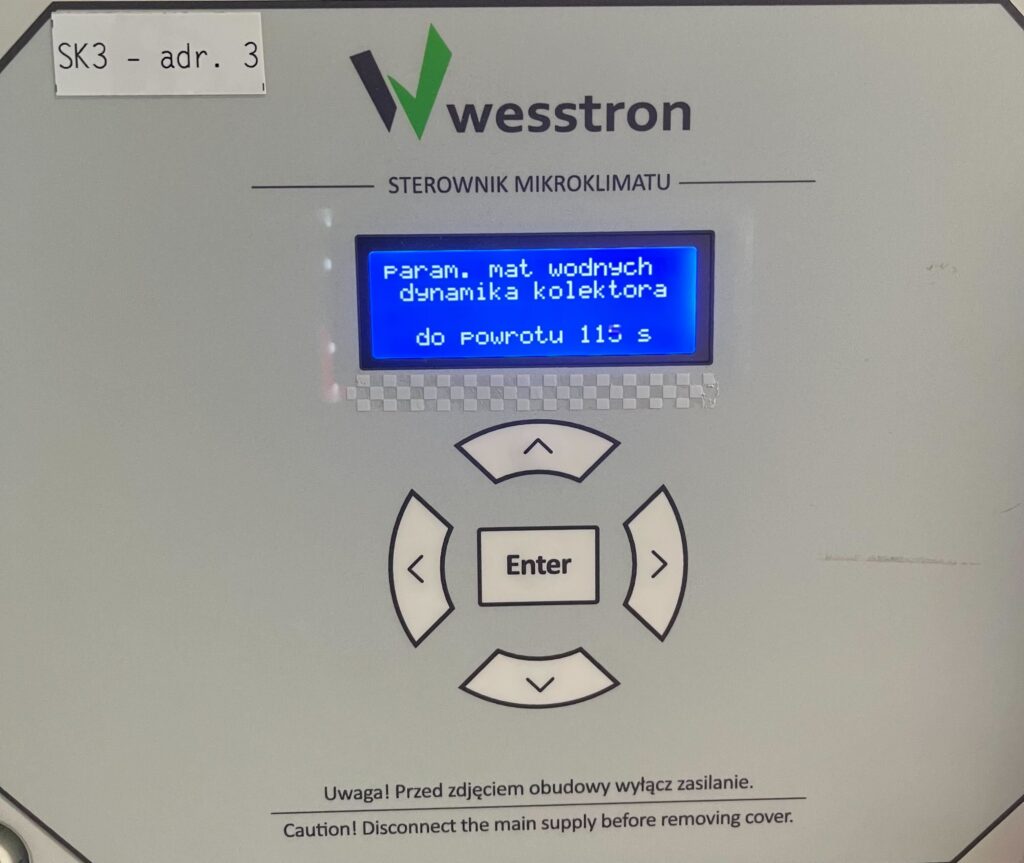
Photo of the SK-3 climate controller display showing the water mat parameters menu heading, positioned at collector dynamics (param. mat wodnych, dynamika kolektora).

Use the down / up arrows to set the collector dynamic time.
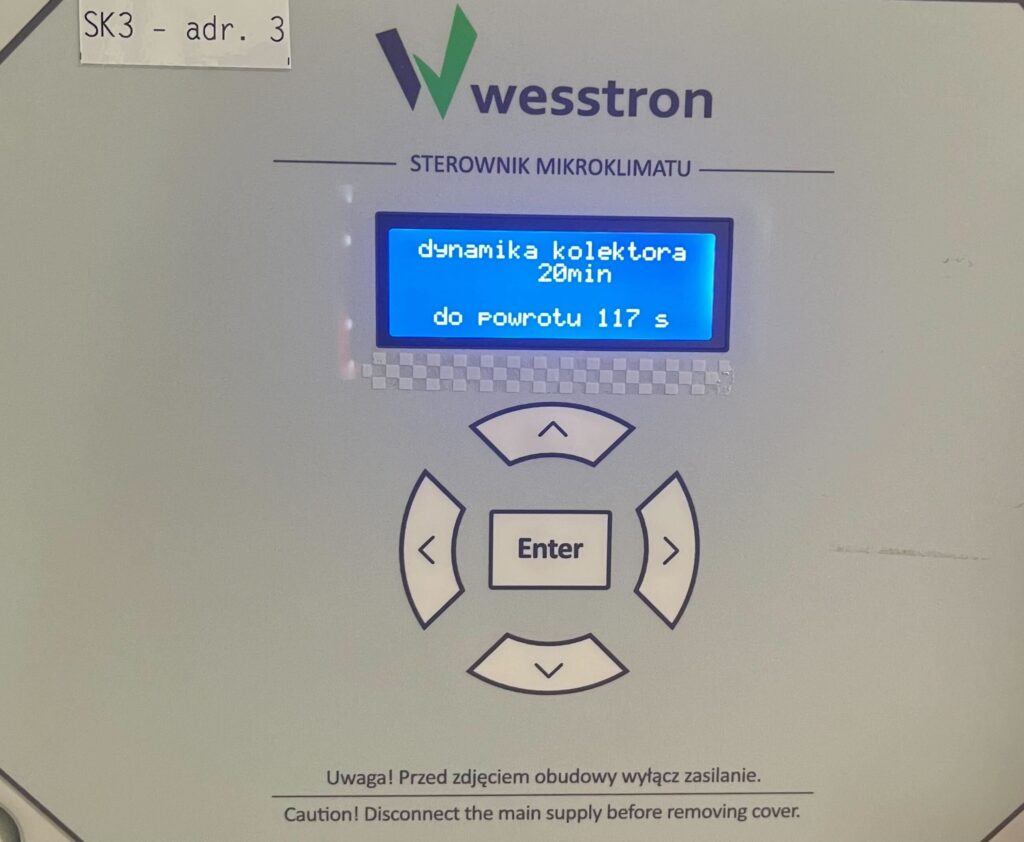
Photo of the SK-3 climate controller display showing the collector dynamics screen (dynamika kolektora) set to 20 minutes.
Alarms and floor temperature

To directly set parameters on the controller, click the highlighted Enter button on the controller.

Photo of the SK-3 climate controller front panel (labelled wesstron STEROWNIK MIKROKLIMATU, sticker SK3 - adr. 3) with the Enter button outlined in a red box, pressed to open the on-device menu. The LCD shows the main screen: first line „00 25  1 czuj. 22.6°”, second line „--- 22.6° --- --- ---”, third line „15.8% 0k. 0m. 31.6%”, bottom line „KNA   Menu   C”. Around the Enter button there are four arrow keys (up, down, left, right). At the bottom of the housing a warning: „Uwaga! Przed zdjęciem obudowy wyłącz zasilanie. / Caution! Disconnect the main supply before removing cover.”

Use the right arrow to go to the User Menu and click Enter.

Photo of the SK-3 climate controller display showing the User Menu screen, with the right arrow button outlined in red, used to move to the next menu item.
Water mats deviation to temperature

Again use the right arrow to access the menu deviation of mats for temp. water mats and use the down / up arrows to change the value of the parameter. Click Enter to save your changes.
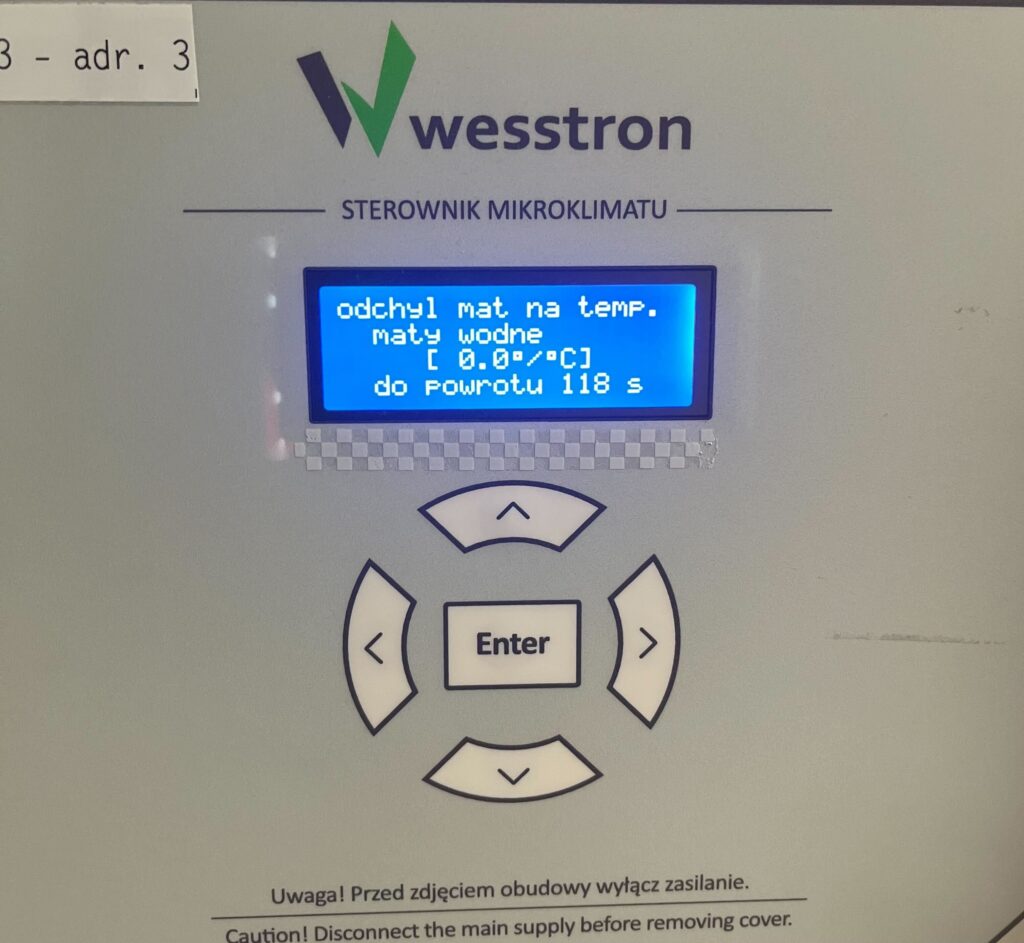
Photo of the SK-3 climate controller display showing the water mat temperature deviation screen (odchył mat na temp., maty wodne) set to 0.0 degrees per degree Celsius.
Desired floor temperature

Use the right arrow to go to the menu desired floor temp. and use the down / up arrows to change the value of the parameter. Click Enter to save your changes.
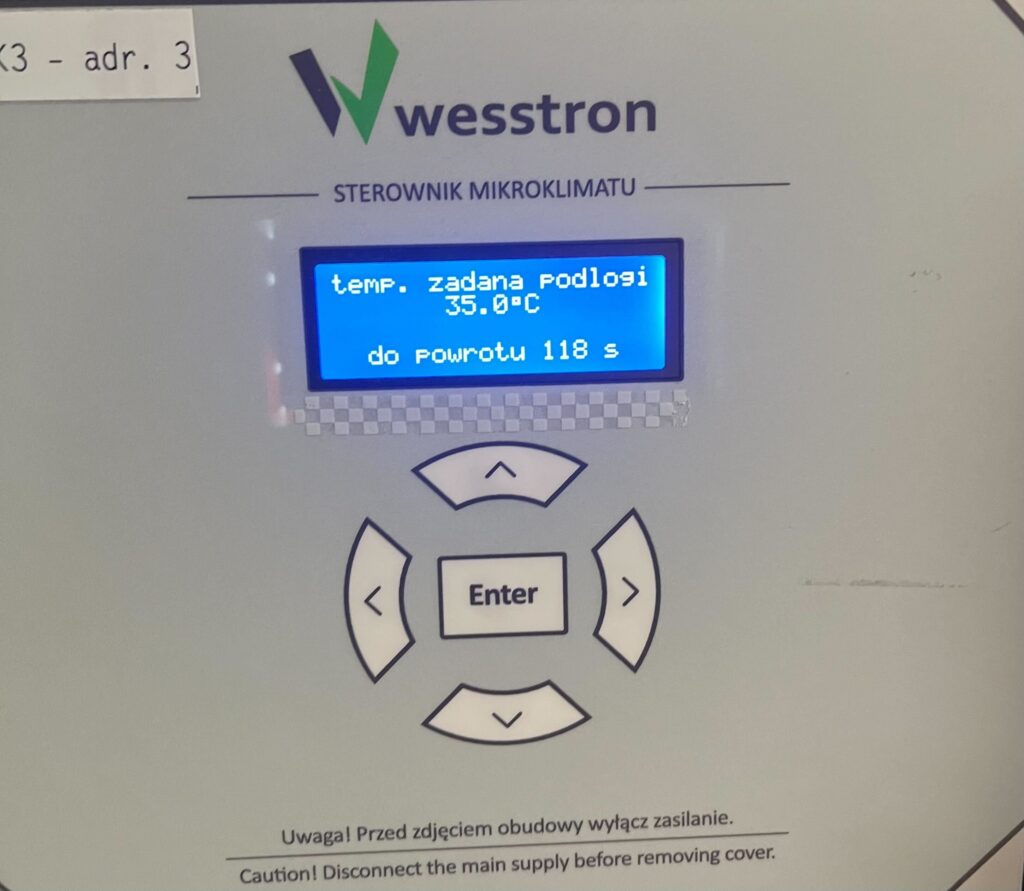
Photo of the SK-3 climate controller display showing the desired floor temperature screen (temp. zadana podłogi) set to 35.0 degrees Celsius.
Floor temperature too high alarm

Use the right arrow to go to the menu floor temp. alarm too high and use the down / up arrows to change the value of the parameter. Click Enter to save your changes.
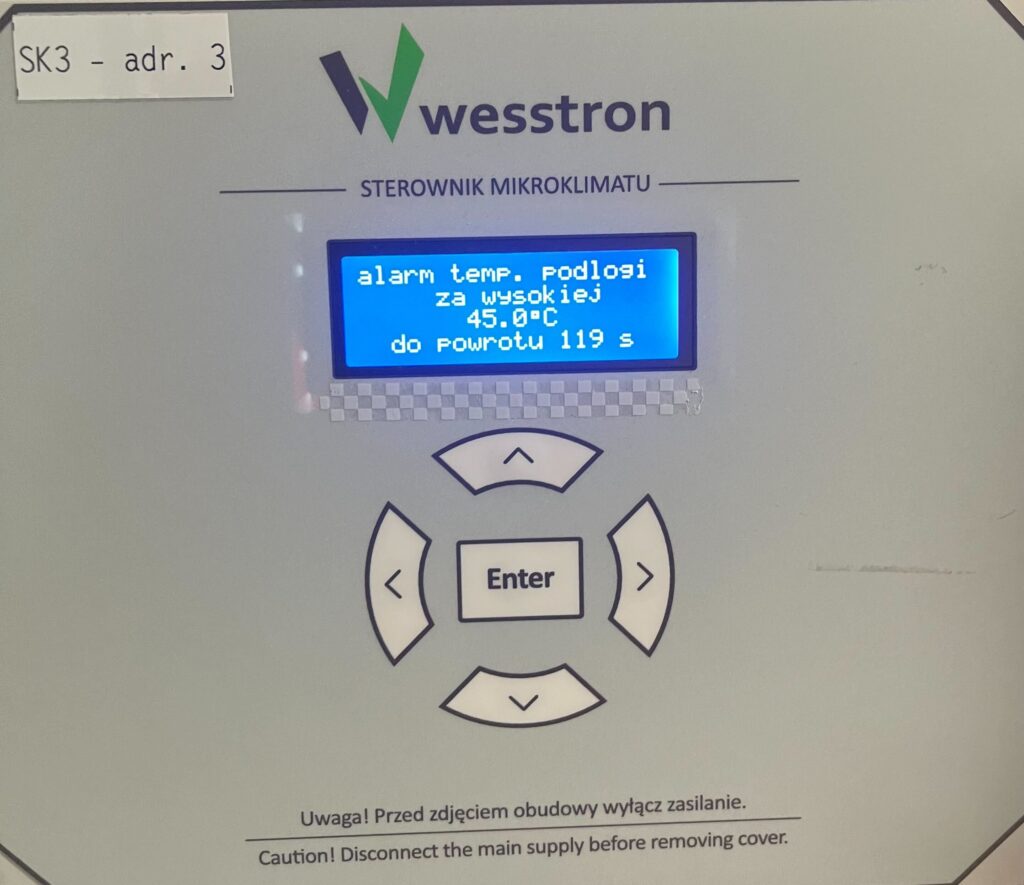
Photo of the SK-3 climate controller display showing the high floor temperature alarm screen (alarm temp. podłogi za wysokiej) set to 45.0 degrees Celsius.
Floor temperature too low alarm

Use the right arrow to go to the menu floor temp. alarm for low and use the down / up arrows to change the value of the parameter. Click Enter to save your changes.
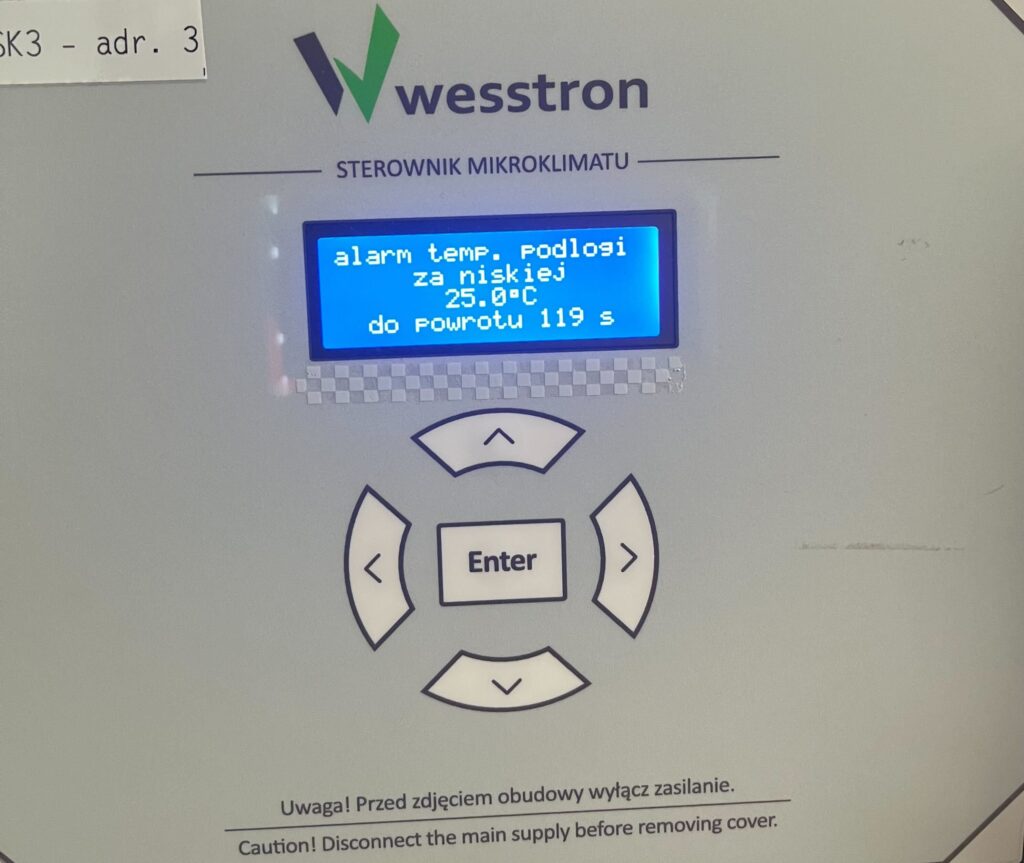
Photo of the SK-3 climate controller display showing the low floor temperature alarm screen (alarm temp. podłogi za niskiej) set to 25.0 degrees Celsius.

Water mat settings on the SK-4 controller

In order to directly set the water mat settings on the SK-4 controller, you need to log on to the climate controller. To do this, click the highlighted item.

Fetura CLOUD SK-4 climate controller touchscreen main view (Ogólne) with the padlock icon in the top right marked by a red arrow, tapped to log in. The screen shows six tiles: Tryb pracy = Automat, Średnia temperatura = 25.6°C, Wentylacja = 89.9% with 2 fan groups, Temperatura żądana = 21.0°C, Min. alarm = 17.0°C, Maks. alarm = 31.0°C. The bottom navigation bar contains: Ogólne, Wentylacja, Sensory, Chłodzenie, Grzanie, and a MYCIE tab is docked on the left edge; the top bar shows the clock, date, a bell icon and the padlock.

Enter the PIN you set, or swipe your card to log in.

Fetura CLOUD SK-4 climate controller Login dialog opened from the padlock icon: on the left a numeric keypad with digits 0-9 and a backspace key, on the right the field „Użytkownik” set to „Service” (dropdown with the available users) and the field „Wprowadź pin” next to the alternative „lub przyłóż kartę” with a card icon. The bottom navigation bar (Ogólne, Wentylacja, Sensory, Chłodzenie, Grzanie) stays visible behind the dialog.

Once you have logged in correctly, a gear icon will appear. Click it to go to the climate controller settings.

Fetura CLOUD SK-4 climate controller main view after logging in, with a red arrow pointing to the gear (settings) icon that has appeared in the top bar next to the bell and the open padlock; the top bar also shows the automatic logout countdown „Wylogowanie za 73 s”. The tiles now have arrows for editing and show: Tryb pracy = Automat, Średnia temperatura = 25.7°C, Wentylacja = 89.9%, Temperatura żądana = 21.0°C, Min. alarm = 17.0°C, Maks. alarm = 31.0°C.

In the new view, go to the Mats tab .

Fetura CLOUD SK-4 climate controller settings menu (Ustawienia, page 1 of 3) with the Maty (Mats) tile highlighted in red. Page 1/3 contains the tiles: Główne, Alarmy, Maty, Chłodzenie, Klimat, Wentylacja.

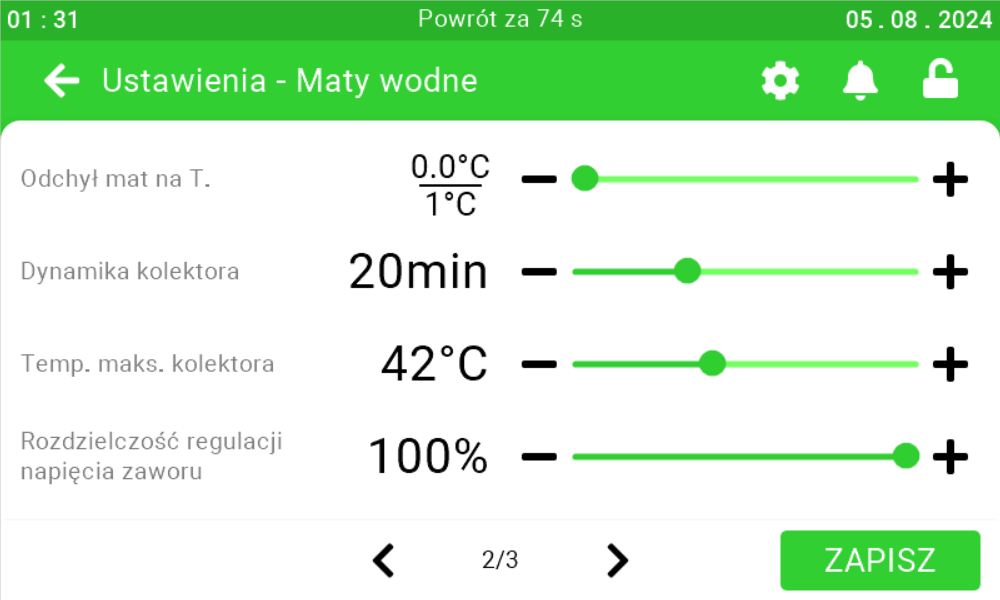
Go to the second page and use the sliders and buttons on their sides to configure the water mats.
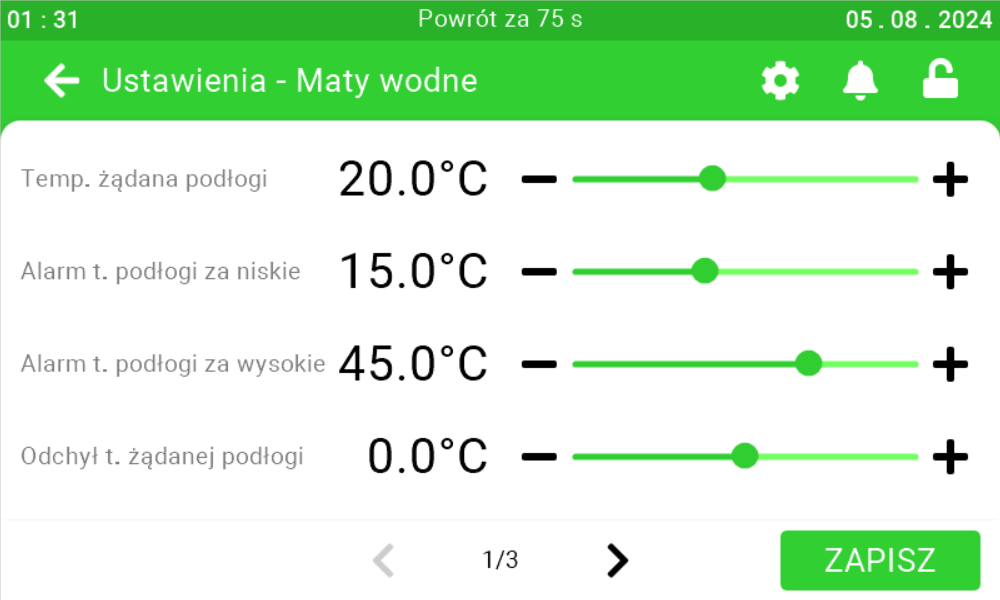
Fetura CLOUD SK-4 Maty wodne (Water mats) settings screen (page 1 of 3) with the sliders: Temp. żądana podłogi = 20.0°C, Alarm t. podłogi za niskie = 15.0°C, Alarm t. podłogi za wysokie = 45.0°C, Odchył t. żądanej podłogi = 0.0°C. The green ZAPISZ (Save) button is in the bottom right corner.
Fetura CLOUD SK-4 Maty wodne (Water mats) settings screen (page 2 of 3) with the sliders: Odchył mat na T. = 0.0°C per 1°C, Dynamika kolektora = 20min, Temp. maks. kolektora = 42°C, Rozdzielczość regulacji napięcia zaworu = 100%. The green ZAPISZ (Save) button is in the bottom right corner.
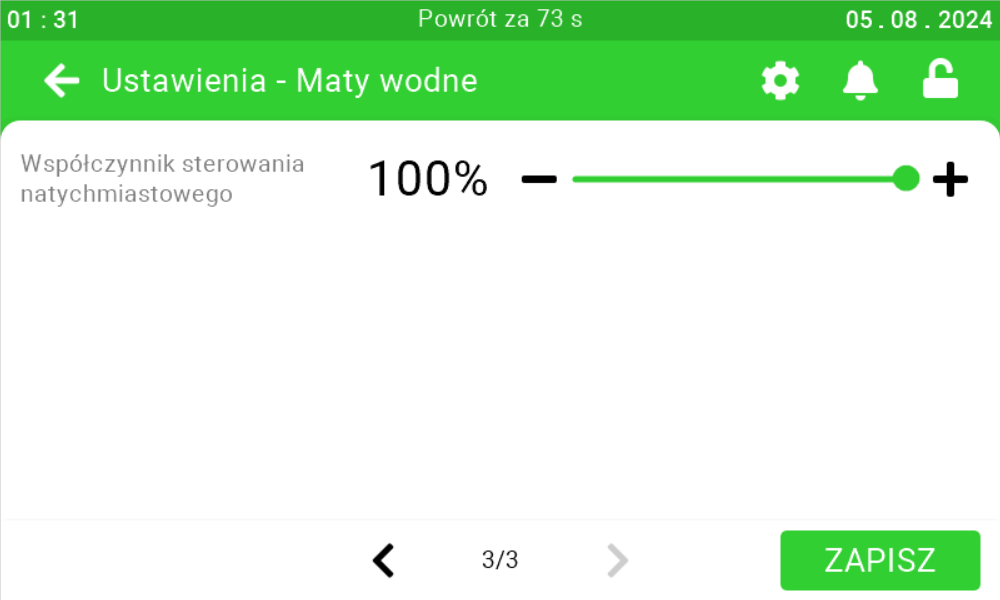
Fetura CLOUD SK-4 Maty wodne (Water mats) settings screen (page 3 of 3) showing the instantaneous control factor slider, with a Zapisz (Save) button.

Limits for opening curtains

On this panel you can set how much minimum [1] and maximum [2] both curtains can be opened. After setting the parameters, click the save button [3].
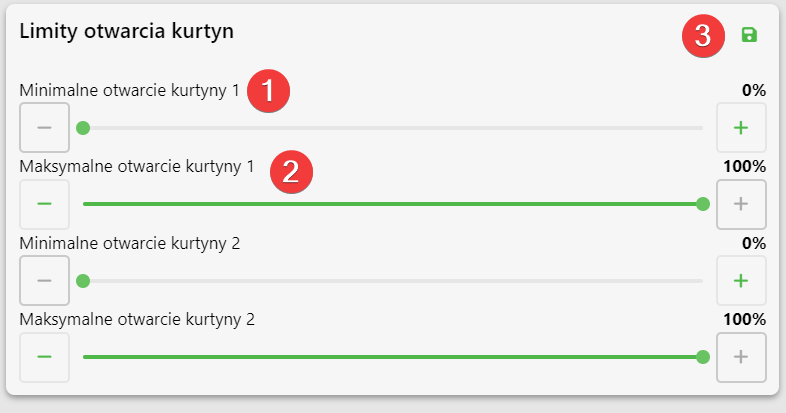
Curtain opening limits panel (Limity otwarcia kurtyn) in Fetura CLOUD with numbered red markers and the values shown on the sliders: Minimalne otwarcie kurtyny 1 nr 1 = 0%, Maksymalne otwarcie kurtyny 1 nr 2 = 100%, Minimalne otwarcie kurtyny 2 = 0%, Maksymalne otwarcie kurtyny 2 = 100%, and the green save icon nr 3 in the top right corner.

Curtain settings on the SK-4 controller

In order to directly set the curtain settings on the SK-4 controller, you need to log on the climate controller. To do this, click the highlighted item.

Fetura CLOUD SK-4 climate controller touchscreen main view (Ogólne) with the padlock icon in the top right marked by a red arrow, tapped to log in. The screen shows six tiles: Tryb pracy = Automat, Średnia temperatura = 25.6°C, Wentylacja = 89.9% with 2 fan groups, Temperatura żądana = 21.0°C, Min. alarm = 17.0°C, Maks. alarm = 31.0°C. The bottom navigation bar contains: Ogólne, Wentylacja, Sensory, Chłodzenie, Grzanie, and a MYCIE tab is docked on the left edge; the top bar shows the clock, date, a bell icon and the padlock.

Enter the PIN you set, or swipe your card to log in.

Fetura CLOUD SK-4 climate controller Login dialog opened from the padlock icon: on the left a numeric keypad with digits 0-9 and a backspace key, on the right the field „Użytkownik” set to „Service” (dropdown with the available users) and the field „Wprowadź pin” next to the alternative „lub przyłóż kartę” with a card icon. The bottom navigation bar (Ogólne, Wentylacja, Sensory, Chłodzenie, Grzanie) stays visible behind the dialog.

Once you have logged in correctly, a gear icon will appear. Click it to go to the climate controller settings.

Fetura CLOUD SK-4 climate controller main view after logging in, with a red arrow pointing to the gear (settings) icon that has appeared in the top bar next to the bell and the open padlock; the top bar also shows the automatic logout countdown „Wylogowanie za 73 s”. The tiles now have arrows for editing and show: Tryb pracy = Automat, Średnia temperatura = 25.7°C, Wentylacja = 89.9%, Temperatura żądana = 21.0°C, Min. alarm = 17.0°C, Maks. alarm = 31.0°C.

In the new view, go to the second page and enter the Curtains tab .
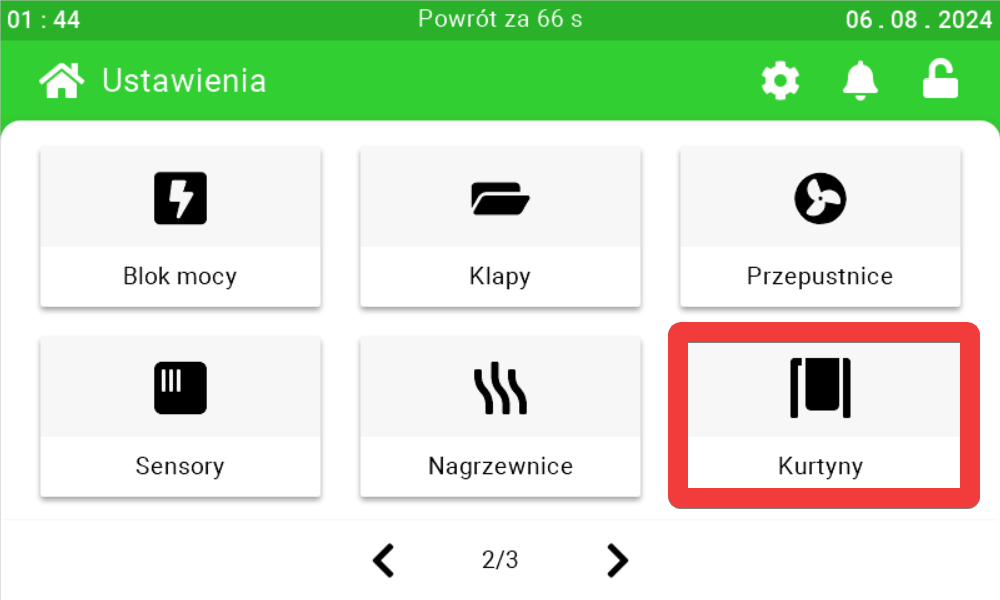
Fetura CLOUD SK-4 climate controller settings menu (Ustawienia, page 2 of 3) with the Kurtyny (Curtains) tile highlighted in red. On this controller page 2/3 contains the tiles: Blok mocy, Klapy, Przepustnice, Sensory, Nagrzewnice, Kurtyny (the Kurtyny tile takes the place of Użytkowe when curtains are configured).

Select how the curtains are to be configured and configure them, or change the curtain settings.
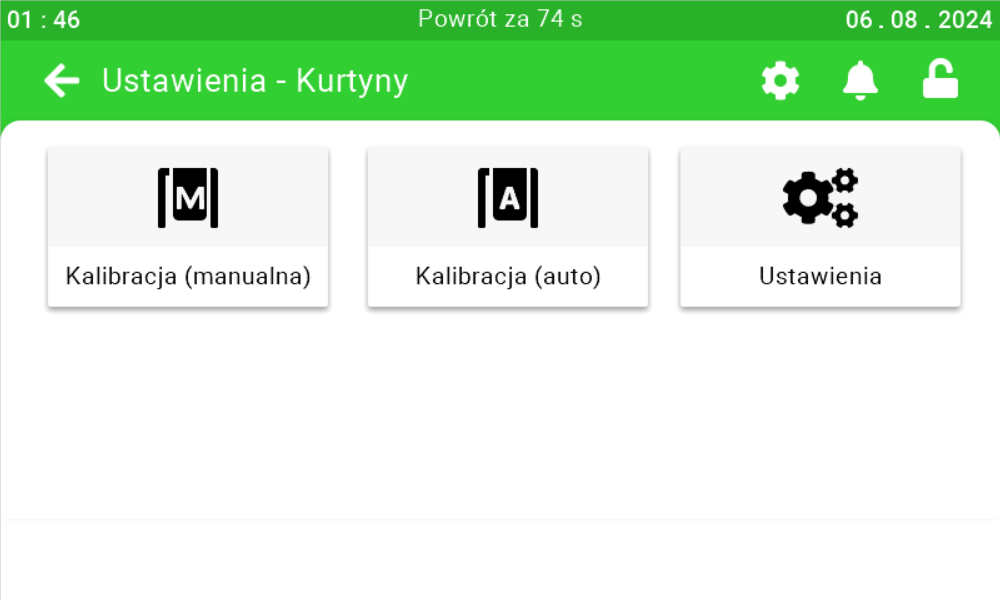
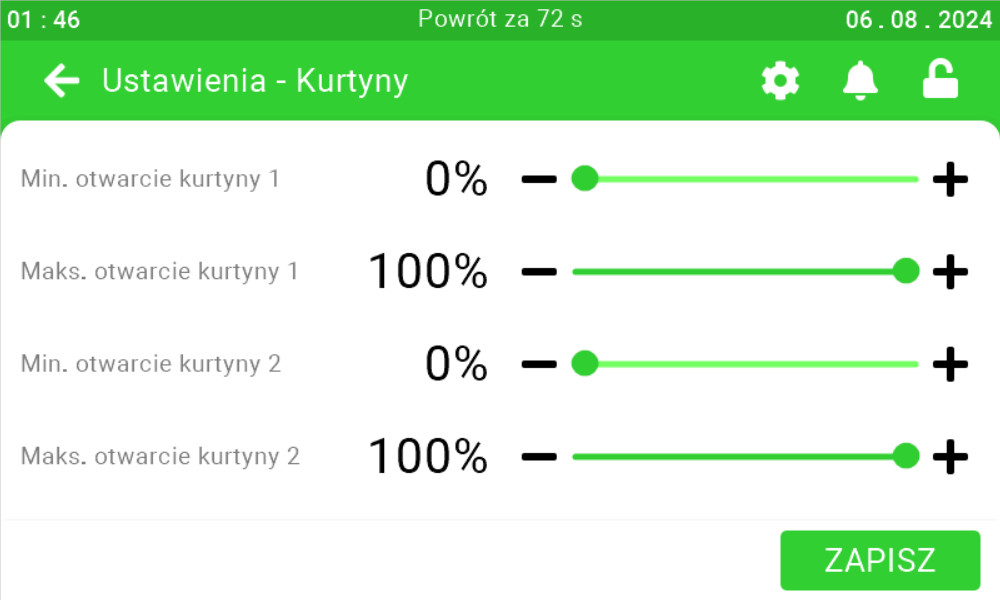
Fetura CLOUD SK-4 Kurtyny (Curtains) submenu showing Kalibracja (manualna), Kalibracja (auto), and Ustawienia (Settings) options for configuring the curtains.
Fetura CLOUD SK-4 curtain settings screen (Ustawienia - Kurtyny) with the sliders: Min. otwarcie kurtyny 1 = 0%, Maks. otwarcie kurtyny 1 = 100%, Min. otwarcie kurtyny 2 = 0%, Maks. otwarcie kurtyny 2 = 100%. The green ZAPISZ (Save) button is in the bottom right corner.

PIN code

On this panel, you can change the PIN used to enter the service mode
on the climate controller. Enter the new four-digit PIN [1] and click the save button [2].
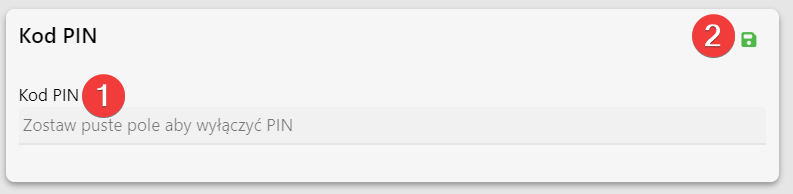
PIN code panel (Kod PIN) in Fetura CLOUD with a numbered red marker for the PIN input field nr 1 and the green save icon nr 2. The input field shows the hint „Zostaw puste pole aby wyłączyć PIN” (leave the field empty to switch the PIN off), so clearing the field disables PIN protection on the controller.

Setting the PIN code on the SK-3 controller

To directly set the PIN on the controller, click the highlighted Enter button on the controller.

Photo of the SK-3 climate controller front panel (labelled wesstron STEROWNIK MIKROKLIMATU, sticker SK3 - adr. 3) with the Enter button outlined in a red box, pressed to open the on-device menu. The LCD shows the main screen: first line „00 25  1 czuj. 22.6°”, second line „--- 22.6° --- --- ---”, third line „15.8% 0k. 0m. 31.6%”, bottom line „KNA   Menu   C”. Around the Enter button there are four arrow keys (up, down, left, right). At the bottom of the housing a warning: „Uwaga! Przed zdjęciem obudowy wyłącz zasilanie. / Caution! Disconnect the main supply before removing cover.”

Then use the right arrow to go to the Enter PIN menu. Click Enter to enter it.
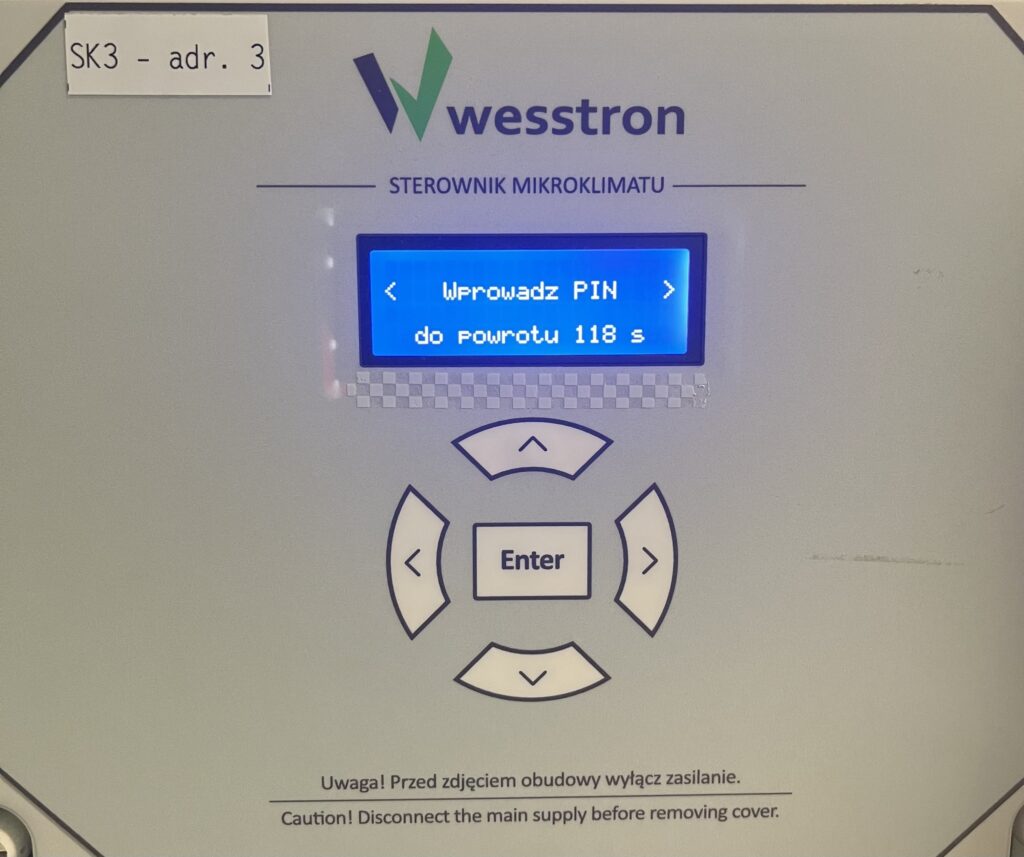
Photo of the SK-3 climate controller display showing the Wprowadź PIN (Enter PIN) menu heading, reached from the User Menu.

Use the down / up arrows to set the PIN code. Use the left / right arrows to select the PIN code item you want to change.
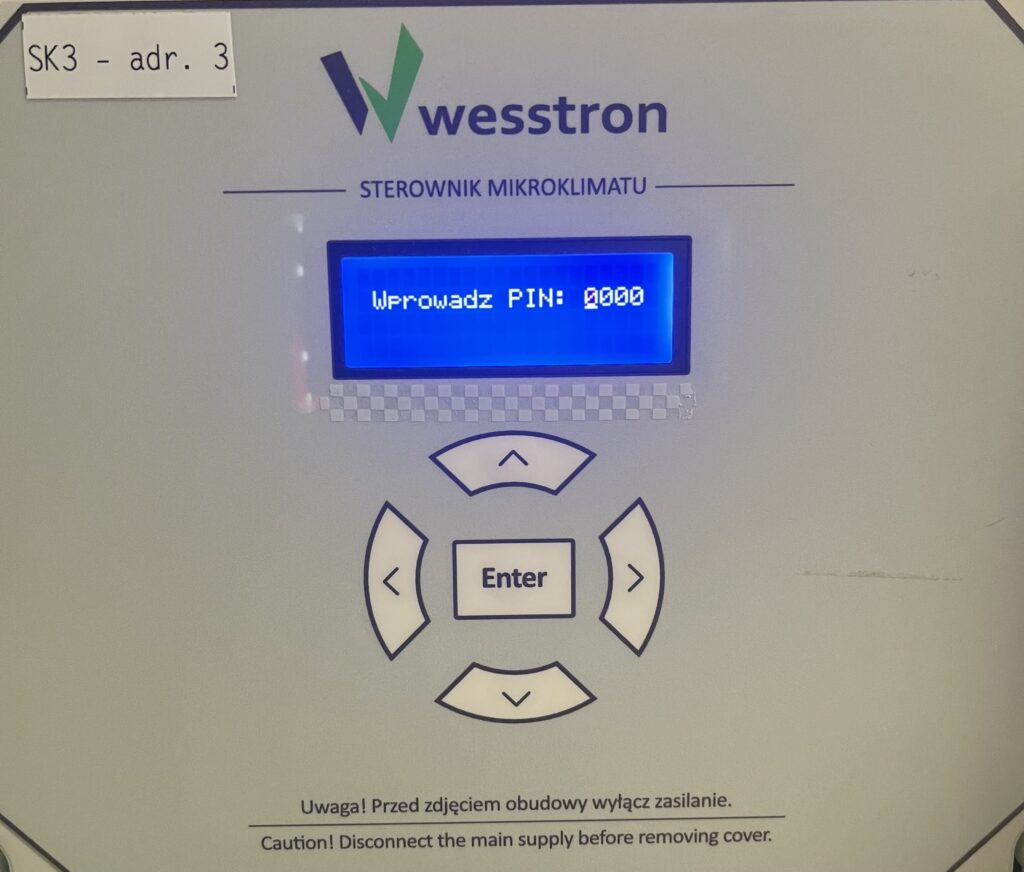
Photo of the SK-3 climate controller display showing the PIN entry screen (Wprowadź PIN) with the digits set to 0000, ready to be changed with the up/down and left/right arrows.

Updated on 2026-07-28
Was this article helpful?

Related Articles

Need Support?
Can't find the answer you're looking for?
Contact Support

Leave a Comment