1. Home
  2. FarmWatch Pro
  3. Initial Setup and Configuration of the FarmWatch Pro Device

Initial Setup and Configuration of the FarmWatch Pro Device

Hi there! We’re here to help you get the most out of FarmWatch Pro—your independent farm management assistant. Whether you’re a seasoned farmer or just starting out, this guide shows you how to quickly and easily set up your FarmWatch Pro device. From adding your first sensor to configuring alarms that keep you constantly informed, we’ve got you covered. Ready to make life easier? Let’s get started!

1. Package Contents

Check to see if the set includes:

  • Main Unit – FarmWatch Pro Control Center
  • Antenna
  • Instructions

2. Requirements

Before you begin, gather the following:

  • A computer or phone with internet access
  • Access to 230V power
  • For the ETH Control Panel, set up an Ethernet cable to connect the control panel to the Internet. If you are configuring the FarmWatch Pro Control Panel with a SIM card, proceed to step 4.

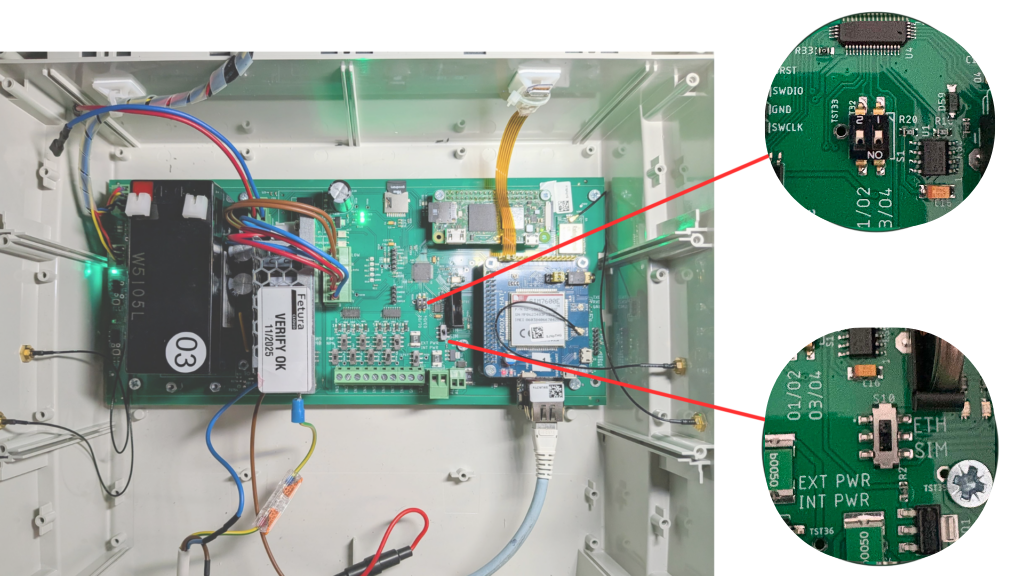
Do not connect the device until you have set the switches to the correct mode.

3. Connecting the Device (ETH Version)

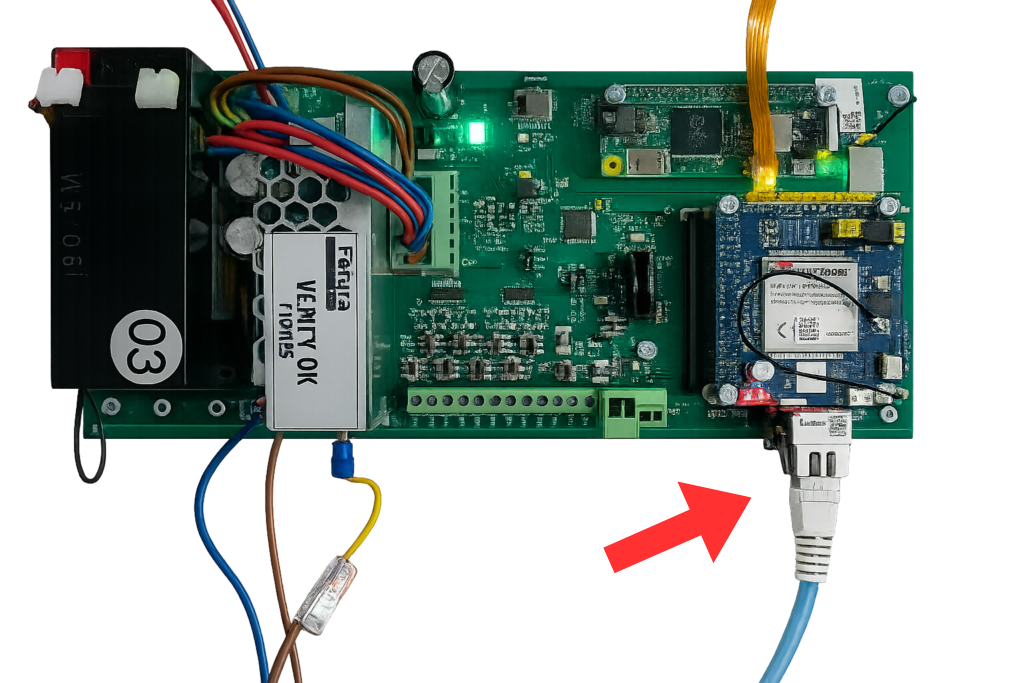
  1. Open the alarm control panel cover by pressing the latch on the bottom of the unit
  2. Connect the LAN cableFarmWatch Pro control unit board with a red arrow pointing to the LAN cable connector used for the ETH network connection.
  3. Set the two switches to ETH modeOpen FarmWatch Pro control panel with red arrows and close-up circles pointing to the two mode switches that must be set to ETH.
  4. Plug the device into an electrical outlet
  5. The device will turn on automatically
4. Connecting the Device (SIM Version)

  1. Open the alarm control panel cover by pressing the latch on the bottom of the unit
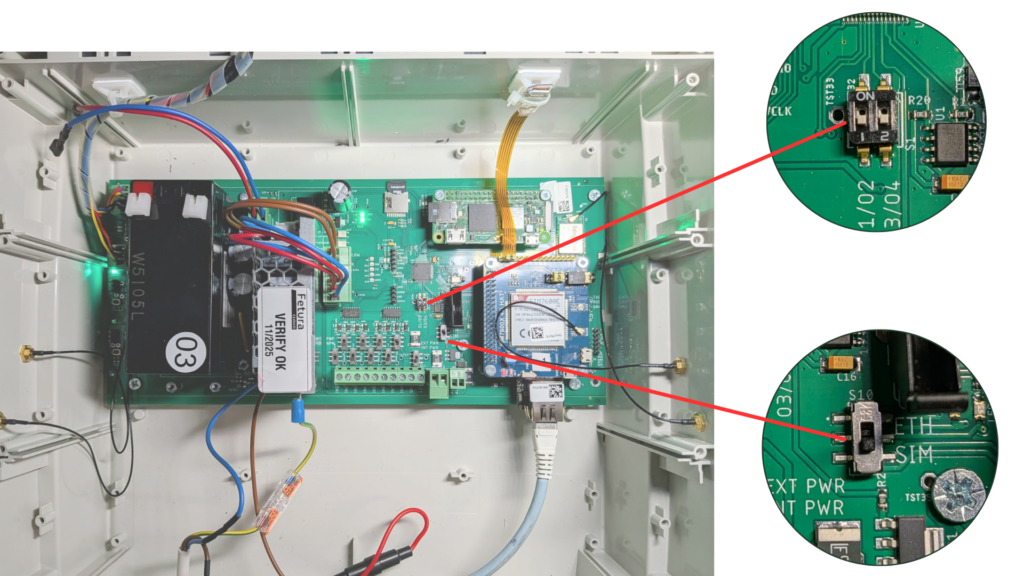
  2. Set the two switches to SIM modeOpen FarmWatch Pro control panel with red arrows and close-up circles pointing to the two mode switches set to SIM/ON position.
  3. Close the lid
  4. Plug the device into an electrical outlet
5. Step-by-Step Setup

Step 1 – Logging In to the Network

Select a language

The initial setup screen is used to select the device's interface language. The user must tap the tile with the flag corresponding to the language in which they want to operate the device (e.g., the Polish flag for the Polish language). The selected language is highlighted in green.

Step 2 – Configuration

After startup, the control panel enters network login mode. Depending on network availability, this process may take up to 20 minutes. Once successfully logged into the network, the control panel will provide instructions on the next steps. To continue, tap anywhere on the screen.

If you are unable to connect to the Internet, check your cellular network coverage; if you are using an ETH control panel, make sure you have a proper Internet connection.
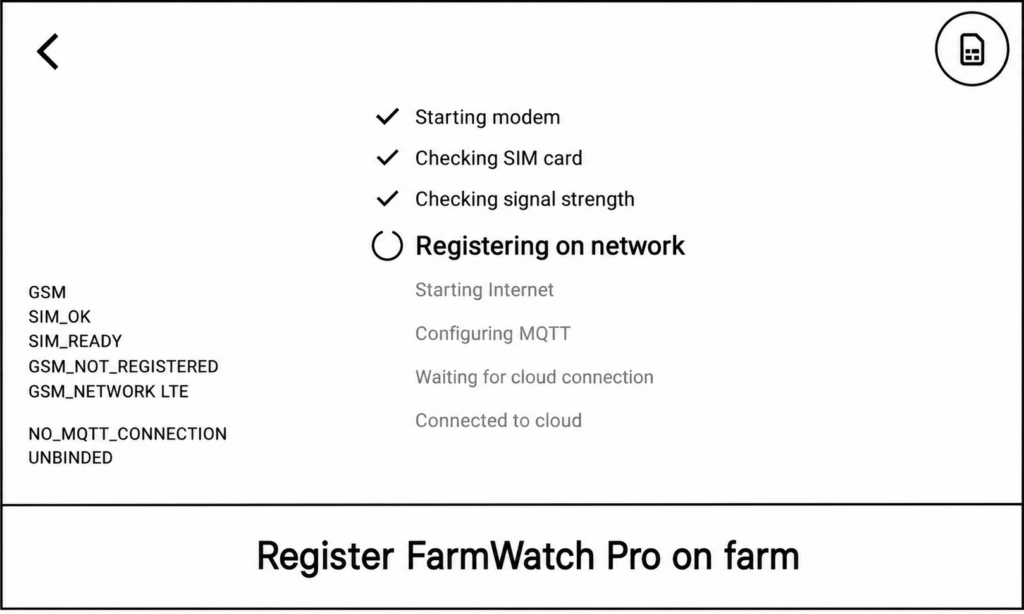
The diagnostic screen of the physical device labeled "Register FarmWatch Pro on farm." This is a loading screen that displays the progress of connecting to the cellular network and the cloud. The user does not need to enter anything or click anything here; simply wait until all items on the list (such as modem, SIM card, and signal strength) are marked as successfully completed.

Step 3 – Assigning a Device to a Farm

For each device to function properly, it must be assigned to a farm. To do this, scan the QR code displayed on the screen. You will be redirected to the FeturaCloud system, where you can register the device. You can also manually enter the activation address in your browser and register the control panel at fetura.com.pl/activate.
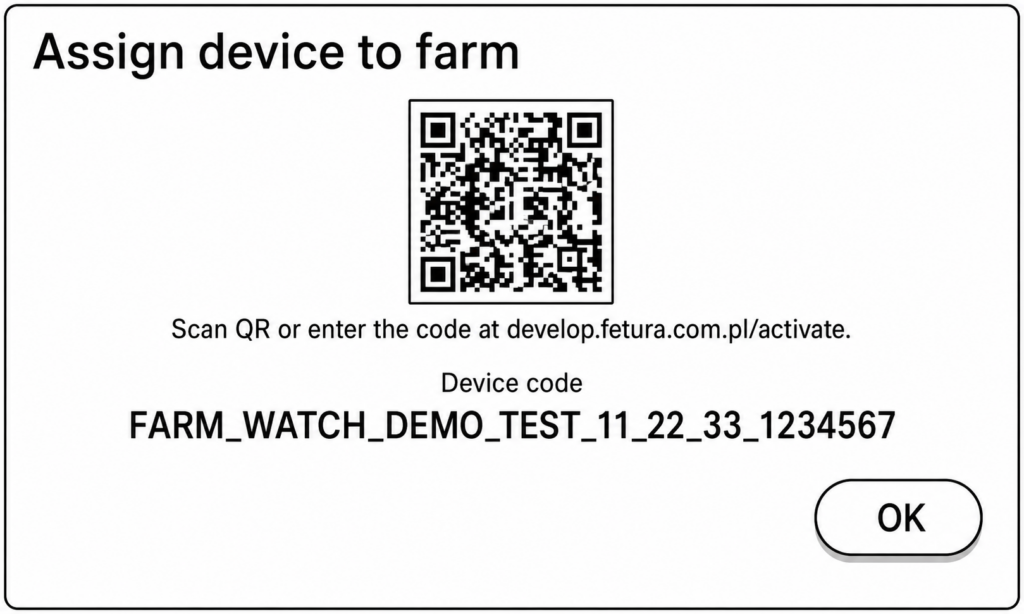
The screen displayed on the physical device labeled "Assign device to farm." It displays a QR code and an alphanumeric string labeled "Device code." The user must read this text-based device code from the screen and enter it exactly as shown in the corresponding field on the online activation form.

6. Activation

After scanning the QR code, you will be redirected to a page where you need to assign the control unit to the farm. To do this, click the “Activate” button . You can also enter the device’s serial number manually.
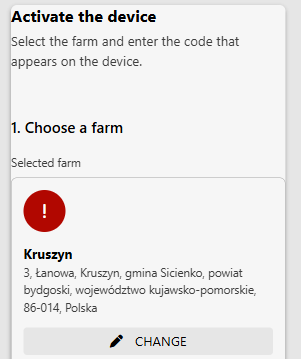
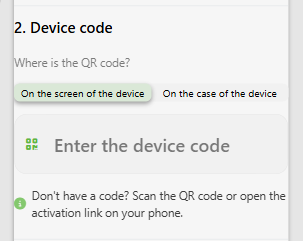
Mobile view of the "Device Activation" web form. In step “1. Choose a farm,” the user have to check if selected farm is correct.
Mobile view of the "Device Activation" web form. In step “2. Device Code,” the user must enter the identification code for their device. Click the text field under the question “Where is the QR code?” and carefully enter the string of characters visible on the physical device.
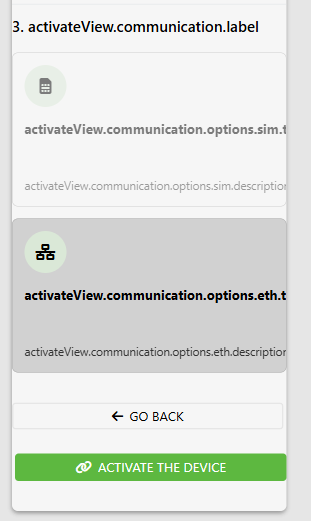
Mobile view of the "Device Activation" web form, "3. Connection Method" section. Here, the user must select how the device connects to the Internet (e.g., by checking the "I want to activate the SIM card" option). After selecting the appropriate method, click the large green "ACTIVATE DEVICE" button at the very bottom of the page to complete the process.

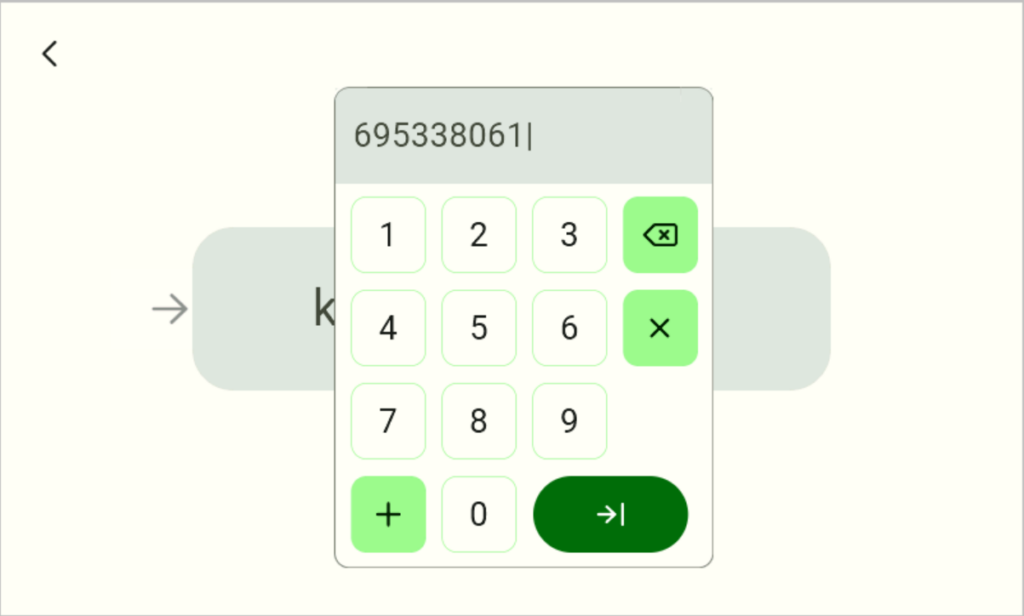
On the FarmWatch Pro Control Panel screen, enter the number and click the green button.
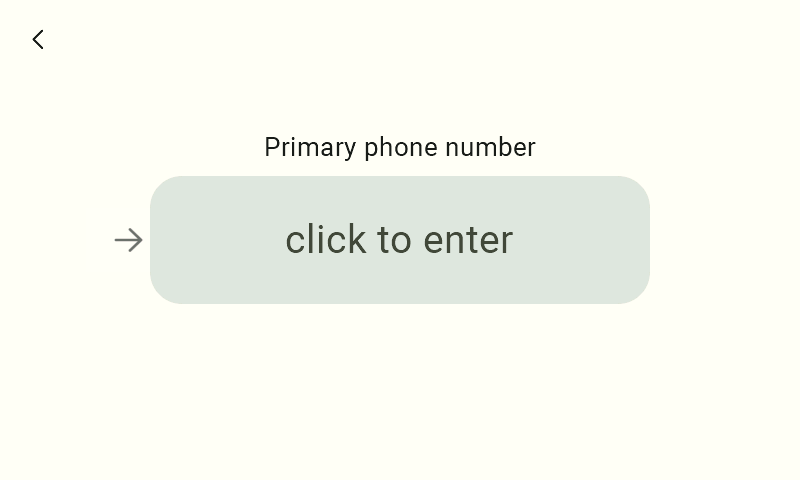
A screen titled "PrimaryPhone Number." This is where you enter your contact number. To start typing, click the large, light-gray field in the center of the screen that says "Click to type," which will bring up the keyboard.
An interface with a numeric keypad displayed on the screen. The user uses this keypad to enter numerical data (such as a phone number or SMS code). After entering the data, confirm it by clicking the green button with an arrow in the lower-right corner of the keypad.

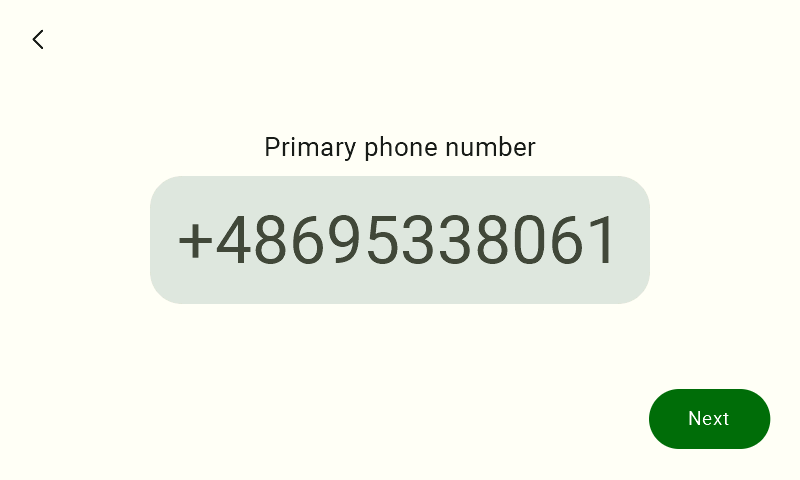
Press the “Next” key.

A screen titled "Main Phone Number" with digits already entered. If the user has already entered their number, they must confirm it by clicking the green "Next" button in the lower-right corner of the screen to proceed to the next step.

Enter the PIN you received on the phone number you provided. That’s it! You’ve completed the first step.

After the PIN you entered is accepted, you should see the screen below.
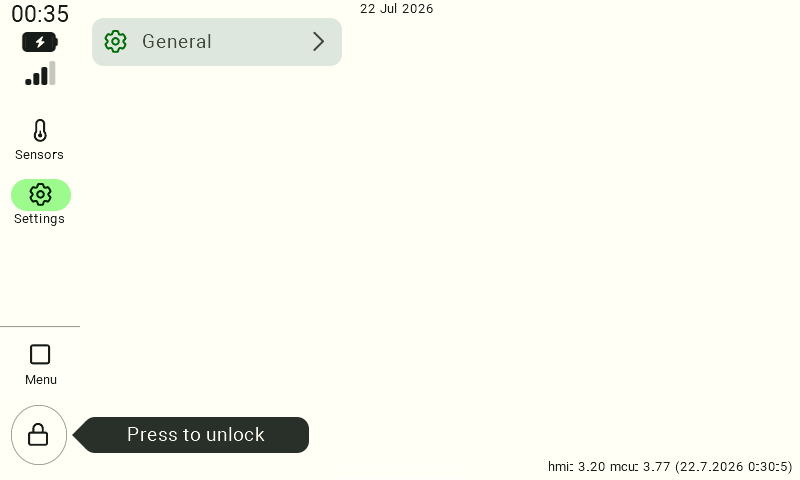
FarmWatch Pro control panel touchscreen showing the Settings menu with a General entry and a "Press to unlock" prompt for the lock icon.

Congratulations! You’ve successfully set up the station. Now you’re ready to enjoy the peace of mind and control that FarmWatch Pro offers.

The next step is to add the first sensor; you can find step-by-step instructions by clicking the button below.

Would you like to add more sensors or phone numbers? Or maybe you’re interested in how to set the date and time, change the display theme, or configure notifications? Check out our other articles—everything is right at your fingertips.

Thank you for choosing FarmWatch Pro. Together, we’re changing agriculture for the better!

Updated on 2026-07-23
Was this article helpful?

Related Articles

Need Support?
Can't find the answer you're looking for?
Contact Support

Leave a Comment